Actions
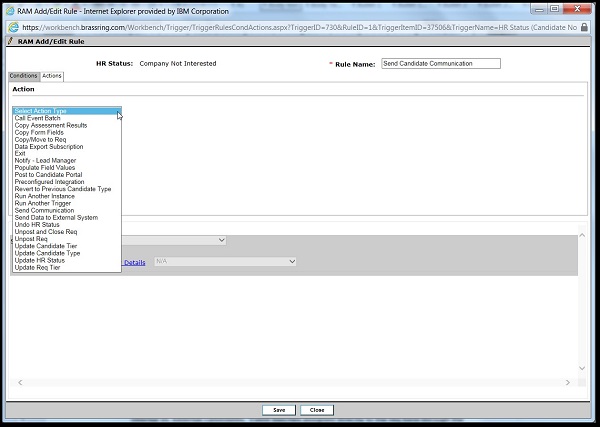
Actions perform automation in the system when conditions are True. Select the action to occur if the conditions for this rule are found to be true by using the pull-down menu. This list depends on the [Triggering Mechanism] and [Trigger Context] that is selected for the RAM trigger.
Multiple actions can be defined for a rule. For example, an HR status can be updated and a disposition form can be filled out with a certain value corresponding to the HR status. Multiple existing actions that are populating different fields on the same form are grouped, and populated together for multiple form instances.

If a RAM trigger is being configured to take two actions and the actions must be in a specified order, it is recommended to create two separate rules. Actions that are in the same rule might not be processed in the order that they display in the UI of the rule. For example,
To configure a rule to populate field values and then send a communication that includes that form or data from that form, create the action to populate field values and the action to send the communication in separate rules. This allows the form to be populated first and then the communication to be sent in a subsequent rule or action.
To configure a rule to update an HR status and send a communication that includes that HR Status, create two rules. The first rule is created to update the HR Status and the second to send the communication. The [Update HR Status] action always happens last in a rule with multiple actions.
Action Types
To create an action, first select an action type. The list of categories might change depending on the Trigger Mechanism and Trigger Context selected. All candidate actions are hidden when there is no candidate in context. All req actions are hidden when there is no req in context.
Call Event Batch
The Call Event Batch action allows users to trigger an event invitation to be sent to candidates who meet the business rule conditions. The Event Batch that is configured in Event Manager and selected on the req determines:
What invitation message is sent to the candidate.
To what event or events the candidate is invited.
Other settings around automated confirmation messages, automated reminder messages, invitation expiration, and others.
The Event Batch is assigned to reqs through both req postings and a custom field on the req form.
Event Batches assigned to req postings (on the posting options page) apply to candidates who apply to those req postings directly. This allows clients to configure different event batches for internal versus external candidates.
Event Batches assigned directly to the req form through the custom req field apply to candidates who are moved, copied, or filed to the req outside of a Talent Gateway.
Example workflow: A candidate applies to req 123BR through a Talent Gateway. That req posting for 123BR is assigned to an event batch that is configured to trigger an invitation to Phone Screen events, when candidates are assigned to the HR Status called Initial Screen. A RAM Trigger is configured for the HR Status that is called Initial Screen with a business rule containing the action to Call Event Batch. If the candidate is set to the HR Status of Initial Screen within req 123BR, they automatically receive an invitation to register for a Phone Screen event. With that invitation, the candidate can self-schedule for a Phone Screen event, either through the Event Manager page on the Talent Gateway, or through a link that is provided in the invitation message itself.
Copy Assessment Results
This action copies any valid, required assessment results into the requisition in context.
The system automatically copies a candidate’s existing, valid assessment results into any receiving reqs with all subsequent submissions.
Copy Form Fields
If you need to copy Multiple fields from one form to another form (for example, taking a snapshot of a form), create the fields on the destination form by using the exact field names. Then, use the action instead of having to create an action for each individual field. This copies all the fields common to both forms from the source form into the destination form.
Copy/Move to Req
The [Copy/Move to req] action has many configuration options available for getting candidates from one req to another. For more information, see Evergreen Push and Evergreen Pull examples on the Common RAM Examples page.
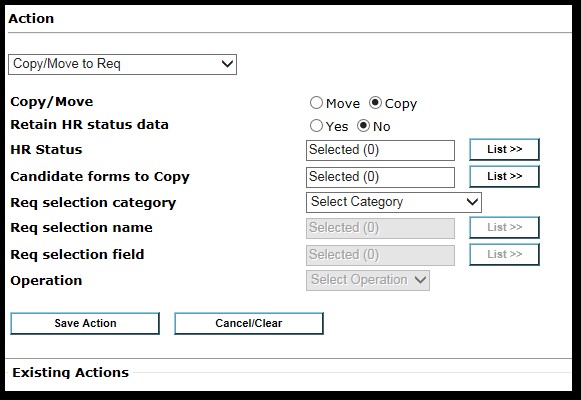
Copy/Move:
Copy: Copies the candidate from a source req into the target req (keeping the candidate in both reqs). Copy also files to a target req if there is no source req.
Move: Moves the candidate from a source req into the target req (removing the candidate from the source req and filing them into the target req). Move also files to a target req if there is no source req.
Retain HR status data:
Yes: This retains the HR status history in the source req, with association to the new target req.
No: This does not retain HR status history information.
HR Status:
This selection defines the starting HR status for the candidate after they are put into the target req.
Candidate forms to copy:
Before adding any forms to be copied, you must first ask yourself if these forms need to be duplicated. If the form needs to stay identical across reqs, that means you did not use the correct form type. Using a per candidate form prevents creating duplicate forms.
Make sure that you are not adding a form that triggers another RAM to run.
This selection defines what PER REQ forms to copy with the candidate into the target req. When copied, the forms become associated with the target req.
Auto-fill field values pulling from a req field are replaced with the destination req field values.
If the candidate exists in the target req, no forms are copied.
If the candidate does not exist in the target req, but still has forms on file for the target req:
If the candidate form is a single per candidate per req form, the form is not copied.
If the candidate form is a multiple per candidate per req from, a new instance is created.
If the candidate does not exist in the target req and no candidate forms exist, the forms are copied to the target req.
For multiple per candidate per req forms, all instances are copied.
Example: Assessment forms are multiple per candidate per req. Candidates complete the assessment in an evergreen req. However, when the candidates are copied into a target (hiring) req, the assessment information needs to be output on the grid. To accomplish this, the assessment form must be copied and associated to the target (hiring) req.
Req selection category:
Like conditions, this category acts as a filter to identify the field that is used to build criteria that defines when a candidate should be copied/moved.
Options include: Candidate forms, Req form fields, Req Status, Req subsidiary form fields, Req templates.
Req selection name:
This field is used to identify the form in which you would like to build your filter from (similar to conditions).
Req selection field:
This field is used to identify the field in which you would like to build your filter from (similar to conditions).
This field is used to get either the Req ID or get all reqs matching a field value.
Operation:
Select Use Field Value if you are looking to copy or move a candidate into a req where the field that is identified in the Req selection field contains a req ID.
Example: An exception scenario allows Hiring Managers to file candidates to reqs outside of the standard application process. However, this is only allowed after approval. A candidate form is set up with an approval process. The form is multiple per candidate. The hiring manager finds the candidates and adds the exception form. The exception form contains a field that captures the req ID that the candidate needs to be filed into. The hiring manager types in the req ID into that field Y, then routes it for approval. A RAM trigger is set up based on form approval, with an action of copy/move. The Req selection field has field Y as the field selected. Therefore, when the RAM runs, it looks up the req ID on the exception form, field Y, and then files the candidate to that req.
All other operations function as they traditionally do under the conditions section.
The list of operations is determined based on the field type that is selected in the “Req selection field”.
Define Value:
Like conditions, this is the value that is used to filter for Evergreen reqs that match the typed in value.
Select Value:
Like conditions, this is the value that is used to filter for Evergreen reqs that match the selected value.
Compare Value:
When using the Evergreen push scenario:
For candidate form field comparisons with req fields, select the req field to compare to the candidate form field.
Data Export Subscription
This action triggers an existing subscription. That includes Candidate Export integrations created in the Mapping Tool or common services integrations such as Background Checks.
When the trigger initiates, it runs the data export subscription and calls the candidate export subscription based on the import/export for the client.
This type of action can be used if you do not want to trigger the candidate export integration on an HR Status and instead use an action like Candidate Form Insert.
Exit
This action causes the trigger to exit, and it also skips the running of any subsequent rules.
Notify – Lead Manager
Notifies Lead Manager to either add a campaign, add a lead, or notify of a status change. Refer to Lead Manager documentation for further details.
Populate Field Values
For more information, see Populate Field Values.
Post Document to Candidate Portal
Posts the documents that are created and belonging to the specific req to the candidate portal for the candidate to view. Build 19.11.11
Post Form to Candidate Portal
This action posts candidate forms to the Candidate Portal when a candidate’s HR status reaches the pre-defined HR status (selected for the Trigger Event). Updated name and trigger mechanisms Build 19.08.19.
Preconfigured Integration
This action is used to configure the mappings for WOTC and Social source.
WOTC Templates display only when client setting of “Work Opportunity Tax Credit Integration” is Yes.
Social Source template displays only when client setting of “Integration Candidate Relationship Management (CRM)” is used with FADV selected.
After the template is selected, the fields that need to be mapped for that vendor are displayed under the ‘Map Template Fields’.
No field mapping is needed for BrassRing Candidate Relationship Manager.
Revert to Previous Candidate Type
This action reverts the candidate type to its previous candidate type.
Run Another Instance or Run Another Trigger Instance
This action is placed after ‘Update HR Status’ in a rule and is a final action in a rule. The trigger exits after all actions in the rule are processed.
This action can be configured only once per rule. After a ‘Run another instance’ action is saved, the user does not see this action category in the pull-down in the same rule.
The user can choose only one option between Use existing date/numeric field and Select run frequency.
Run Another Trigger
This action is placed after Run another instance in a rule and is a final action in a rule. The trigger exits after this action is processed.
This action can be configured only once per rule. After a ‘Run another trigger’ action is saved, the user does not see this action category in the pull-down in the same rule.
This new action is visible only for the following combinations:
Req based triggers (except Req Edit) with context Across Candidates.
Candidate-based triggers with context Across Reqs.
HR Status
Send Communication
Allows automated communications to be sent.
Selection of language and email template occurs based on the user’s BrassRing user ID. If the user’s email address is the only available information, the system identifies the user’s language, if it exists in the system. If the user’s language information is not available on the user’s BrassRing profile, then the communication is sent in the client’s default language.
Selection of recipient list occurs. The recipients available are based on whether the candidate or req is in context. For example, a Req Edit trigger mechanism with a Trigger Context of None means that the candidate is not in context. Therefore, the talent record email address is not listed as a recipient.
A check box is available to Include old and new values… for req form fields modified. This is used with the Condition of Req form fields modified. When checked, it appends the fields that are selected in the condition section of the email communication. Note: only fields that are contained within the condition are evaluated. And if the fields selected in the condition have not changed, they are not included in the email communication.
Before BrassRing Release 19.03.11, when communications were sent by using a RAM trigger, if the communication was sent based on the user’s BrassRing user ID, the language of the user was determined correctly. However, if you sent a communication to a user based on an email address entered into an email field, the communication was sent in the client’s default or base language; which might not match the user’s language. This was because the email address was the only information available in the field. With BrassRing Release 19.03.11, the RAM engine has been enhanced so that even if the user’s email address is the only information available, the system identifies the user’s language, if it exists in the system, and sends the communication in that language. If the language information of the user is not available on the user’s BrassRing profile, then the communication is sent in the client’s default or base language.
Build 19.07.22. The user selection list does not display Inactive users.
Build 19.07.22. The user selection list displays a name differentiator; if enabled in the client’s site.
Send Data to External System
Sends data to and receives data from an external system. The action is set up by the PSE team.
Undo HR Status
Performs an Undo of the HR status for the candidate, returning candidate to the previous status.
Behaves the same as an Undo in the BrassRing user interface.
Unpost and Close Req
This action allows unposting, and closing of the req.
Selecting this action category unposts the req from all gateways and job boards, and closes the req. No other selections are necessary with this category.
Standard prerequisites for closing the req apply here.
When you use this action, it is recommended to disable the auto-close user interface popup on the HR status.
Unpost Req
This action allows only unposting the req.
Selecting this action category unposts the req from all gateways and job boards. No other selections are necessary with this category.
Update Candidate Tier
This action updates the candidate tier.
Automates the same action that can be performed in the BrassRing UI for updating a candidate’s tier. Usually, this is done in exception scenarios.
It is hidden if there is no req context for the trigger.
If the selected tier is not part of the req template when the trigger runs, the action does not complete.
Update Candidate Type
This action updates the candidate Type.
Update HR Status
Updates the candidate’s HR status
Can disobey closed tracking logic rules if client setting is turned on for “Disobey Closed Tracking Logic in RAM”. Otherwise, the HR status updates only if it is an available next step in the configured workflow.
Options include the following check boxes.
Note
No check box is required. If you want to update for the req in context, do not check any of the following check boxes.
Only update in other reqs (all active req templates) – checking the box for this option means that this HR status update action occurs only in other reqs and not the req in context. Scenarios include the ability to update the candidate’s status in one req, and then reflect that same status update in all other reqs they presently reside in. For example, a candidate is updated to “Hire” in one req (this acts as the trigger mechanism). The candidate is then moved to a status called “Hired in other req” in other reqs (this is the rule action with only this check box setting checked). This option does not update candidates if they are in a final HR status. This option updates across all req templates.
Only update in other reqs (this req template) – checking the box for this option means that this HR status update action occurs only in other reqs and not the req in context. Scenarios include the ability to update the candidate’s status in one req, and then reflect that same status update in all other reqs they presently reside in. For example, a candidate is updated to “Hire” in one req (this acts as the trigger mechanism). The candidate is then moved to a status called “Hired in other req” in other reqs (this is the rule action with only this check box setting checked). This option does not update candidates if they are in a final HR status. This option updates across all reqs that have the same req template as the req in context.
Update across all active reqs in all req templates – checking the box for this option means that this HR status update action occurs in both this req and other reqs. Scenarios include the ability to disposition a candidate in one req, and reflect that same disposition status in other reqs. For example, a candidate failed a drug screen and is updated to “Failed Drug Screen” final status. The candidate is moved to this status for all reqs. This option updates across all req templates.
Update across all active reqs in this req template – checking the box for this option means that this HR status update action occurs in both this req and other reqs. Scenarios include the ability to disposition a candidate in one req, and reflect that same disposition status in other reqs. For example, a candidate failed a drug screen and is updated to “Failed Drug Screen” final status. The candidate is moved to this status for all reqs. This option updates across all reqs that have the same req template as the req in context.
Update Req Tier
This action updates the currently visible req tier.
Automates the same action that can be performed in the BrassRing UI for updating the visible req tier. Usually, this is done in exception scenarios.
It is hidden if there is no req context for the trigger.
Populate Field Values Action Type
Abstract
Populate Field Values Action Type.
Populate Field Values: Define Value
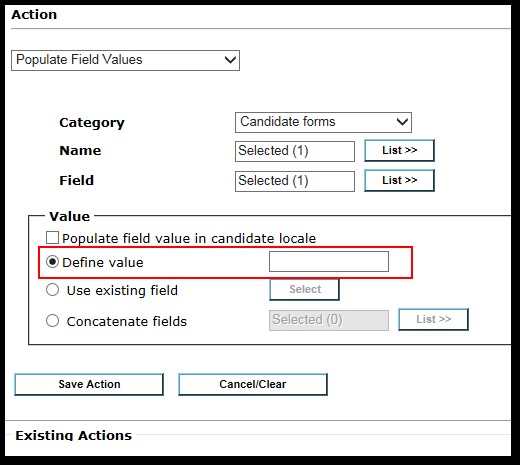
The Define value option is available for date, numeric, text, and text area field types, when using the Populate field values action. Enter a value that updates the field on the form.
When selecting a date field, complete the Define value or select from the list of options for Use existing field. The value of [Today] can be entered for Define value, and when the trigger runs and the action is performed, it inserts in the current date at run time. The option Extend/Reduce field value by (days) can be used to either extend or reduce by days the date that was entered in Define value or Use existing field. Example: If a candidate takes an assessment and the results for the assessments last for 90 days, then you would enter 90 days for Extend/Reduce field value by (days) as it would populate the date 90 days in the future.
Automates the form create and update process.
Can specify which values to insert or update on forms.
Req form fields, candidate form fields, req subsidiary form fields, and Talent record fields are supported.
Talent record selection contains Candidate type, which can be updated.
Auto-fill fields on forms need to be explicitly added within the action in order for them to appear on the form. Select the auto-fill field, and click Save Action. No value selection is necessary in this case.
Support for dynamically populating fields based on other fields is allowed by using the Use existing field selection where a source field can be specified. This is also allowed for auto-fill fields, where it overrides the standard auto-fill configuration.
If the destination is an option field, ensure that the destination field has the same Options at the Code level as the source field. Otherwise, the type of the field should match between source and destination except if the destination is a text. In that case, any source field type should work.
For fields that have constraints, for example date type, ensure that the constraint for the destination field allows dates in the past, as the date from the source is most likely an older date.
Constraints on the destination should match the constraint on the source. For example, configure the length constrain of the destination field to be the same length as source field.
Do not use an autofill field as a source but rather use the source of the autofill.
If the destination field is autofill, you should add autofill field into the RAM configuration. Otherwise, the field wouldn't be auto-filled just because they are autofill. In this case, you do not select a source for a destination autofill.
Populate Field Values: Select Value(s)
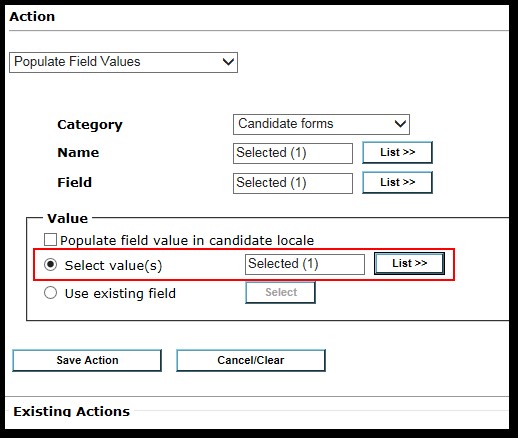
When using the Populate field values action, the Select value(s) option is available for all finite selection lists (that is Single-select, Multi-select). Select a value or values, which then update the field on the form.
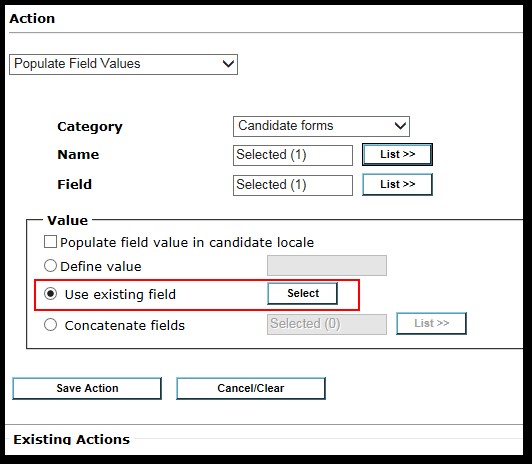
Populate field values - Use Existing Field
The Populate Field Values, use existing field is available for dynamically auto-filling fields. The source field to copy from can be set up as an action, effectively allowing for a field to have more than one source (achieved by setting up multiple rules). For example:
Field A is a text field. Rule 1 is set up with a specific condition and then an action for populate Field A with the value from Field B.
Rule 2 is set up with a different condition, and then an action for populate Field A with the value from Field C. This allows Field A to be populated based on some criteria.
When using the standard auto-fill field configuration (outside of the RAM), select the field and save the action. Do not use this option. Only use the radio button to overwrite the standard auto-fill source setup, or when configuring a non-auto-fill field to be treated as one in the RAM as in the previous example.
Populate Field Values: Concatenate Fields
The Populate Field Values, concatenate fields is available for text and text area field types. This option allows the selection of one or more fields to be concatenated and then inserted in the text or text area form field. The following are concatenated field rules.
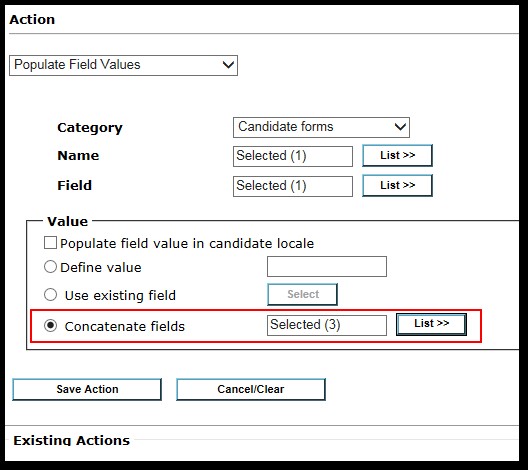
The order of the fields that are selected and shown in the Selected side of the dialog box determines the order of the concatenation.
If a field is blank when concatenating (meaning the field on the form is blank, or the form does not exist), text of NA is put in its place.
Each field value is separated by a pipe symbol (|).
If the sum of the character lengths of the fields that are selected, are greater than the text, or text area fields being populated (the destination field), then all characters past the destination field limit are truncated.
For field types that have both Code and Description, the Description is used in the concatenation.
Do not select encrypted fields for concatenation since they are not encrypted in the [destination/concatenated] field.
SSN field types cannot be used in concatenation.
Multi-select and checkbox fields are not available for selection.
Date field types are reformatted as YYYY-MM-DD and include time stamp where applicable.
Populate Field Values: Multiple Form Instances
When an action for populating field values on a multiple per candidate or multiple per candidate per req form is saved, you must also specify how to handle the multiple versions. The following selections are available based on form type.
Single per candidate and Single per candidate per req
If the form is one of these types, it either updates the form (if one is already present) or creates a form if not already present.
Multiple per candidate
Create new form instance.
Update most recently edited form instance.
Update all form instances.
Multiple per candidate per req
Create new form instance.
Update most recently edited form instance.
Update all form instances for this req.
