Abstract
Product: BrassRing
Add or Edit a Req
Your company might have multiple req templates to choose from. Req forms are customized for your organization.
Making a selection in an Autocomplete field, inserts details into other fields on the form.
When adding a req, some fields might be read only.
When you select a Job code, some or all of the fields on your req form might populate with pre-defined information. The process is referred to as Job Code Default Data (JCDD).
Saving a Req as new is a shortcut for creating a req by duplicating a req that is already in BrassRing. This copied information can be edited.
If multiple languages were purchased, reqs can be created in more than one language. Reqs can be posted in the languages you select. Candidates can then search for, view, and apply to those requisitions in the language of their choice.
Evergreen Reqs
Organizations typically use evergreen requisitions for high turn-over roles for which they continually accept applications. Evergreen Reqs:
Can be posted indefinitely until manually removed.
Allow an organization to hire up to 999,999,999 candidates within on req.
The archive function can help an organization manage the candidate volume.
Ability to exclude Evergreen requisitions or archived candidates for evergreen requisitions from DIT reports.
Use the Push and Pull RAM triggers to automate the distribution of candidates.
Use the Req Reapply function to allow candidates to apply to requisitions multiple times. Coupled with specific RAM triggers, this function can restrict the timeframe in which the candidates can reapply to specific requisitions.
Organizations can have a separate requisition template for evergreen requisitions or use their existing standard requisition template by identifying it as an evergreen requisition. The differences between an evergreen requisition and a standard requisition are:
User selects Yes for the Evergreen Requisition field.
An infinity sign appears in the Days until posted and the Removal date field on the Posting page.
Standard reqs already opened and posted can be changed to evergreen reqs as follows:
Unpost the standard req from any Talent Gateway.
Edit the standard req and change the Evergreen Req field for Evergreen Req to Yes.
Complete the Req form and post the req.
Relevant eLearning
Process
Add a Req
Select Menu → Reqs → Add new req.
Select a Req template by using the pull-down menu.
If you are using more than one language select the languages for the requisition by using the pull-down menu.
Select Add new.
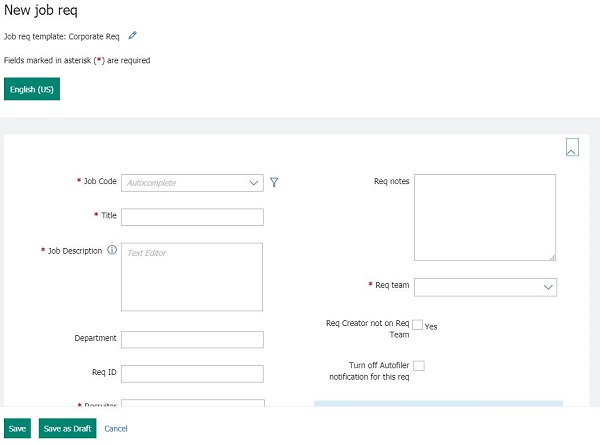
The new job req window opens. Insert the details of the Req. Fields with an asterisk are required to be completed before saving.

BrassRing assigns a unique req number for every req that is created, whether the req is opened or not.
Removing the req creator from the req team can only be accomplished when creating the requisition. The field becomes read-only after the req has been saved and cannot be edited.
Editing the description opens a Text Editor that is used to add formatting to the description. This text editor can be used to insert links, images, and videos into the description.
Selected recruiters and managers have access to the req, and have similar privileges as the req creator and Req Team. Some Managers might not have access to BrassRing and interact with the Req through eLinks.
BrassRing automatically decreases the number of positions whenever a candidate is hired for a req until 0 is reached, at which point the req might be closed.
The Set Proximity Coordinates section allows the recruiter to enter location information specific to the requisition. Candidates, in turn, can search for positions within a certain distance of their location on the Talent Gateways.
If you are creating a multi-language req, you can select or deselect each language to create the req in, and toggle between each hyperlinked language.
Req team members are individuals who might help filling a req. It might be a colleague who covers the req while you are away from the office or perhaps an HR Generalist. Req team members, req creators, and the recruiter for a job req, generally can:
Receive emails with the req details, such as when it is opened or put on hold.
Access and update HR statuses of candidates that are associated with the req.
Search and locate reqs for which they are team members.
Edit or modify the req form.
Selecting Autofiler Notification prevents email notifications from being sent to the members of the req if a candidate is Autofiled to the req folder to which they have applied.
Errors can be encountered in [Text Area] fields when saving the Req form. The errors can be caused by issues with HTML tags, or invisible characters if the content was pasted from a third-party program or website. For information on correcting these issues, see Using Notepad++ to Identify Missing HTML Tags and Invisible Characters.
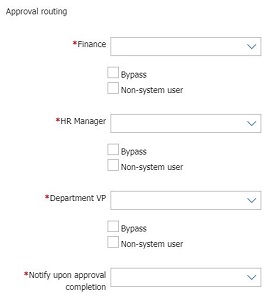
If applicable to your company, expand the Approval routing section by using the arrow.

Select the BrassRing users to approve the req by using the pull-down menus.
Select Bypass to bypass that Approval section.
Select Non-system user, and enter the users email address, if the approver is not a BrassRing user.
Add users to Notify Upon Approval Completion. These users receive an email when all approvals were received for the req.
Select Save.
If multiple languages were selected, the req form opens in the next language selected. Complete the req form for all languages that are selected and select Save.
Insert an email message to the first approver and, if needed, the Req team. To copy the Req team, select CC: req team.
Select Open Req to open the Posting Options window. For more information on posting reqs, see Searching Reqs
Save a Req as New
To save an existing req as new, open the req to duplicate.
SelectActions → Save As New.
All information is copied including: job code, recruiter, manager, req team, and approval routing. Edit any req form fields as necessary.
Select Save and continue.
Save a Req as a Draft, and access Draft Reqs
To save a Req as a Draft, when editing the Req Form, select Save as Draft. The Job Title field is required to be completed before it can be saved.
To access a Draft Req, select Menu → Reqs → My Draft Reqs.
Select the Draft Req, and select Actions → Edit to open the Req to continue editing.
Edit a Req or update a Req status
To edit or update a req status, open the req.
Select Edit, update the req as needed, and select Save.
To update the req status, select Hold, Cancel, More → Close, or More → Delete.
Add a Default Req
For information on setting req defaults, see Set Req Defaults.
To add a default req, select Menu → Reqs → Add my Req.
Select the default req.
Edit the details of the default req, and select Save and Continue.
Embed a video in a Req
If your organization enabled Embedded URL, you can embed URLs to videos in the job description field when adding or editing your req form.
The video is available to your candidate from the job details page of the Talent Gateway.
Candidates do not have to be logged in to the Talent Gateway to watch the video.
BrassRing supports the following video sources: YouTube, Vimeo, and Metacafe.
To Embed a video in a req, select Menu → Reqs → Add new req → Select Req Form.
Insert the job description, if it does not automatically populate based on the job code selection through the Job Code Default Data.
Select the description at the point in the description field you want the video to display.
Select the Embed URLs hyperlink.
The Embed URL dialog box opens. Select Video by using the pull-down menu.
Enter the full URL format, and select Preview. The Video preview opens.
Adjust the video pixel size, width, and height if needed.
Select OK. This adds the video merge token into the Job Description field. The candidate can view the video wherever the token is located.
Req Attachments
Attachments can be added to req forms.
The Req Attachments client setting must be enabled, and the user must have the appropriate user type privileges to add, view, or delete attachments.
The ability to add attachments is configured for each req form type, and the number of attachments, attachment categories, and types of attachments are configured by Workbench administrators. For more information, see Configure Req Attachments.
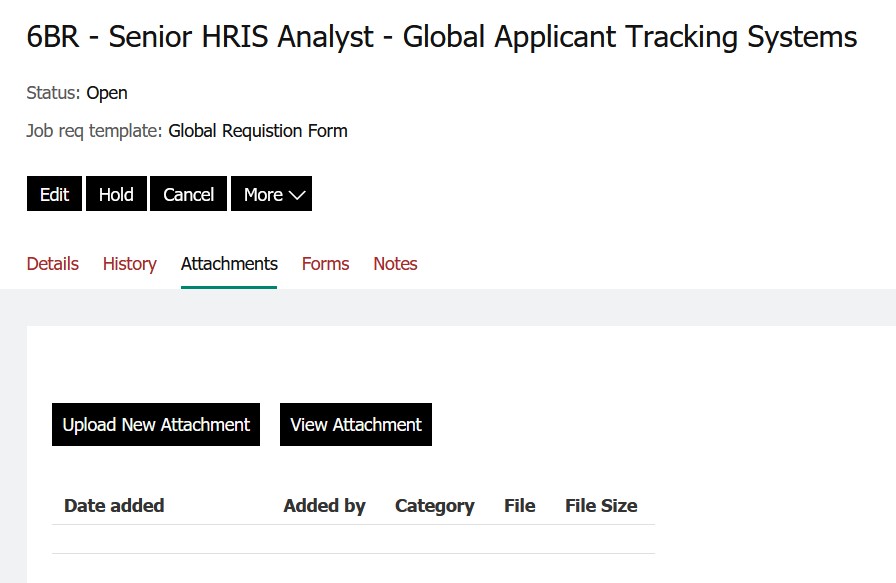
To add req attachments, while adding or editing a req, select Upload New Attachment.

Select Browse, select the attachment from your computer, and select Upload.
Select the Attachment category as needed, and select Upload.
Select View Attachment to view, download, delete, or update the [Attachment Category] as needed.