Create Facebook App
Abstract
Contact your organizations Infinite representative before the Facebook API keys are updated as the candidate experience might be impacted by the update.
When candidates log in to Talent Gateways by using the Sign In with Facebook option, a unique ID is created and mapped, and their Talent Gateway account is connected to their Facebook profile. For these candidates to continue logging in to the Talent Gateway by using their Facebook profile, this unique ID must not change.
If the API keys are updated in Workbench, the candidates that were accessing the Talent Gateways with their Facebook profile are not able to view their previous job submissions. This is because a new unique ID is created for the new API key.
If the API key is updated, Facebook returns a different Unique-ID for the same Facebook credentials. The Infinite Talent Gateway creates a new account for that profile instead of logging the candidate into the old profile, as the mapping for this new Unique-ID cannot be found.
There are two options for resolution:
Revert to the Old API keys, so that the old candidates who logged-in before the new API keys were updated, can safely log in to their profile. This can affect the candidates who logged-in after the new API keys update.
Leave the new API keys as it is and ask the candidates (who submitted with old API keys) to log in to the Talent Gateway and update their profile in the profile page (candidate zone) with the same details as before. This stacks their profiles with the previous talent record in BrassRing. After it is stacked, they can see the previously submitted applications in the TG.
The process on this page shows the process on a third-party website. This website and process is subject to change without notification. Infinite is not responsible for the content on third-party websites.
Process
Login to your Facebook account and scroll down to the bottom, where there are hyperlinks displayed as shown in the following figure. Select Developers.

Select Apps → Register as a Developer. If you are already a registered developer, Create a New App is displayed, move to step 7

Enter your Facebook password for confirmation if it is requested.
A pop up Register as a Facebook Developer is displayed. select YES to accept the policy and then select Next.

To verify your account, phone number is requested. A code is sent to this phone number for confirmation. The entered number is added to your timeline but would not be visible to your friends.

After successful registration, a pop up is displayed. Select Done.

Select Go to Apps → Create a New App.

Enter the App details as stated below:

For security check, enter the text that is displayed on the screen in the text box and select Submit.

App is created with the Display Name.

Select Show, to view the Secret Key.
You are requested to re-enter your Facebook password for security. Enter the password and select Submit.

Secret Key is now displayed on the screen.

Select the Settings tab, select the Basic Settings tab and select Add Platform.

In the Select platform pop up, select Website.

In the Basic tab, enter the appropriate URL in the Site URL field, depending on the BrassRing environment your organization/client is creating this app for.

US Production: https://sjobs.brassring.com/TGWebHost/SocialMediaIntegration.aspx
US Staging: https://sstagingjobs.brassring.com/TGWebHost/SocialMediaIntegration.aspx
EU Production: https://krb-sjobs.brassring.com/TGWebHost/SocialMediaIntegration.aspx
EU Staging: https://stagingkrb-sjobs.brassring.com/TGWebHost/SocialMediaIntegration.aspx
In the Advanced tab, under the Security section, select YES for the highlighted fields in the following figure. All other fields can be left as they are with the default values.

Select App Details tab to update your company details.


Select Status & Review tab.
Select YES for the query Do you want to make this app and all its live features available to the general public?
Select Confirm.

In Workbench, open Facebook's Administer configuration page and insert the App ID and App Secret.

You may choose to use one API key and Secret Key pair for all three combinations, but it is a best practice to create three different pairs. The advantage of creating your own Facebook app is that, candidates and users see client's brand instead of BrassRing's brand on the authorization screen.

Create a LinkedIn App
Abstract
Product: BrassRing
BrassRing is partnered with LinkedIn and allows clients to create Apps with LinkedIn to configure:
Posting to LinkedIn
Sign In with LinkedIn and Sign In with LinkedIn using OpenID Connect
Contact your organizations Infinite representative before the LinkedIn API keys are updated as the candidate experience might be impacted by the update.
When candidates log in to Talent Gateways by using the Sign In with LinkedIn, a unique ID is created and mapped, and their Talent Gateway account is connected to their LinkedIn profile. For these candidates to continue logging in to the Talent Gateway by using their LinkedIn profile, this unique ID must not change.
If the API keys are updated in Workbench, the candidates that were accessing the Talent Gateways with their LinkedIn profile are not able to view their previous job submissions. This is because a new unique ID is created for the new API key.
If the API key is updated, LinkedIn returns a different Unique-ID for the same LinkedIn credentials. The Infinite Talent Gateway creates a new account for that profile instead of logging the candidate into the old profile, as the mapping for this new Unique-ID cannot be found.
There are two options for resolution:
Revert to the Old API keys, so that the old candidates who logged-in before the new API keys were updated, can safely log in to their profile. This can affect the candidates who logged-in after the new API keys update.
Leave the new API keys as it is and ask the candidates (who submitted with old API keys) to log in to the Talent Gateway and update their profile in the profile page (candidate zone) with the same details as before. This stacks their profiles with the previous talent record in BrassRing. After it is stacked, they can see the previously submitted applications in the TG.
The process on this page shows the process on a third-party website. This website and process is subject to change without notification. Infinite is not responsible for the content on third-party websites.
Process
Create a LinkedIn App
Access https://developer.linkedin.com.
Select Create app.
Sign in by using your account credentials.
Select Create app.

Complete the form with as much detail as possible and select Create app.
Table 17. Application Details required to create a LinkedIn App
S. No
Field Name
Required
Description
1
Company Name
Yes
Your Company Name
2
Name
Yes
Name of the Application. Example: Infinite Talent BrassRing EU Staging
3
Description
Yes
Your App Description
4
Application Logo URL
Yes
Your company or product Logo URL
5
Website URL
Yes
e-mail address of the App owner
6
Business E-mail
Yes
Phone number of the App owner
7
Business Phone
Yes
Update the appropriate URL from the URL table given at the end of this document
8
OAuth 2.0 Authorized Redirect URLS
No
9
OAuth 1.0a Default "Accept" Redirect URL
No
10
OAuth 1.0a Default "Cancel" Redirect URL
No

Select the Redirect URLs pencil icon.

Select + Add redirect URL.
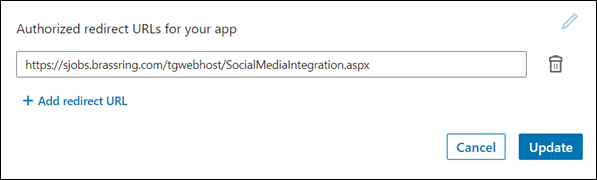
Insert the redirect URLs from the table as needed.
Ensure that there are no spaces after the URLs.
The URLs are case-sensitive and must be entered exactly as specified.
Table 18. Redirect URL List
Domain
Type
Redirect URLs
US Production
Akami
https://sjobs.brassring.com/tgwebhost/SocialMediaIntegration.aspx
US Production
SSL
https://sjobs.brassring.com/tgwebhost/SocialMediaIntegration.aspx
US Production
Vanity
Client set Vanity URL/tgwebhost/SocialMediaIntegration.aspx
Staging
Akami
https://sstagingjobs.brassring.com/tgwebhost/SocialMediaIntegration.aspx
Staging
SSL
https://sstagingjobs.brassring.com/tgwebhost/SocialMediaIntegration.aspx
Staging
Vanity
Client set vanity URL/tgwebhost/SocialMediaIntegration.aspx
EU Production
Akami
https://krb-sjobs.brassring.com/tgwebhost/SocialMediaIntegration.aspx
EU Production
SSL
https://krb-sjobs.brassring.com/tgwebhost/SocialMediaIntegration.aspx
EU Production
Vanity
Client set vanity URL/tgwebhost/SocialMediaIntegration.aspx
Select Update.
A confirmation message, the API, and secret keys, is displayed. The App that is created is now listed in the My Apps tab. Select the app to view and edit the app settings.
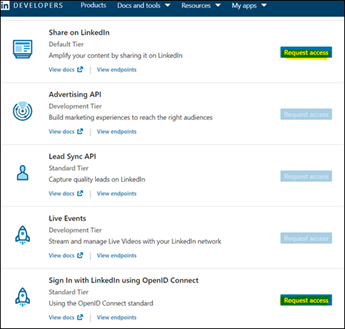
Upon creation of the App, select Request access for Sign In With LinkedIn using OpenID Connect and Share on LinkedIn from the Products list.
For the Clients with existing keys, add the product Sign In With LinkedIn using OpenID Connect from the Products list.
Workbench Configuration
In Workbench select Tools → Settings → Social Media Configuration.
Select the LinkedIn Administer configuration icon.
Insert the API Keys and Secret Keys.
If your organization is using more than one workflow of LinkedIn integration, it is recommended to create three separate APIs. One API key and Secret Key pair can be used for all three combinations, but it is a best practice to create three different pairs.
The first API key is used for BrassRing workflows, or posting to company or individual accounts from within BrassRing.
The second API key is used for Talent Gateway workflows for logged in users.
The third API key is used for Talent Gateway users who have not logged in.

Select Save.
Create a Twitter API
Please select an appropriate access plan as shown while creating the App.


Contact your organization's Infinite representative before the Twitter API keys are updated as the candidate experience might be impacted by the update.
When candidates log in to Talent Gateways by using the Sign In with Twitter option, a unique ID is created and mapped, and their Talent Gateway account is connected to their Twitter profile. For these candidates to continue logging in to the Talent Gateway by using their Twitter profile, this unique ID must not change.
If the API keys are updated in Workbench, the candidates that were accessing the Talent Gateways with their Twitter profile are not able to view their previous job submissions. This is because a new unique ID is created for the new API key.
If the API key is updated, Twitter returns a different Unique ID for the same Twitter credentials. The Infinite Talent Gateway creates a new account for that profile instead of logging the candidate into the old profile, as the mapping for this new Unique ID cannot be found.
There are two options for resolution:
Revert to the old API keys, so that the old candidates who logged in before the new API keys were updated, can safely log in to their profile. This can affect the candidates who log in after the new API keys update.
Leave the new API keys as it is and ask the candidates (who submitted with old API keys) to log in to the Talent Gateway and update their profile on the profile page (candidate zone) with the same details as before. This stacks their profiles with the previous talent record in BrassRing. After it is stacked, they can see the previously submitted applications in the Talent Gateway.
The process on this page shows the process on a third-party website. This website and process are subject to change without notification. Infinite is not responsible for the content on third-party websites.
How to Create Twitter API
This task outlines the procedure to create a Twitter API and the configuration of the Secret Key that is obtained in the process.
Process
Open the developer site for Twitter https://developer.twitter.com/. Create a new developer account.

Provide your Twitter account details.

Insert the details on the application form.

Read and agree to the terms and conditions. Select Accept Terms & Conditions. Select Submit.

Add a name to your Twitter app, and set up your company's icon.

Your app is successfully created and the API key is displayed as shown in the following image.
Copy and store the keys on a local file. They are not visible after this step. These keys must be entered in Workbench > Social Media Integration > Twitter
Note
The keys displayed in the following image are for guidance only. Create a new set of keys for your company's use.

The next screen displays a reminder to save the secret keys.

The next step is to set up the user authentication settings. Select Set up.

Select the App permissions and Type of App in the user authentication settings.

In the next screen, add the Callback URI and Redirect URLs accurately. Refer to the table at the end of the page for URI/URLs.
Your title goes here
Website URL = Client's Talent Gateway URL
Organization Name = Client Name
The callback URI must be named as per the BrassRing environment.

Now the Twitter app is created and it has essential access. The next step is to apply for elevated access from the product to V2. Select Apply.

Enter appropriate information in the Basic Info section. While adding information, it is better to add a team profile, so that more than one employee of the organization has access to this app account.

In the next step, enter information about the intended use of this app. Provide a description in over 200 words explaining what is the purpose of this app.
Note
Sample description: This Twitter app and the keys enable our company's job applicants to log in to the company's career sites using their Twitter login credentials. They also allow our candidates to tweet the jobs posted on our careers site to their respective Twitter accounts.

Intended Use section continued - Choose No for all the specific options.

Verify that your project displays the V1.1 access.

Review all the information for Elevated access.

In the next step, use add app option at the project level to create apps for staging and production environments separately.

The API Key and Secret key must be provided in Workbench on Twitter's Administer configuration page as follows:

You might choose to use one API key and Secret Key pair for all three combinations, but it is a good practice to create three different pairs. The advantage of creating your own Twitter app is that candidates and users see the client's brand instead of BrassRing's brand on the authorization screen.
When candidates use Twitter to log in to the Talent Gateway for the first time, authorization is required.

URI/URL Table
Note
All URLs/URIs are case-sensitive. It is recommended to copy and paste the URL/URI from the following table to ensure accuracy. The last URL is for Talent Gateways in the Staging environment.
Table 19. URI/URL
https://jobs.brassring.com/tgwebhost/SocialMediaIntegration.aspx |
https://xjobs.brassring.com/tgwehost/SocialMediaIntegration.aspx |
https://localhost/tgwebhost/SocialMediaIntegration.aspx |
https://krb-jobs.brassring.com/tgwebhost/SocialMediaIntegration.aspx |
https://sjobs.brassring.com/tgwebhost/SocialMediaIntegration.aspx |
https://krb-sjobs.brassring.com/tgwebhost/SocialMediaIntegration.aspx |
Any custom domain that the client might be using. |
https://sstagingjobs.brassring.com/tgwebhost/SocialMediaIntegration.aspx |
Google Login and Google Drive API instructions
Product: BrassRing
Google Login and Google Drive API
Contact your organization's Infinite representative before the Google Login and Google Drive API keys are updated as the candidate experience might be impacted by the update.
When candidates log in to Talent Gateways by using the Sign In with Google option, a unique ID is created and mapped, and their Talent Gateway account is connected to their Google profile. For these candidates to continue logging in to the Talent Gateway by using their Google profile, this unique ID must not change.
If the API keys are updated in Workbench, the candidates that were accessing the Talent Gateways with their Google profile are not able to view their previous job submissions. This is because a new unique ID is created for the new API key.
If the API key is updated, Google returns a different Unique-ID for the same Google credentials. The Infinite Talent Gateway creates a new account for that profile instead of logging the candidate into the old profile, as the mapping for this new Unique-ID cannot be found.
There are two options for resolution:
Revert to the Old API keys, so that the old candidates who logged in before the new API keys were updated, can safely log in to their profile. This can affect the candidates who logged in after the new API keys update.
Leave the new API keys as it is and ask the candidates (who submitted with old API keys) to log in to the Talent Gateway and update their profile in the profile page (candidate zone) with the same details as before. This stacks their profiles with the previous talent record in BrassRing. After it is stacked, they can see the previously submitted applications in the TG.
The process on this page shows the process on a third-party website. This website and process is subject to change without notification. Infinite is not responsible for the content on third-party websites.
Google Drive API instructions
This process must be done twice. Once for staging and again for production.
1. Create the Client ID
Access https://console.developers.google.com/start, and select the Select a project pull-down menu.

Select New project.

Insert a project a name, and optionally insert a Location, then select Create

Select ENABLE APIS AND SERVICES.

Search for Google Drive API, and select Google Drive API.

Select Enable. If the API has previously been enabled the Enable button cannot be selected. Select Manage

After the API is enabled, select Create Credentials.

Add credentials to your project screen:
What data will you be accessing?: select User data.

Click Next.
Select OAuth Consent Screen

App information - This shows in the consent screen, and helps end users know who you are and contact you
a) Insert name of the app asking for consent
b) Insert User Support email – For users to contact you with questions about their consent.
c. App Logo - This is your logo. It helps people recognize your app and is displayed on the OAuth consent screen.
d. Developer Contact Information - These email addresses are for Google to notify you about any changes to your project.
Click Save and Continue
Scopes(Optional)
Click Add or Remove Scopes
Scopes express the permissions you request users to authorize for your app and allow your project to access specific types of private user data from their Google Account.

Select ../auth/drive.readonly See and download all your Google Drive files.

Click Update to update selected scopes

Click Save and Continue
OAuth Client ID
Select Application Type – Web Application
Name - The name of your OAuth 2.0 client. This name is only used to identify the client in the console and will not be shown to end users.

Select the URL’s from the below list and click Create.
a. Authorized JavaScripts origins: Enter the URL from the list and select enter to add. ·
Staging URL: https://sstagingjobs.brassring.com
US Production URL: https://sjobs.brassring.com
US Production URL: https://xjobs.brassring.com
EU Production URL: https://krb-sjobs.brassring.com
b. Authorized redirect URLs: Enter the URL from the list and select enter to add.
Staging URL: https://sstagingjobs.brassring.com/TGWEBHOST/mobile/cscallback.aspx
US Production URL: https://sjobs.brassring.com/TGWEBHOST/mobile/cscallback.aspx. For US Production both the URLs should be added.
US Production URL: https://xjobs.brassring.com/TGWEBHOST/mobile/cscallback.aspx.
For US Production both the URLs should be added.
EU Production URL: https://krb-sjobs.brassring.com/TGWEBHOST/mobile/cscallback.aspx
Download your credentials - Download this credential information in JSON format. This is always available for you on the credentials page. Click Done

Click Create Credentials.
Select API Key


Use this key in your application by passing it with the key=API_KEY parameter.

Select OAuth CONSENT SCREEN.

Select Publish App

Push to Production screen appears.

Click Confirm and then click Prepare for Verification.

Upon clicking Prepare for Verification

1. Insert the Talent Gateway page into the [Application Homepage link] field.
2. In the [Application Privacy Policy Link] field:
a) If your organization is not using a vanity URL for the Talent Gateway, insert the Privacy Policy link: https://jobs.brassring.com/TGnewUI/PrivacyPolicy.html
b) If your organization is using a vanity URL for the Talent Gateway, use the privacy policy that's hosted on the domain, and ensure it is available on the footer of the Talent Gateway. This helps in Google's approval process.

On the authorized domain page
a) If your organization is not using a vanity URL for the Talent Gateway, insert brassring.com.
b) If your organization is using a vanity URL for the Talent Gateway, insert the vanity URL.

Click Save and Continue.

If you add sensitive () or restricted () scopes, like scopes that let you access a user's emails or contacts, you will need to submit your app for verification.

What features will you use?

How the scopes be used?
(Explain to Google why you need these scopes, how you will use them, and why more limited scopes aren’t sufficient)
Insert the below message:
Infinite Talent BrassRing is an applicant tracking system that deals with posting jobs and candidates applying to the same via the home page URL provided in the OAuth section of the app. The home page URL is a career site and the home page displays the search boxes to search for the career opportunities and candidates can start applying by creating a login. So, the main functionality of the home page is to display jobs based on the search criteria selected and also the status of the previously applied jobs by logging in. Now, the Google Drive functionality will be used in the process of uploading a resume for the selected job. Candidate initially logs in and then selects the upload button to import their documents like Resume, Cover letter, attachments, etc. to upload during the application process.

Please provide a YouTube video demonstrating how you will use the data from these scopes in your app. Your video must include all OAuth clients that you assigned to this project.
Click Save and Continue
Apply With LinkedIn
Abstract
Product: Workbench
Prerequisites
Infinite Talent has no control over the function, design, or pages that the Apply with LinkedIn button appears on. The format, location, and the buttons text, font, size, and colors, are all static attributes dictated by LinkedIn. The Apply with LinkedIn button label also cannot be edited.
The Client Setting Enable Social Media Integration → LinkedIn - Apply with LinkedIn must be enabled. Client settings can only be enabled by Infinite Representatives.
If the client setting is enabled, but the social media configuration is not completed, the Workbench administrator sees an error message on selecting LinkedIn - Apply with LinkedIn. The error does not prevent the user from selecting this option. However, the Apply with LinkedIn button is not displayed on that specific Talent Gateway until the client level configuration is completed."
The workbench administrator must have login credentials for Apply with LinkedIn-Infinite client admin account on LinkedIn Recruiter (appropriate for environment and Parent keys).
As per guidelines from LinkedIn, your organization is required to enable either the Skip Sign-in (Bypass Login) or Disable Sign-in functions on the Responsive Talent Gateways to use Apply with LinkedIn.
When configured, the Apply with LinkedIn button is available on the Job Details page next to the regular Apply button. If your organization skips the Job Details page your candidates do not have this action available to them.
The configuration for this LinkedIn feature does not overlap with any other LinkedIn feature offerings that are used within BrassRing. Each of the LinkedIn integration features like Apply with LinkedIn and Signing in using LinkedIn, have their own configurations.
The Apply with Linked feature is for single job applies only.
Apply With LinkedIn Candidate Experience
When candidates select Apply with LinkedIn, LinkedIn confirmation windows is displayed for confirmation to proceed. When candidate provides confirmation, the candidate's LinkedIn information is pulled into their Talent Gateway profile.
List of fields pulled from LinkedIn:
First Name (required)
Last Name (required)
Email address (required)
Web address (Candidate's LinkedIn profile URL) (required)
Country (optional)
Phone Number (optional)
Up to 3 education fields (optional)
Up to 5 Work experience fields (optional)
Up to 50 skills fields (optional)
The candidate's Talent Gateway profile information is overwritten by the candidate's LinkedIn profile information if it belongs to the same fields.
Candidates cannot submit duplicate applications using the Apply with LinkedIn feature unless the requisition supports multiple submissions.
There is no integration with the LinkedIn app on phones or tablets. Candidates using those devices need to be logged into LinkedIn on their browser to see the Apply with LinkedIn button.
The Apply with LinkedIn button's label is displayed in the language of the candidate's LinkedIn profile. It might match the locale of the Talent Gateway in which the candidate is submitting their application. For example, if the candidate's LinkedIn profile is in French and the candidate is on a Spanish locale responsive Talent Gateway, the Apply with LinkedIn button's label is displayed in French.
Best Practice Suggestions
Clients should not bypass Job Details page if they want candidates to be able to use this feature. Apply with LinkedIn feature is available only on Job details page.
Clients should not use read-only fields for Internal SSO TG (XML profile import) if they want candidates to be able to use this feature.
Regular Talent Gateway apply has a better profile import (with full resume data extraction) if the candidates have a resume file. Therefore, it is recommended to not use this feature unless your organization expects a significant candidate volume where candidates have a LinkedIn profile and do not have resume files available to upload, from their laptop/device, or cloud storage applications like Google Drive or Dropbox.
Process
Enable the Apply with LinkedIn button
A LinkedIn Recruiter account is required for this configuration.
The LinkedIn – Apply with LinkedIn client setting must be enabled. Contact your Infinite Representative to enable this setting.
Log into your LinkedIn Recruiter account on your browser.
In Workbench, select Tools → Settings → Social Media Configuration.
Select the LinkedIn – Apply with LinkedIn Administer configuration icon. For this step you need to be logged into your LinkedIn Recruiter account in the same browser session so the LinkedIn API can display their page by using the API.

In the Administer Configuration window, select Request for Apply with LinkedIn. This section of this page is controlled by LinkedIn.

A message displays stating that the integration has been successfully requested, select Go back.
The Apply with LinkedIn section displays an Enabled message.

Select Close.
Configure the Apply with LinkedIn button to display
Select Tools → Talent Gateways.
Select the Administer Talent Gateway icon for the Talent Gateway to have the button.
Select Social Media Integration → LinkedIn – Apply with LinkedIn.
A notification displays if the LinkedIn – Apply with LinkedIn button has not been enabled.

Select Save.
Dropbox App Guide
Abstract
Product: Workbench
Dropbox Configuration
To enable candidate access to their Dropbox accounts when applying by using mobile devices, clients must create and configure their own Dropbox app. The Dropbox app needs to be submitted to Dropbox for testing and approval of production status. After production status is approved by Dropbox, there is no limit on the number of candidates accessing the Dropbox app by using BrassRing Talent Gateways per day. By creating their own app, clients can display their branding on the Dropbox authentication page.
Create a Dropbox App
Access the Dropbox developers page: https://www.dropbox.com/developers, select My Apps, and insert your Dropbox log in credentials.
Select Create App.
Select Choose an API → Dropbox API.
Select Full Dropbox– Access to all files and folders in a user's Dropbox access.
Insert a name for the Dropbox App. Enter an appropriate name that matches your company name to get your app approved for production.
Select Create App.
The App details opens, select Enable additional users, increase the limit to 500 users and select Ok.
Take a note of the App key and App secret as these are required to be entered into Workbench by the Infinite Representative.
Add the Redirect URLs and the Chooser/Saver domains to match the staging or production environment in the two fields. Add the URLs without spaces or commas with each URL on a new line.
Redirect URLS:
https://sjobs.brassring.com
https://sstagingjobs.brassring.com
https://stagingkrb-sjobs.brassring.com
https://krb-sjobs.brassring.com
Chooser/Saver domains:
sjobs.brassring.com
sstagingjobs.brassring.com
stagingkrb-sjobs.brassring.com
krb-sjobs.brassring.com
Select the Branding tab
Upload the logo for the App in the App Icons field and select Save Changes.
You have now configured the app for staging. The Dropbox App client settings, must now be enabled and configured by an Infinite Representative.
Client and Workbench settings
Client Settings can only be configured by your Infinite representative. Contact your Infinite representative with a request to enable the Dropbox App client settings in the Staging Environment. Include the App Key and secret details so the Infinite Representative can enter them.
Synchronize the Talent Gateways after these changes and you can access the Dropbox through the API. For more information on syncing changes with Talent Gateways, see Synchronize Changes with Talent Gateways.
You should now test the app is working as expected.
Applying for Production Status
Dropbox’s requirement for reviewing the application for production status is that the app should be linked with at least 50 users. You can apply for production status before this requirement is met, but the review happens only after a minimum of 50 users are linked to the app.
While applying for production status, you must give a detailed description of how your company is to use the Dropbox App and a Job Apply URL for the Talent Gateway configured with Dropbox App in staging for them to test the app. Dropbox does not approve the app for production unless these details are provided accurately.
To apply with Dropbox for production status, open the Dropbox for developers page: https://www.dropbox.com/developers.
Access the App details page and select Applying for Production Status.
Enter the details as described:
Confirmation: Select My app will need to link with more than 50 Dropbox users.
Description: Insert This app is an applicant tracking system where candidates apply for jobs.
Dropbox Integration: Insert: Job applications sometimes require candidates to submit various documents. During the process of job application, candidates might access their Dropbox account by using this app and upload the documents that they might have stored in their respective Dropbox accounts.
Website: Insert Yes.
Platform(s): Select Web from the list of options and insert the URL of the BrassRing Talent Gateway in which Dropbox can be accessed.
Testing instructions: Insert the detailed steps here for your Talent Gateway workflow, so that the testing team at Dropbox can follow them for testing your app.
Provide the Staging Talent Gateway URL and one or two test candidate credentials to log in to the Talent Gateway.
Describe how to search for a job, apply, how to create a profile, select the resume, upload a file by logging in to Dropbox.
Provide the entire flow that lets the Dropbox testing team know how a candidate is using the Dropbox by using the Talent Gateway.
Test account credentials: Provide the test account credentials
Testing conditions: Select I have provided either test account login info or a link to a test build or a link to screenshots or a screencast detailing my app’s integration with Dropbox.
Request early review: This is an optional field. If needed enter a reason as to why your app needs to be reviewed before 50 users are included.
Select Submit app.
After receiving confirmation from Dropbox that the app has been upgraded to production status, contact your Infinite Representative to insert the App Key and App Secret values in the Workbench Client Settings in the Production environment. If any of the values that are entered do not match with the values provided by Dropbox API, then an error message is displayed as opposed to Dropbox authentication page. Your organization should use only SSL-encrypted Talent Gateways for responsive apply in order to use the Dropbox feature.