BrassRing new features for release 25.04.15 are listed here.
BRASSRING Dark Launch
Dark Launch features are those that are released to the Staging environment only and are NOT released to the Production environment for a considerable amount of time.
This process gives an opportunity and enough time to test these features thoroughly before they are available in the production environment. Clients are requested to configure and test these features and provide their feedback and inputs to your respective Infinite representatives.
There are no Dark Launch features in this release.
BRASSRING VISIBLE CHANGES
The BrassRing visible changes for the current release are listed here.
Responsive Recruiter: New UI – Dashboard improvements
Currently, on the new UI home page, only the 'Welcome' text is displayed before the gear icon, which allows you to personalize the widgets. Additionally, there is no space between the widgets
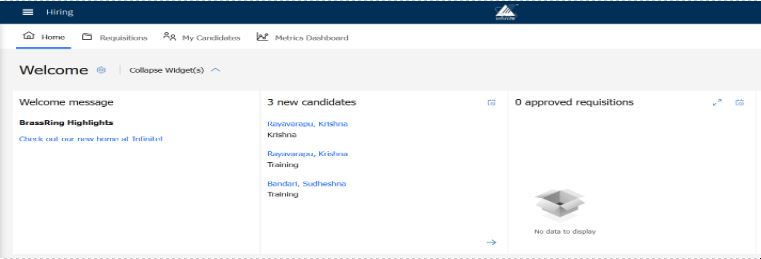
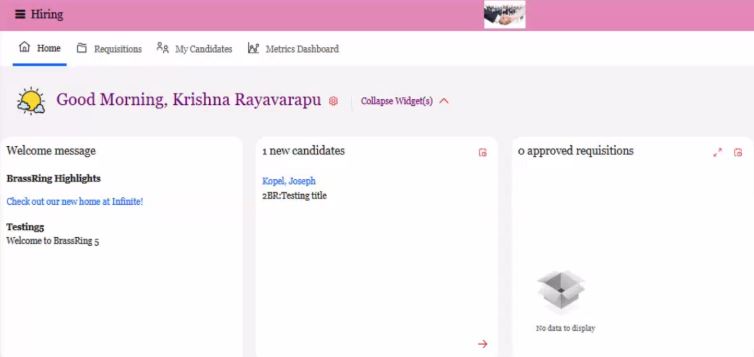
Beginning with this release, logged-in Brassring users will see an icon displaying the current time of day. The icon dynamically greets the user according to the time and time zone, with messages such as "Good Morning," "Good Afternoon," or "Good Evening," followed by the user's first and last name.
The widgets' design has been enhanced with rounded edges and added spacing between each widget to improve the user experience.
Internal Reference Azure Board # 54228.
Responsive Recruiter: New UI – My Tasks tab
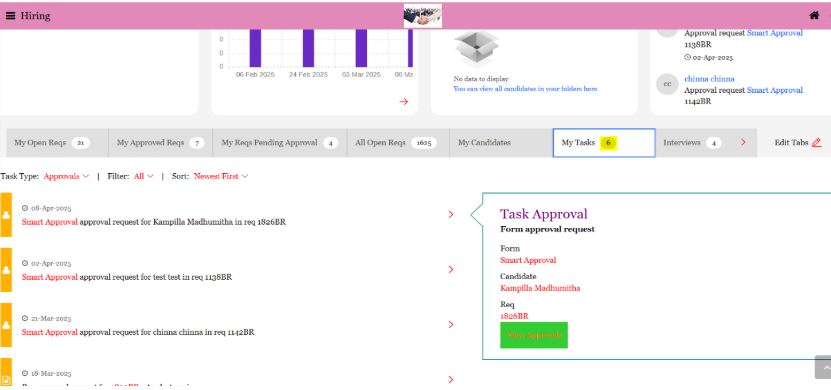
The ‘My Tasks’ tab contains two types of tasks: ‘Approvals’ and ‘HR Status Aging’. When a user selects the ‘Approvals’ task, it shows the count of pending approvals. If the user switches to a different tab and then returns, the pending approvals count is displayed correctly. However, when the user selects the ‘HR Status Aging’ task type, it initially displays the correct count. If the user then switches to another tab and returns to select ‘HR Status Aging’, it incorrectly displays the pending approvals count instead.
This release addresses the above-mentioned behavior, ensuring accurate counts for both 'Approvals' and 'HR Status Aging' task types.
Internal Reference Azure Board # 53569.
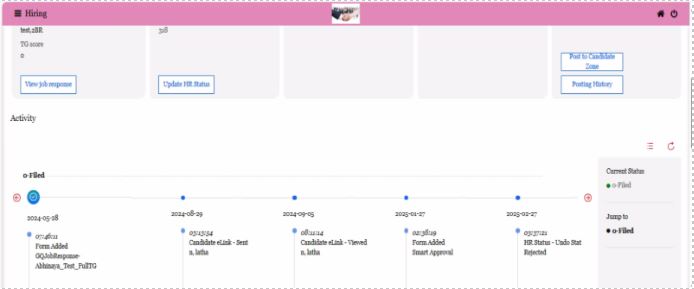
Responsive Recruiter: New UI – Flow view in talent record
Currently, when users attempt to access a candidate's talent record through requisition and clicking the ‘Flow view’ icon in the activity log section, the ‘Search’ icon appears.

Starting with this release, the ‘Search’ icon is removed from the ‘Flow view’ workflow, as it is unnecessary for this view.
Internal Reference Azure Board # 53967.
Responsive Recruiter: Forms drop-down list
Currently, the forms in the drop-down list are not displayed in alphabetical order when a user tries to select them from the ‘Add forms’ section.
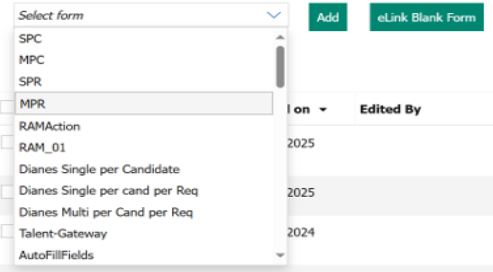
This release addresses the issue, ensuring forms are displayed in the correct alphabetical order.
Internal Reference Azure Board # 54173.
Data Insight Tool: Character encoding format
Currently, when creating or editing a template in the Data Insight tool under the ‘Template Output’ section, we support 'Unicode' (UTF-16 LE) for tab-delimited reports and both Unicode (UTF-16 LE) and ANSI for comma-delimited reports.
With this release, support for 'Unicode', specifically 'UTF-8' and 'UTF-8 with BOM' formats, has been implemented for both Tab and Comma delimited reports.
After generating the report data, when you double-click on the created CSV files to open them in Excel, you will notice that a comma delimiter separates data into new columns, while a tab delimiter keeps all data in the same column. If you need to change the delimiter for the columns when opening a report encoded with 'UTF-8' or 'UTF-8 with BOM' in Excel, please follow the steps outlined below:
Open Excel (don’t double-click to open the file directly).
Go to File >> Open and select your tab/comma delimited file.
In the Text Import Wizard, select Delimited and click next, then choose Tab as the delimiter.
This will force Excel to recognize and split the data correctly into multiple columns.
If UTF-8 is selected, we display this message for both Tab and Comma options.

Note: Character encoding is not implemented in reports that have macros attached.
Internal Reference Azure Board # 1569.
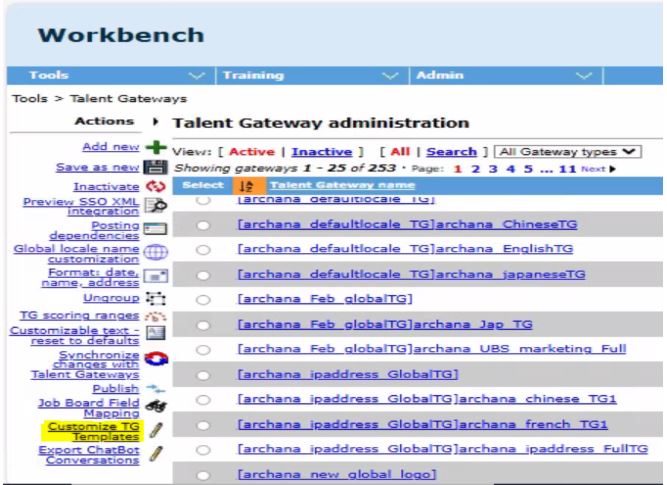
Talent Gateway: Custom homepage design in VBT
Beginning with this release, a new 'Custom homepage design' tool is available to enhance the branding capabilities allowing clients to design their Talent Gateways homepage. The Custom homepage design tool can be launched from below path.
Path: Workbench >> Tools >> Talent Gateways >> Actions >> Customize TG templates >> Custom homepage design
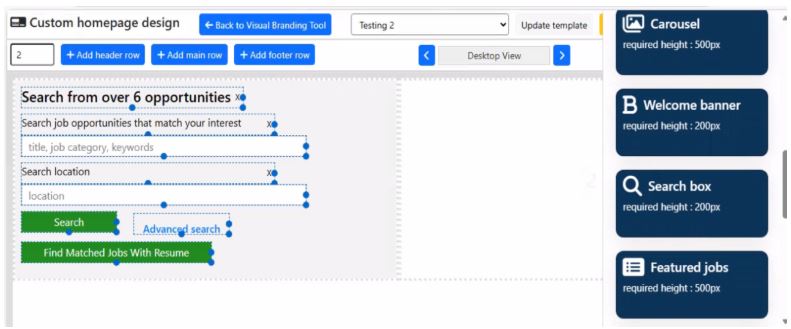
At the top of the page, the first tool bar displays Custom homepage design text, ‘Select template’ drop-down which are categorized into Draft, Active, Inactive and Associated templates.
Draft - When user creates template and save, it's in Draft Status. If template is in draft status users can edit, update, activate the template.
Active - When user activates draft template, then it will be in Active status. These Active templates are visible in VBT tool to apply. If template is in active status user can edit, update, inactivate the template.
Inactive - When user inactivates activated template, then it will be in Inactive status. If template is in inactive status users can't edit, update the template
Associated - When user selects template in VBT tool & click on Save, then template status changes to Associated.
Users can see a button 'Save template'. Clicking Save button - a pop will open allowing user to provide a template name and save template.
Save as new template button will be visible when selecting an existing template.
On the second tool bar, users can select the number of columns up to 12 and by default it displays 2 columns. Users have the buttons Add header row, Add main row and Add footer rows.
Header row is added on top of the page.
Main row is added between last header & first footer row.
Footer row is added after last main row.
Users can slide to Desktop view, Mobile view and tablet view and upon configuring the page they can preview it.
Next to preview, there is a Hamburger button to open Widgets which are of three types.
Media widgets consist of Image, text and video widgets which can be added multiple times
Standard widgets consist of all responsive TG widgets (Client Logo, Header Links, Carousel, Welcome banner, Search box, Featured jobs, Login box, Submit resume and Footer) which can be added only once. Following widgets are not allowed to add in header & footer row - Search box, Featured jobs, Login box and Submit resume.
Custom widgets will have custom widget (Insert a widget with custom HTML) and Link widget (Insert a widget with clickable link)
Each widget can be dragged and dropped. After clicking edit widget button, editing options will appear according to the widget type. Users can move or delete elements within the widgets, adjust their height and width, and resize buttons to improve the overall user experience.
Right clicking on a cell display:
Row Height input box - To change height of row in pixels
Column width input box & slider - To change width of row in percentage
Split into row - To split cell into two rows
Delete column - To delete column
Delete entire row - To delete row
Users can now launch the Visual Branding tool to customize the design of the Talent Gateway home page using templates created in Custom homepage design tool. The configured templates are visible in the Visual Branding tool, which can be applied to the talent gateway when clicked on 'Save' button.
There is a template remove button (x) to remove or dissociate template from the TG.
Internal Reference Azure Board # 47387 and 53772.
Talent Gateway: TG Profile Import Integration
With this release, the TG profile import integration is now enabled to automatically create employee profile data through the referral program using a secure SSO SAML feed.
This feature ensures a secure, compliant, and efficient process by sharing only essential employee data through the SSO SAML feed, thereby reducing manual data entry.
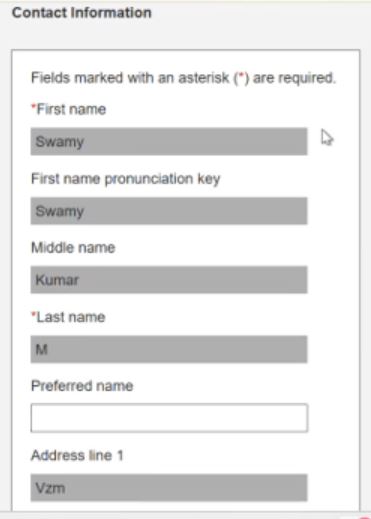
Note: The fields mentioned below have been newly added and are now supported for Contact Single Sign-On (SSO) in SAML responses. These fields will be accepted when sent in the specified format. On the TG profile contact information page, users can only edit the fields that are missing and were not included in the SAML response. Clients can select any fields they wish to import, and these are not mandatory. You may remove any fields entirely and submit only the ones you require.
Contact SSO fields:
First Name
Middle Name
Last Name
Preferred name
First name pronunciation key
Email
Address line 1
Address line 2
City
Zip/Postal code
Country (Need to send 2 letter ISO at time sending Data in node in UI will show Full name at time of display)
State/Region/Province
Home phone
Work phone
Other phone
Fax
Web address
Candidate stacking field
Employee ID
Sample SAML response xml:
<samlp:Response ID="_ff4fb29b-bb76-46e9-8765-c2286277cc9b" Version="2.0" IssueInstant="2025-04-04T11:37:34.824Z" xmlns:samlp="urn:oasis:names:tc:SAML:2.0:protocol">
<saml:Issuer xmlns:saml="urn:oasis:names:tc:SAML:2.0:assertion">testsaml.com</saml:Issuer>
<samlp:Status>
<samlp:StatusCode Value="urn:oasis:names:tc:SAML:2.0:status:Success"/>
</samlp:Status>
<saml:Assertion Version="2.0" ID="_9e2991a4-913e-4851-9798-7948912ddc46" IssueInstant="2025-04-04T11:37:34.825Z" xmlns:saml="urn:oasis:names:tc:SAML:2.0:assertion">
<saml:Issuer Format="urn:oasis:names:tc:SAML:2.0:nameid-format:entity">assertion url<saml:Subject>
<saml:NameID>xxxxxxxxx</saml:NameID>
</saml:Subject>
<saml:Conditions NotBefore="2025-04-04T11:37:19.826Z" NotOnOrAfter="2025-04-04T11:40:39.826Z"/>
<saml:AuthnStatement AuthnInstant="2025-04-04T11:37:34.826Z"/>
<saml:AttributeStatement>
<saml:Attribute Name="Application" FriendlyName="Application">
<saml:AttributeValue>3</saml:AttributeValue>
</saml:Attribute>
<saml:Attribute Name="SiteId" FriendlyName="SiteId">
<saml:AttributeValue>6225</saml:AttributeValue>
</saml:Attribute>
<saml:Attribute Name="First Name" FriendlyName="First Name">
<saml:AttributeValue>xxxx</saml:AttributeValue>
</saml:Attribute>
<saml:Attribute Name="Middle Name" FriendlyName="Middle Name">
<saml:AttributeValue>xxxxxx</saml:AttributeValue>
</saml:Attribute>
<saml:Attribute Name="Last Name" FriendlyName="Last Name">
<saml:AttributeValue>xxxxxx</saml:AttributeValue>
</saml:Attribute>
<saml:Attribute Name="Preferred name" FriendlyName="Preferred name">
<saml:AttributeValue>xxxxx</saml:AttributeValue>
</saml:Attribute>
<saml:Attribute Name="First name pronunciation key" FriendlyName="First name pronunciation key">
<saml:AttributeValue>xxxxxx</saml:AttributeValue>
</saml:Attribute>
<saml:Attribute Name="Email" FriendlyName="Email">
<saml:AttributeValue/>
</saml:Attribute>
<saml:Attribute Name="Address line 1" FriendlyName="Address line 1">
<saml:AttributeValue>xxxxx</saml:AttributeValue>
</saml:Attribute>
<saml:Attribute Name="Address line 2" FriendlyName="Address line 2">
<saml:AttributeValue>xxxxx</saml:AttributeValue>
</saml:Attribute>
<saml:Attribute Name="City" FriendlyName="City">
<saml:AttributeValue>xxxxx</saml:AttributeValue>
</saml:Attribute>
<saml:Attribute Name="Zip/Postal code" FriendlyName="Zip/Postal code">
<saml:AttributeValue>535002</saml:AttributeValue>
</saml:Attribute>
<saml:Attribute Name="Country" FriendlyName="Country">
<saml:AttributeValue>India</saml:AttributeValue>
</saml:Attribute>
<saml:Attribute Name="State/Region/Province" FriendlyName="State/Region/Province">
<saml:AttributeValue>AP</saml:AttributeValue>
</saml:Attribute>
<saml:Attribute Name="Home phone" FriendlyName="Home phone">
<saml:AttributeValue>1234567890</saml:AttributeValue>
</saml:Attribute>
<saml:Attribute Name="Work phone" FriendlyName="Work phone">
<saml:AttributeValue>1234567890</saml:AttributeValue>
</saml:Attribute>
<saml:Attribute Name="Other phone" FriendlyName="Other phone">
<saml:AttributeValue>1234567890</saml:AttributeValue>
</saml:Attribute>
<saml:Attribute Name="Fax" FriendlyName="Fax">
<saml:AttributeValue>1234567890</saml:AttributeValue>
</saml:Attribute>
<saml:Attribute Name="Web address" FriendlyName="Web address">
<saml:AttributeValue/>
</saml:Attribute>
<saml:Attribute Name="Candidate stacking field" FriendlyName="Candidate stacking field">
<saml:AttributeValue/>
</saml:Attribute>
<saml:Attribute Name="Employee ID" FriendlyName="Employee ID">
<saml:AttributeValue>1234567</saml:AttributeValue>
</saml:Attribute></saml:AttributeStatement>
</saml:Assertion>
</samlp:Response>
Internal Reference Azure Board # 53730.
Indeed Integration: Send disposition signals to Indeed
Starting with this release, users now have the ability to automatically send disposition signals to Indeed. This allows Indeed to receive updates about the hiring status of candidates, supporting the ongoing improvement of their AI matching models and job seeker experience.
Optional RAM Trigger Setup (Opt-In)
Important Note:
Creating a RAM trigger for this feature is entirely optional.
Only users who choose to create this trigger will send disposition data to Indeed.
Creating the trigger is considered an opt-in, signaling your organization’s agreement to share candidate hiring outcomes.
The data sent to Indeed is not shown on the candidate's experience page. Instead, it is used solely for internal AI training purposes to improve matching quality and platform accuracy.
A new text field has been added to the existing Indeed Integration Form in Workbench to store each job application's application ID received from the Indeed portal. This field is hidden by default from all user types.
DB Field Name: IndeedJobAppID
Field Label: Indeed Job App ID
Steps to create RAM Trigger to send disposition signals to Indeed:
Path: Workbench >> Tools >> Automation Manager >> Admin >> Add new trigger.
Create a new RAM Trigger by selecting HR Status as the triggering mechanism and select the dispositioned HR Status for the triggering item.
Indeed Standard Disposition Statuses : {NEW, REVIEW, LIKED, CONTACTED, SCREEN, ASSESS_QUALIFICATIONS, INTERVIEW, OFFER_MADE, BACKGROUND_CHECK, VERIFY_ELIGIBILITY, HIRED, NOT_SELECTED, OFFER_DECLINED, WITHDRAWN, INCOMPLETE, UNABLE_TO_MAP, POSITIVELY_SCREENED, ONBOARDED, JOB_CLOSED, JOB_INACTIVE} )
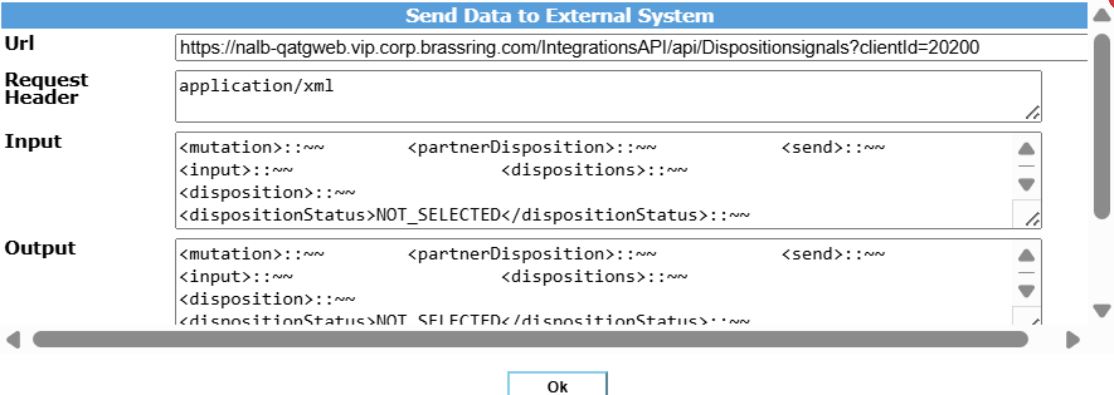
Add a rule, edit the rule and select actions tab, select Action type as 'Send Data to External System'
Add the below details in the selected action type
URL: Based on the environment, use the correct url.
Staging: https://stagingjobs.brassring.com/IntegrationsAPI/api/Dispositionsignals?clientId= {client_id}
US Prod: https://sjobs.brassring.com/IntegrationsAPI/api/Dispositionsignals?clientId={client_id}
EU Prod: https://krb-sjobs.brassring.com/IntegrationsAPI/api/Dispositionsignals?clientId={client_id}
Note : {client_id} - This should be replaced by the client’s Id in Brassring system.
Sample Data for RAM Trigger Rule (Action: Send Data to External System):
Request header: application/xml
Input:
<mutation>
<partnerDisposition>
<send>
<input>
<dispositions>
<disposition>
<dispositionStatus>HIRED</dispositionStatus>
<rawDispositionStatus>Hired</rawDispositionStatus>
<identifiedBy>
<indeedApplyID><SourceTypeIDField InstanceType="CandForm" InstanceId="{{FormType_ID}}" InstanceName="Indeed Integration Form" FieldName="IndeedJobAppID" StartPosition="0"></SourceTypeIDField></indeedApplyID>
</identifiedBy>
<atsName>Infinite Talent Brassring</atsName>
</disposition>
</dispositions>
</input>
</send>
<numberGoodDispositions></numberGoodDispositions>
<failedDispositions>
<identifiedBy>
<indeedApplyID></indeedApplyID>
</identifiedBy>
<rationale></rationale>
</failedDispositions>
</partnerDisposition>
</mutation>
Output:
<mutation>
<partnerDisposition>
<send>
<input>
<dispositions>
<disposition>
<dispositionStatus>HIRED</dispositionStatus>
<rawDispositionStatus>Hired</rawDispositionStatus>
<identifiedBy>
<indeedApplyID><SourceTypeIDField InstanceType="CandForm" InstanceId="{{FormType_ID}}" InstanceName="Indeed Integration Form" FieldName="IndeedJobAppID" StartPosition="0"></SourceTypeIDField></indeedApplyID>
</identifiedBy>
<atsName>Infinite Talent Brassring</atsName>
</disposition>
</dispositions>
</input>
</send>
<numberGoodDispositions></numberGoodDispositions>
<failedDispositions>
<identifiedBy>
<indeedApplyID></indeedApplyID>
</identifiedBy>
<rationale></rationale>
</failedDispositions>
</partnerDisposition>
</mutation>
Note: {{FormType_ID}} – Form type Id value of “Indeed Integration Form” candidate form for the client.
Save Action and Activate RAM Trigger.
Steps to Create a RAM Trigger for One HR Status
Precondition: Configure the HR Status in Workbench.
Login to Workbench.
Navigate to: Tools >> Automation Manager >> Admin >> Add New Trigger >> Trigger Name >> Trigger Type >>I Agree >>Save and Continue >>Select Trigger Mechanism >>Select Trigger Event >>Timing Mechanism.
Select the HR Status (e.g., 'Rejected').
Add a rule >>Enter Rule Name >>Save and Continue >>Actions >> Send Data to External System.
Enter the XML data, save the edits, and save the trigger.
Add a rule for the RAM Trigger: Edit the trigger >>Actions >>Select Action >> Send Data to External System.
Add the data as shown in the reference image.
Testing the Trigger:
Log in to Enterprise and select the Indeed Apply candidate.
Change the HR Status of the candidate to 'Rejected'.
Navigate to: Workbench >> Tools >> Automation Manager >>RAM/AM Log Files. Select the Trigger Name and click Search to view the logs for the candidate whose HR status you updated.
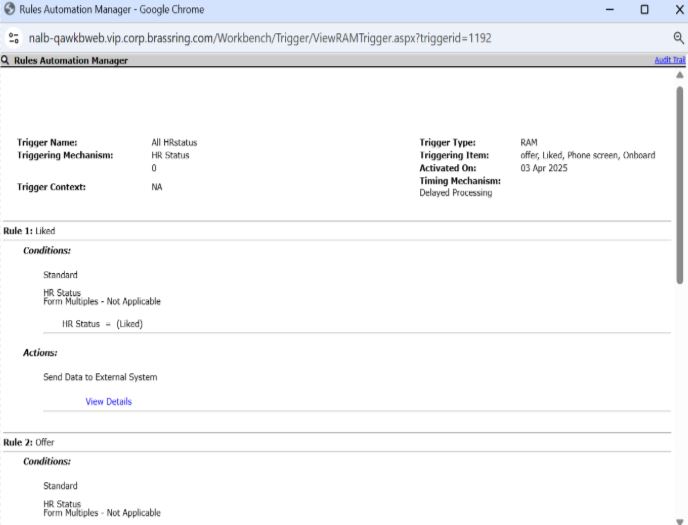
Creating a RAM Trigger for Multiple HR Statuses:
Steps:
Log in to Workbench and select the client from the list.
Navigate to: Tools >> Automation Manager >> Admin >> Add New Trigger >> Trigger Name >> Trigger Type >> I Agree >> Save and Continue >> Select Trigger Mechanism >> Select Trigger Event >> Timing Mechanism.
For HR Status: Select multiple statuses (e.g.: REVIEW, INTERVIEW, HIRED, OFFER_MADE). Add a rule >> Enter Rule Name >> Save and Continue >> Actions >> Send Data to External System. Enter the XML data, save the edits, and save the trigger.
Create rules for each HR status: Edit the rule and add a condition for each status (as shown in the reference image). If you configure 4 HR statuses, you must create 4 rules with their respective conditions.
The RAM Trigger should be created with the configured data. Once created, activate the trigger.
Log in to Enterprise and select the Indeed Apply candidate.
Change the candidate's HR Status (e.g., to 'Rejected').
Navigate to: Workbench >Tools >Automation Manager >RAM/AM Log Files. Select the Trigger Name and click Search to view the logs for the candidate whose HR status you updated.