- 04 Mar 2024
- 5 Minutes to read
- Print
- DarkLight
BrassRing Interview Manager Calendar Integration
- Updated on 04 Mar 2024
- 5 Minutes to read
- Print
- DarkLight
Abstract
BrassRing Interview Manager Calendar Integration
Outlook 365 is part of Microsoft Office 365 Suite, a cloud-based subscription service that allows organizations to create, communicate, and collaborate by using Microsoft tools. Infinite takes no responsibly for the content in third-party programs, and the process on this page might not accurately represent the Microsoft 365 system. Infinite is not responsible for the content on third-party websites.
Connecting to your Calendar
The Manage Schedules page in the Interview Manager module is used to select the interviewers for an interview and look up their real-time availability based on their Outlook calendar. The free or busy schedules can be viewed for any BrassRing user and those that have shared their calendars with the BrassRing user. The Connect your calendar allows the BrassRing user to log in to their Office 365 account and give consent to the BrassRing application to access the organization calendar.

Calendar Integration Configuration Types
BrassRing Calendar integration offers two types of Configuration:
Basic Configuration. BrassRing provides an inbuilt Office 365 app to validate the integration. It is only intended for testing and validating the integration by connecting to the organization’s Office 365 calendar, giving consent to the BrassRing app, and getting the free or busy schedule of the users in their organization.
Advanced configuration. For Production use, clients should register their own app in Microsoft Azure Portal and then enter the App Key and App Secret in Workbench. With the Advanced configuration, the client has an option to decide between User Consent or Admin Consent for the app.
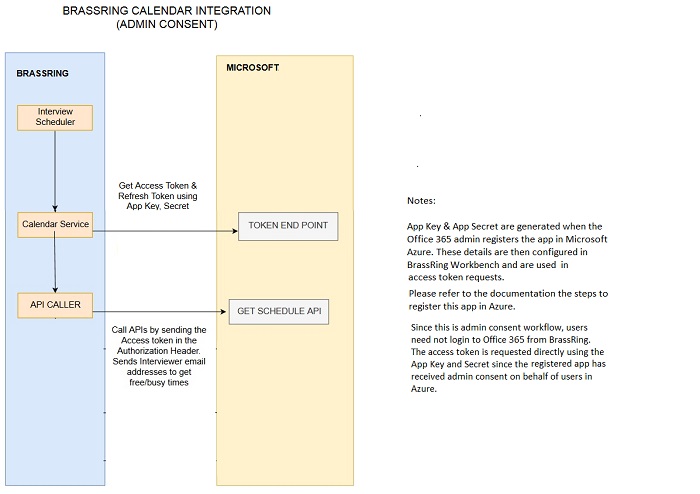
With Admin Consent the user is signed in to their Office 365 account by using their BrassRing user email ID and they can obtain the free or busy schedules of any user with the domain.
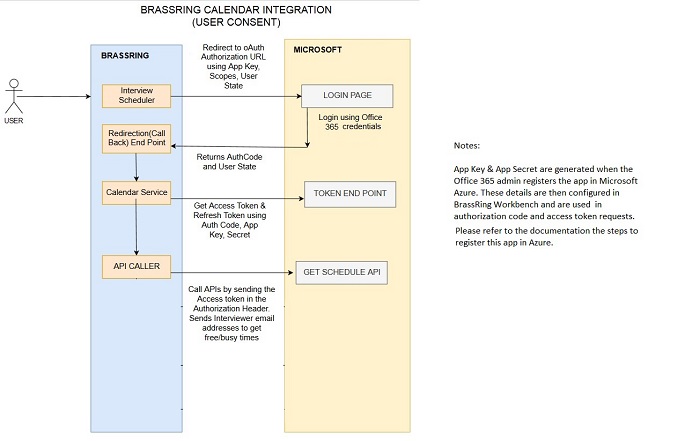
With User Consent, the users must sign in to their Office 365 account by using the Connect your calendar option and provide the consent.
Calendar Integration Authorization workflows:
BrassRing uses the app configuration details that are entered in Workbench and connects to Office 365 by using oAuth2 access tokens.
The User Consent Workflow:
The Admin Consent Workflow:
GetScheduleAPI Request/Response data
BrassRing uses the GetSchedule API (POST /{user}/calendar/getSchedule) from Microsoft Graph to get the free busy times for an Office 365 user. API documentation can be found here. This is the only API end point that BrassRing uses to get the free or busy information of an Office 365 user. The request to this API from BrassRing includes the list of email addresses for whom the free or busy schedule is being requested (this is usually the interviewers selected in the Manage Schedules screen).
Request Body Sample:
{ "schedules":["test@test.onmicrosoft.com"], "startTime":{"dateTime":"2019-11-19T00:00:00"}, "endTime":{"dateTime":"2019-11-25T00:00:00"} }The response from the API is the free or busy schedule of the requested users. This GetSchedule API response does not include the actual meeting body or any attachments. The list of possible data elements for a meeting are listed here.
Response Sample:
{ "@odata.context":"https://graph.microsoft.com/v1.0/$metadata#Collection(microsoft.graph.scheduleInformation)", "value":[ { "scheduleId":"test@test.onmicrosoft.com", "availabilityView":"0000000000000000000000000000000000000", "scheduleItems":[ { "status":"tentative", "start":{ "dateTime":"2019-11-19T19:00:00.0000000", "timeZone":"UTC" }, "end":{ "dateTime":"2019-11-19T19:30:00.0000000", "timeZone":"UTC" } ], "workingHours":{ "daysOfWeek":[ "monday", "tuesday", "wednesday", "thursday", "friday" ], "startTime":"08:00:00.0000000", "endTime":"17:00:00.0000000", "timeZone":{ "@odata.type":"#microsoft.graph.customTimeZone", "bias":300, "name":"Customized Time Zone", "standardOffset":{ "time":"02:00:00.0000000", "dayOccurrence":1, "dayOfWeek":"sunday", "month":11, "year":0 }, "daylightOffset":{ "daylightBias":-60, "time":"02:00:00.0000000", "dayOccurrence":2, "dayOfWeek":"sunday", "month":3, "year":0 } } } } ] }Sign-in experience when using Connect your calendar
Persona: BrassRing user (the interview coordinator or the recruiter)
Objective: To Schedule an interview and find available times for an interviewer.
Workflow:
Open the Manage Schedules page for the specific interview and select Connect your Calendar. This Button does not appear if Client is using Advanced Configuration with Admin Consent provided.

The Microsoft login page opens. This login URL can be configured in Workbench with the Advanced configuration. While the login URL is same most Office 365 tenants, some tenants have custom branding for this login page. For such cases, the login URL can be appended with whr query string parameter (ex: https://login.microsoftonline.com/common/oauth2/v2.0/authorize?whr=<tenant name in Azure>)
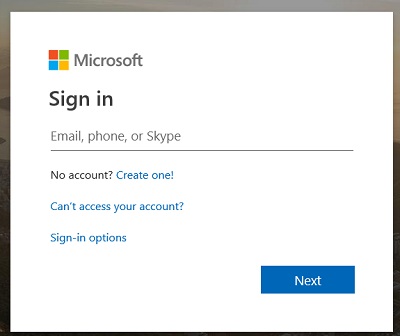
The user logs in by using their Office 365 account credentials.
A consent screen with the list of the permissions that are requested by the app opens. The user selects Accept.
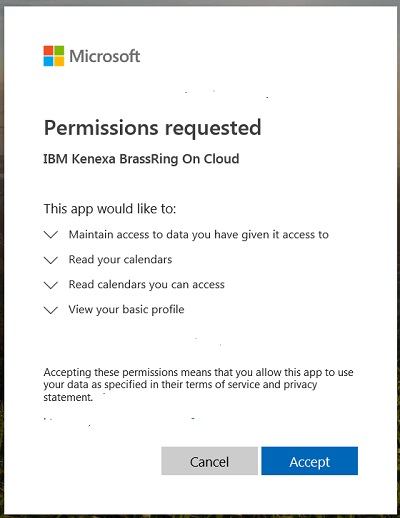
BrassRing receives an authorization for the user to access the Calendar by using an Access Token. This token is stored against the user profile for subsequent automatic logins.
BrassRing receives an authorization code from the provider (Office 365), which is then used to obtain an access token and a refresh token for the logged-in user. This access token is then used to call getSchedule end point of Microsoft Graph API. For this request, the access token is sent in the Authorization HTTP header. The request body includes the list of email addresses for whom the free or busy schedule is being requested. The response from the API is the free or busy schedule of the requested users.
The Manage Schedules page is populated with the schedule of the requested interviewers. The page button changes to Signed in to Office 365 Calendar with an option to Sign Out.

For every subsequent visit to the Manage Schedule page by this user or when any new interviewer added to this interview, BrassRing uses the saved access token to get the schedules of the interviewers selected for the interview. If the access token expires, the application automatically attempts to refresh the token for the by making a call to the token endpoint of Microsoft Graph by using the refresh token. If where tokens are invalidated or any conflict occurs, the user is prompted to sign in again.
Advanced configuration setup
For the advanced configuration setup, the Office 365 administrator of the client must configure an app in Azure Portal.
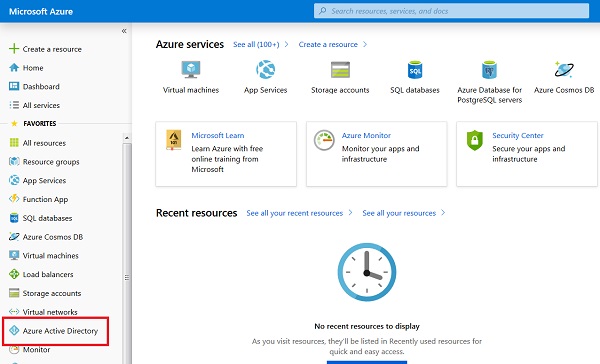
Log in to Azure Portal and select Azure Active Directory.
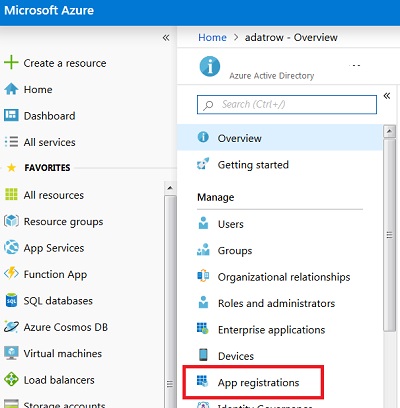
Select App registrations.
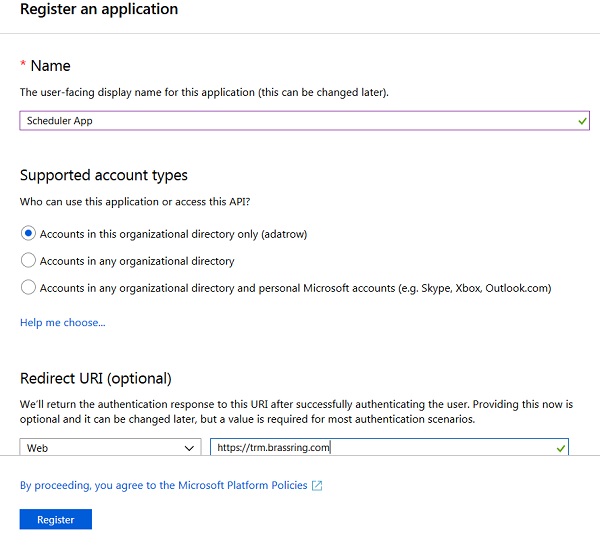
Select New registration.

Enter the details in the register application screen and select Register.
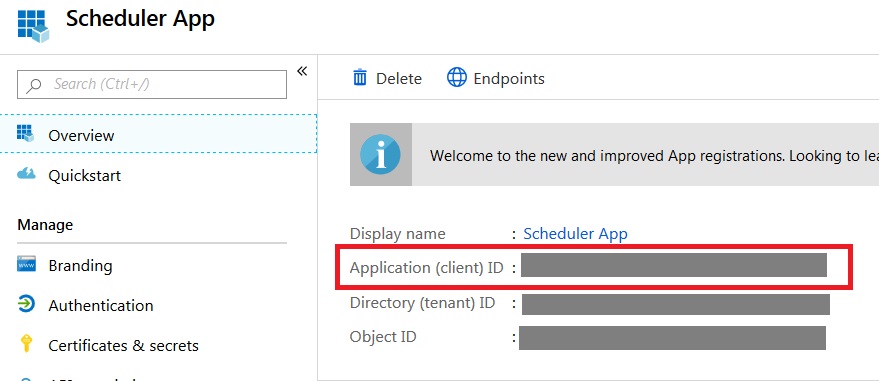
After the app is created, make a note of the Application (client) ID.
Select Authentication, enter the redirect URLs and select Save. These urls are specific to US-PROD and must be replaced with the corresponding environment’s Domain names.
https://trm.brassring.com/mobile/getcalendar
https://trmx.brassring.com/mobile/getcalendar
https://trmx128.brassring.com/mobile/getcalendar
https://trm128.brassring.com/mobile/getcalendar

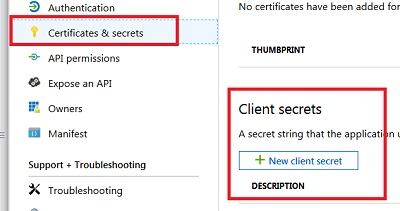
Select Certifications & secrets and then select New client secret.
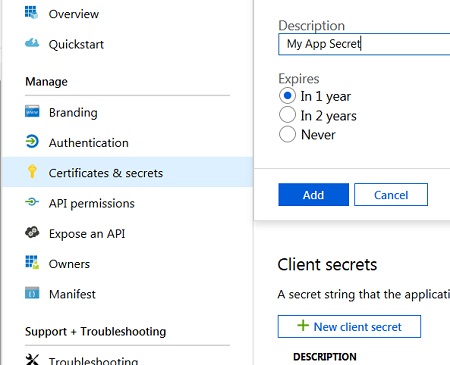
Enter a description and wanted expiration and select Add. After the client secret is created, note the value.
Select API permissions and then select Add a permission.
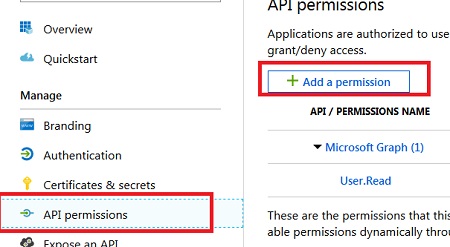
Select Microsoft Graph.

If this app is for the User Consent workflow, then select Delegated permissions.
To give Admin consent on behalf of all users in your organization, then select Application permissions.

Select Calendars → Calendars.Read.

After adding the permission, it is listed under the API permissions. For the admin consent workflow, select Grant admin consent to grant domain-wide consent.

Open Workbench and select Tools → Interview Manager → Calendar Configuration.
Select Advanced Configuration and Provider = Office 365.
Enter the client id and client secret values and enter the Advanced configuration attributes.
Select Test calendar connection button on this page to validate the calendar connection.
