- 16 Apr 2025
- 6 Minutes to read
- Print
- DarkLight
Common Service Integrations
- Updated on 16 Apr 2025
- 6 Minutes to read
- Print
- DarkLight
Abstract
Product: Workbench
Common Service Integrations
Common services indicates two partners, for example BrassRing and a vendor, are using a common schema to interact. This common platform allows for a more streamlined integration, which can be offered in a more cost effective and quick manor. While custom integrations require BrassRing engineers to write new scripts, common services already have a script written eliminating the need for engineer involvement during configuration. Types of common service integration include:
Background Checks.
Video Interviewing.
Work Order Tax Credits (WOTC).
Assessments.
Job Board Aggregators.
Contact your Infinite representative for an up-to-date list of vendors.
1-Step vs 2-Step
1-Step Overview
System users can trigger a preselected Background Check, Drug Screen or Video Interview by updating a candidate’s HR Status.
All necessary information is sent to the vendor and a real-time response is received by the user verifying Success or Failure.
If Successful, no further action is required. The vendor processes the request and sends back results when available.
If Unsuccessful, the user needs to undo the HR Status on the candidate and update the necessary form or field with the missing or invalid information (or might not be a valid user with the vendor). Then, the candidate can be updated to the HR Status again.
RAMs can also be used to initiate 1-Step integrations by updating the candidate to the applicable HR Status.
This integration type saves time when all of the details for the integration have already been collected within BrassRing.
1 Step Workflow:
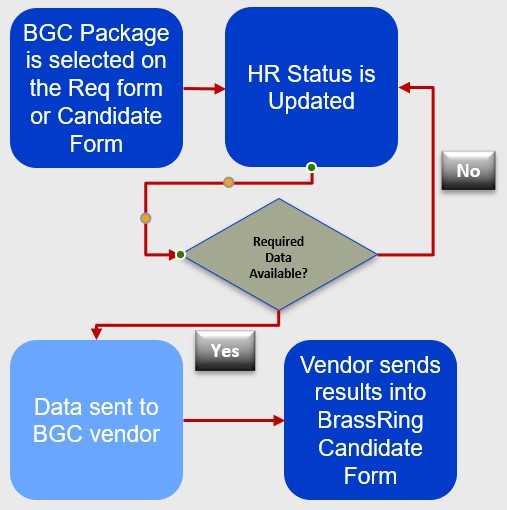
BCG Package is selected on the Req or Candidate Form.
HR Status is Updated.
If the required data is not available, the flow returns to the HR status update.
If the required data is available, the Data is sent to the BCG vendor.
The Vendor sends results into the BrassRing form.
2-Step Overview
Upon updating the HR status for a candidate, the Vendor user interface (UI) is shown and the system user will complete any additional information (such as package or account) before submitting the request.
RAMs cannot be used to initiated 2-Step integrations.
This integration type is useful when necessary details are not known in advance or are not collected within BrassRing.
2-Step Workflow
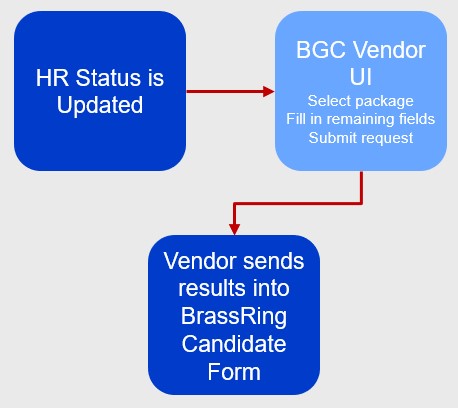
The HR Status is Updated
In the BGC vendor user interface, select the package and complete the remaining fields to submit the request.
The Vendor sends the results to the candidate form.
Configuration Steps
Enable the Client Settings
Client Settings can only be enabled by Infinite Representatives.
Enable the Common Service Integration Type Client Setting.

Enable the Power user edit access: Integrations - Administration Client Setting.

Access and Manage Subscriptions
Select Tools → Integrations → Administration..
A Candidate Export might be available.
If you do not see this Integration Type, select Actions → Add Integration type.
Select the Candidate export Integration Type and select Continue.
Ensure HR status is selected and Talent record launch is unchecked.
Select Save.
Select the Subscription admin icon.

In the Subscription administration – Candidate export screen, Common Service Candidate export Subscriptions that have been set up for your organization.
To manage existing Subscriptions, select the View Settings or Edit Settings icons as needed.
Select Actions → Add subscription to create a new subscription.
Select Actions → Subscription - Export to Excel to provide a template for subscription details.
Select a subscription, and select Actions → Save as New Subscription to create a new subscription copied from an existing.
Select Add subscription.
Select the Subscription tab and enter the following details:
Subscription Name: CLIENT_VENDOR_REQ. Same as Manifest Name.
Manifest Name: CLIENT_VENDOR_REQ. Same as Subscription Name.
Select Schema: HRXML 2.5 Common Service (Background Check, and so on).
Select req template: Standard Requisition. One Req per Subscription.
Custom candidate form for vendor results: You might need multiple forms if your vendor uses separate subscriptions for background and drug OR if you use multiple vendors. Consult your Infinite Representative for more details.
Notes: Optional; Version or History Notes.
Export: Code or Description. Vendor to specify.
UTF type: N/A. Preset.
Client message: Display response message (default) or Display vendor/host configured message. Vendor to specify.
Email error notification: None (default); Default email (System Admin); Custom email. Option to receive an email on error.
Error notification additional recipients: System Users. Option to add more system users to receive an email on error.
2xO Onboarding: N/A
Additional XSLT formatting: N/A
Order Details Link Use Logged in User ID: Check box. This should be checked for users to access the Results Link in the Results Form.
Export Country ISO Codes: Default; 2 Character ISO; 3 Character ISO. Vendor to specify.
Export State 2 Character ISO Codes: Vendor to specify.
Include Candidate Experience Month: If yes is selected, the work experience month data is included in the XML.
HR Status: Select the HR Statuses that trigger the export. HR Status or Statuses that initiate the integration.
Common Service Integration Type (Background Check, etc.): 1-step or 2-step. Depends on the Integration type available and wanted.
Select the Subscriber tab and enter the following details:
Select Vendor: List available of Common Service Background Check and Video Interviewing Vendors.
All Security & Transmission properties: N/A.
All Authentication properties: Vendor to specify.
Select the Mapping tab. The mapping fields information is provided by a vendor. Enter the following details:
Select export fields: Opens a window to select the fields from candidate forms, candidate profile, Req Standard, Req Custom, and User Profile fields to be included in the subscription to the vendor
Talent Record fields found as [Candidate info].
Talent Record State/Region/Province listed as [Candidate info]Location.
[User] fields pertain to the User initiating the transaction by using an HR Status update.
Document Sub Form (Offer Acceptance Form) fields are not available for mapping.
Include Education? and Include Experience?: Maps the Talent Record Standard Education and Experience fields to the vendor pre-mapped to the corresponding BGCs
All sends all supplied Education or Experience fields.
Most recent sends only the Education or Experience fields that are marked as most recent.
Selection of these Standard fields replace any manually mapped Education or Experience fields.
Select Map to map a field. The XML schema-mapping window opens.
Map all fields according to the vendor details.
Mapped fields change color when mapped.
All fields should be mapped before saving.
BGC## in green is the field being edited
BGC## in grey have been mapped to another field and are not available for selection
BGC## in black have not been mapped
The specific mapping details should be provided by your vendor

Select Add custom value to add custom tags or values. Any specific custom-mapping details should be provided by your vendor.
After all Subscription, Subscriber and Mapping information is complete, select Save as active to make immediately available.
After saving, warning message about Disabling SSL certification validation might appear. The SSL certificate validation settings for Common Service Integrations are pre-set and not editable by using the screens. This notification can be ignored by selecting Yes.
Troubleshooting Integrations and Reviewing the Integrations Dashboard
XML Integrations – Integration Tools
For XML Integrations, select Tools → Integrations → Integration Tools. Select Retrieve client posts to search XML logs for past transactions.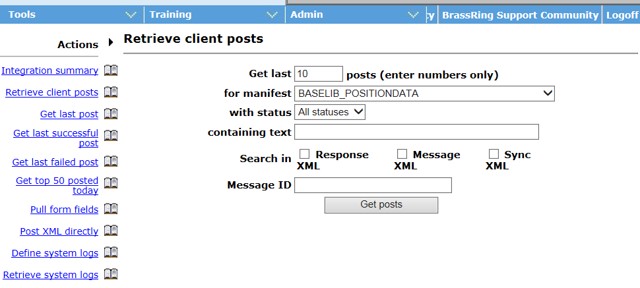
To access the integrations dashboard select Tools → Integrations → Integrations Dashboard. The Dashboard provides a comprehensive view of the integrations and transaction logs, including your Onboard integrations,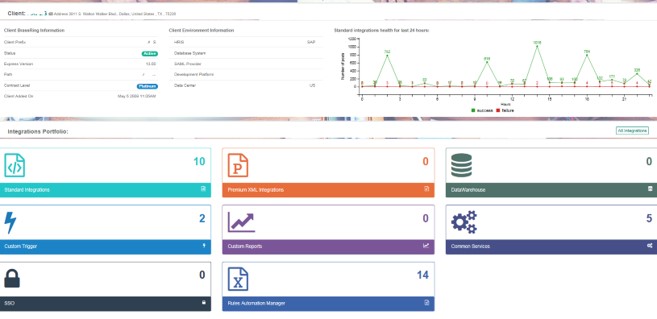
Premium XML Integrations
Premium XML Integrations are those where input data is provided over FTP in XML or Flat File format. Then, the data is transformed into XML and processed.

Custom Integrations
The Integrations Dashboard can be used to access specific Custom Trigger integrations and see individual transaction datetime, status, among other details.

SSO Integrations
The SSO Dashboard lists the client’s current certificates and their expiration dates. You can check if the expiration date is coming up. PSE requires 30 days heads up to staff a certificate change request.

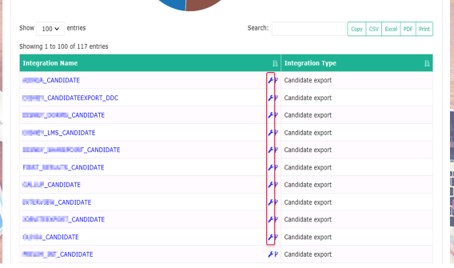
Candidate Export Integrations
The settings for candidate export integrations are viewable in the integrations dashboard.
Infinite Required Log Review
The following integration components require Infinite involvement as their logs are restricted to specialized tools.
Layer 7 (2-way SSL Certificate, TLS, XML Transformation).
Message Level Encryption (RSA, AES).
Talent Gateway profile Import.
