Abstract
Product: Workbench
Configure Lead and Campaign Fields
The process for configuring Lead and Campaign Fields is the same.
Lead Fields are the fields that store data about a Lead. As part of your implementation, the default Lead Fields were added to your system including; the Leads name, address, education, and employment fields. These fields are marked with a [STD] tag in their name.
Campaign Fields are fields that store data about a Campaign. As part of your implementation, the default Campaign Fields were added to your system including; the job title, benefits information, and created by details. These fields are marked with a [STD] tag in their name.
To add custom Lead Fields or Campaign Fields to the Lead or Campaign Profile, see Configure the Lead and Campaign Profiles documentation.

Relevant eLearning:
Process:
Access Lead or Campaign Fields
To access Lead or Campaign Fields, select Tools → Lead Manager.
Select Administer Lead Fields or Administer Campaign Fields.
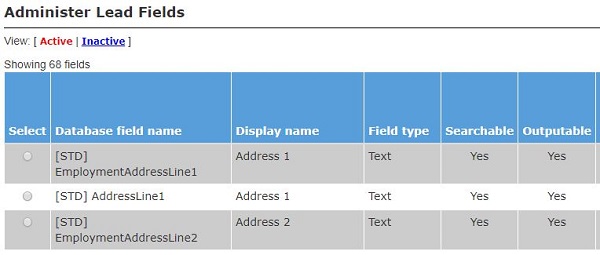
The Active Lead Fields or Active Campaign Fields appear in the table.
The table shows the field name in the Lead Manager database, the name that displays in Lead Manager, the type of field, and whether the field is searchable, outputable, and synced with Acoustic Campaign.
Fields that are marked with [STD] are standard fields that should not be edited or inactivated.
View Inactive or Active Fields
To view Inactive Lead Fields or Inactive Campaign Fields, select Inactive.
To view Active Lead Fields or Active Campaign Fields, select Active
Add New Fields
To add a new field, select Add New Field.
The Add New Field window opens.
Enter a unique name for the field in the database. For Lead Fields, this is the name of the field to add to Acoustic Campaign.
Enter a name for the field in Lead Manager. This is the name of the field that shows in Lead Manager.
To enter in field names in different languages expand the Field Name section, and enter the names in the languages needed.
Set the Field Type. The Field Type can vary the type of information that is inserted into Lead Manager. For example, a Lead name would be inserted into a Text Field. A date of birth would be inserted into a Date Field.
Optionally, select the User Types to hide this field from.
Optionally, select the User Types that cannot edit the field.
Select the User Types that are required to complete the field. To leave the field as optional do not select a User Type.
To select more than one user type, hold the Control [CTRL] key, and click the user types.
Select Save and Continue.
A confirmation message displays indicating that the field has been added successfully, select OK.
The Define Field Attributes page opens. Set the field length, search and output options for the Field.
For Lead Fields, check the box to synchronize the field with Acoustic Campaign. For the field to sync correctly you must access the database in Acoustic Campaign, and add the field to the database. The database field name must match exactly in both systems. For more information, see the Acoustic Campaign documentation.
Select Save to save the field.
A confirmation message displays indicating that the field has been updated successfully, select OK.
A confirmation message displays indicating that the Custom field has been added to the custom req fields, select OK. The new field appears in the list of fields.
Edit an Existing Field
To edit an existing field, select the Edit Field Attributes Pencil icon beside the field to be edited.

The Add New Field window opens. When editing a field, the Database field name cannot be edited.
Update the user types as required, and select Save and Continue.
A confirmation message displays indicating that the field has been updated successfully, select OK.
The Define Field Attributes window opens. Use the radio button to select whether the field remains as searchable, and outputable.
Select Save and Continue.
A confirmation message displays indicating that the field has been updated successfully, select OK.
A confirmation message displays indicating that the field has been saved, select OK.
Inactivate a Field
It is best practice to inactivate rather than delete a Field when the Field is no longer required.
To inactivate a field, select the field to be inactivated.
Select Inactivate.
A notification appears stating that the field might be currently in use. Select OK to inactivate the field, or Cancel to leave the field active.
A confirmation message displays indicating that the field has been inactivated, select OK.
Delete a Field
It is best practice to inactivate rather than delete a Field when the Field is no longer required.
To delete a field, select the field to be deleted.
Select Delete.
A notification appears stating that the field and all associated data will be permanently deleted from the system. Select OK to delete the field or Cancel to leave the field active.
A confirmation message displays indicating that the field has been deleted, select OK. The field no longer appears in the list of Lead Fields.