- 28 Feb 2024
- 5 Minutes to read
- Print
- DarkLight
Configuring Create New Hires
- Updated on 28 Feb 2024
- 5 Minutes to read
- Print
- DarkLight
Abstract
Onboarding managers with access permissions can create new hires directly within the Onboard Manager application.
Onboarding managers use the Create New Hire button on the My Tasks page in Onboard Manager. This launches the Create New Hire page and onboarding managers can complete all the required* fields and maybe optional fields and then save. Once the new hire logs onto Onboard, the hire will appear on the Currently Onboarding page in Onboard Manager as a part of the new hire list.
Note
Previously, Talent Suite supported only the editing of personal information of a new hire that had been imported into the Talent Suite via integration with the Onboard Configuration application or the BrassRing application.
Figure 47. Create New Hire button
Figure 48. Create New Hire page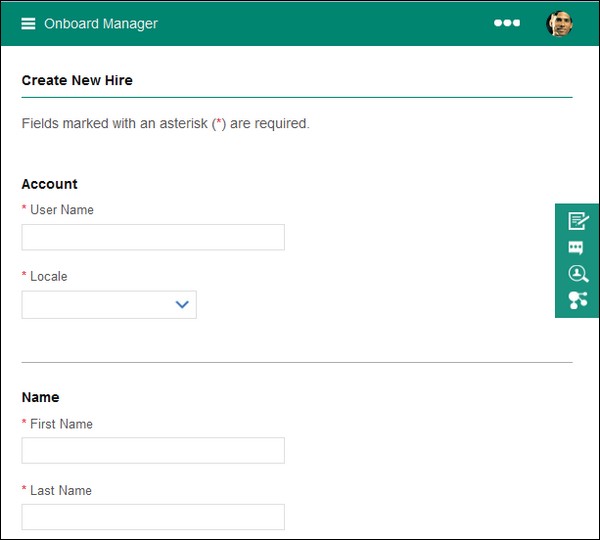
Create New Hire Configuration
Abstract
This feature is based on permissions. By default, capabilities are enabled for the hiring managers.
To switch back to Onboard Configuration (and view the Applicants category), go to the Manage Users: User Type screen, and select the Show Legacy Capabilities check box.
Note: There is no need to switch back to Onboard Configuration. The New Hire Management category contains all needed functionality.
In the Global Toolbar, display the Settings menu and then select Settings.
Select the Users tab.
Display the Show drop-down list and then select User Types.
Select the desired User Type from the User Type list pane to display the Manage Users: User Type page.
Select the New Hire Management link.
Figure 49. Create New Hire
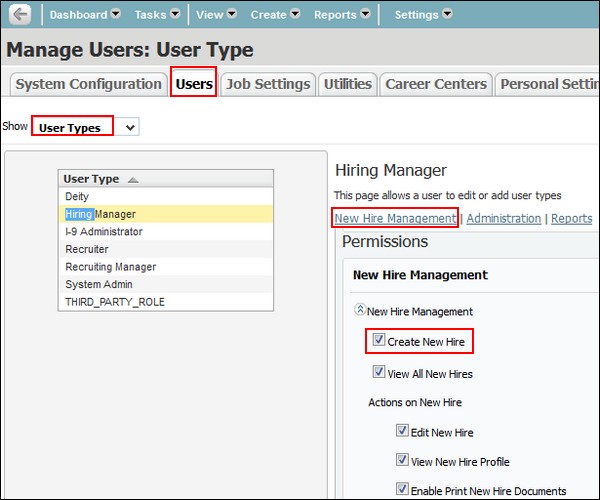
Select the Create New Hire check box.
Select the Save
 icon to save changes.
Assign Capabilities - New Hire Management
Abstract
Administrators must assign the following capabilities to allow a selected user type to see the Create New Hire button and proceed to create new hires.
Infinite Talent Acquisition Suite user type permissions are regrouped under a single category, New Hire Management. The single category enables configuration engineers to identify and enable required Onboard features easily for clients.
Previously, on the Manage Users: User Type screen, there were the following seven permissions categories: Job Requisitions, Applicants, Administration, Screens & Assessment, Activities, Tasks, and Reports.
Now, there are three permissions categories: New Hire Management, Administration, and Reports.
Reports and Administration settings remain common to both the Talent Suite and Onboard Configuration applications.
On the System Configuration: Manage System Settings screen, in Onboard Settings, the Enable Talent Suite Configurations check box must be selected to display New Hire Management.
To switch back to Onboard Configuration (and view the seven permissions categories), go to the Manage Users: User Type screen, and select the Show Legacy Capabilities check box. Note: There is no need to switch back to Onboard Configuration. The New Hire Management category contains all needed functionality.
The Assign Capabilities configuration is performed as follows.
In the Global Toolbar, display the Settings menu and then select Settings.
Select the Users tab.
Display the Show drop-down list and then select User Types.
Select Admin from the Settings pane to display the Admin settings page.
For new hire management, select the New Hire Management link.
Figure 50. New Hire Management
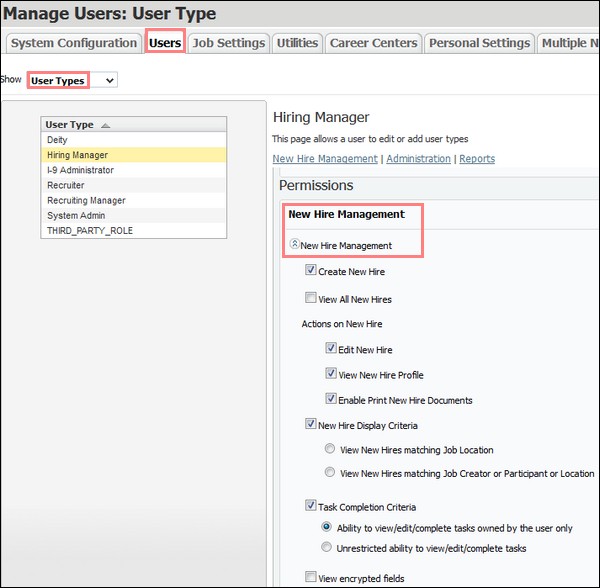
To enable the (Create New Hire) capability, select the Create New Hire check box.
To enable an Include All Hires check box as a filter in the Currently Onboarding screen in Onboard - Manager, select the View All New Hires check box.
To enable the (Print New Hire Documents) capabilities, which allows document attachment, select the Enable Print New Hire Documents check box.
To enable the (View and Edit New Hires) capabilities, select the View All New Hires check box and the Edit New Hire check box.
To enable the (View New Hire Profile) capability, select the View New Hire Profile check box.
To enable the (New Hire Display Criteria) capability, select the New Hire Display Criteria check box, and select the View New Hires Matching Job Location option or the View New Hires Matching Job Creator or Participant or Location option.
To enable the (Task Completion Criteria) capability, which controls access), select the Task Completion Criteria check box, and select the Ability to View/Edit/Complete Tasks Owned by the User Only option or the Unrestricted Ability to View/Edit/Complete Tasks option.
Select the Save
 icon to save changes.
Configure Mandatory Create New Hire Fields
Abstract
Mandatory fields configured on the Create New Hire page are as follows:
Account
User Name (needs to be unique)
Locale
Name
First Name
Last Name
Email
Work Email
Job Details
Job Req.
Employment Start Date
Create New Hire Profile
Date of Birth
Note
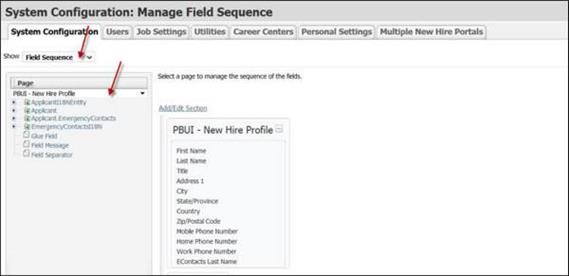
Other optional fields can be added through System Configuration: Manage Field Sequence.
In the Global Toolbar, display the Settings menu and then select Settings.
Select the System Configuration tab if not already selected.
Display the Show drop-down list and then select Field Sequence.
Figure 51. Configure New Hire Profile fields
Note
Fields on the Create New Hire Profile page are not exportable.
Important
Talent Suite does not allow duplicate users with same user name and email address to be created. This applies to a user that exists as a new hire and/or a hiring manager.
Additional fields that are configured on the Create New Hire Page screen must follow the validation rules set in the Manage Labels and Custom fields section. (for administrators)
Users that are allowed to create a new hire need to also be able to select an open job to create a new hire.
In drop-down lists, keep your options to 35 characters (including spaces) or less to avoid truncation. If more than 35 characters (including spaces) are needed, it is recommended to use radio buttons.
Configuring Edit New Hire Start Date
Abstract
An onboarding manager can update a new hire's start date.
USE IN ONBOARD MANAGER
An onboarding manager who has the privilege to edit the start date:
Selects a pointer icon by a hire name on the Currently Onboarding or My Tasks pages. This displays a menu containing various selections, including a new Job Information menu item:
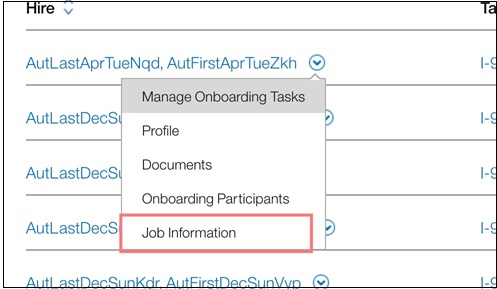
Selects the Job Information menu item to display a new Job Application page with the following columns:
Job Application Name (read-only)
Onboard Start Date (read-only)
Onboard End Date (read-only)
New Hire Start Date (capability driven, per job application). This start date is either a:
Link if an onboarding manager user has the privilege to edit AND if Onboarding End is not complete.
Read-only field.
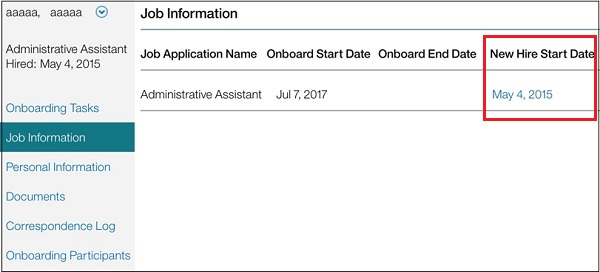
Selects the link in the New Hire Start Date column to open a pop-up with the start date value auto-populated.
Updates the new hire start date and selects Save. Note: The start date cannot be earlier than the current (today's) date.
The updated start date is applied across all the activities for that job application for the new hire.
CONFIGURATION
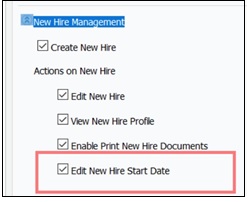
For Users tab > User Types, on the Manage Users: User Type screen, there is an Edit New Hire Start Date check box in New Hire Management.
By default, the check box is not enabled. You must select it to enable the feature.
For existing user groups, to update the start date you must either configure Edit New Hire Start Date or create a new user group.
Edit New Hire Start Date check box:
