Abstract
Do you have new or modified Onboarding forms to present to your new hires and need to understand how to prepare and configure the form in the Onboarding system?
MANAGE AND EDIT FORMS
The Onboarding system allows organizations to prepopulate Onboarding data into PDF form fields. You can also upload other form formats to be displayed as an informational attachment (without field mapping). All Onboarding forms need to be associated with an activity and added as a workflow attachment in order to be available to users (New Hire/HR users).
If the form is a mapped PDF, you will first need to create a writeable PDF version of the form, and name the form fields. This requires the user to have a full version of Adobe Acrobat (or other software that can create/edit PDFs) installed.
Please also refer to Adobe Writer system documentation or online help for more detailed instructions on writing Adobe PDFs.
BASIC PDF WRITING/FORM MARKUP INSTRUCTIONS
Marking Up a New Form (Initial Markup)
Open the PDF form, and select Tools/Edit.
If the form has not been marked up previously, you will be prompted with the following message, indicating that no form fields have been detected: [Currently, there are no form fields in this PDF. Do you want Acrobat to detect form fields for you?] Select either:
Yes. Form will prepopulate with prenamed fields based on Adobe’s ability to detect where fielded data is supported.
No. Form will be placed in Edit mode. No fields will be automatically added. Instead, all fields must be manually added by selecting Add New Field.

Best Practice: Use simple naming conventions with no spaces. Enter underscore (_) where a space would normally be (for example, First_Name).
Field Types (Text Field and Check Box)
Other field types are available but only Text Field and Check Box fields are needed for Onboarding form mapping functionality.
Check Box fields must be named using [cb_] (for example, cb_checking and cb_savings):
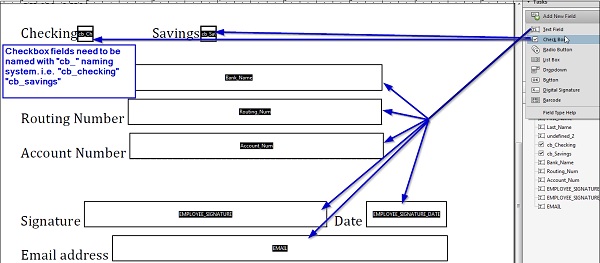
Some fields require specific naming in order to be correctly auto populated with applicable data. The following table shows applicable required field names.
Table 28. Required Field Names
PDF Field Name (Standard Naming Rules) | Description |
|---|---|
EMPLOYEE_SIGNATURE | Automatically prefills the Employees electronic signature (collected on generic form activities) |
EMPLOYEE_SIGNATURE_DATE | Automatically prefills the date that each form is electronically signed |
EMPLOYER_SIGNATURE | Automatically prefills the assigned users electronic signature (collected on generic form activities). For example, Recruiter, Hiring Manager. |
EMPLOYER_SIGNATURE_DATE | Automatically prefills the date that each form is electronically signed by a system user. For example, Recruiter, Hiring Manager. |
SOCIAL_SECURITY_NUMBER | Required naming convention to display an unencrypted SSN. If any other naming is used, the SSN appears encrypted to the end user. |
Once the PDF form markup is complete (all desired data elements have been provided with a PDF field and named accordingly), you are ready to configure a form.
FORM CONFIGURATION
Go to: Settings > Job Settings tab > Show statement > Forms > Manage and Edit Forms screen.
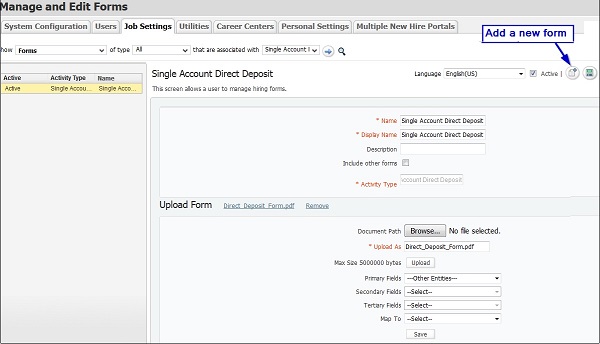
Add a New Form
Select the Add New Form icon to display empty fields for adding a new form.
Enter the Name and Display Name of the new form.
Enter the Activity Type (activity name) for this form to be associated with.
Specify the Document Path (or Browse and attach).
Select Upload to upload the form version. If the upload was successful, the form name will display in the Upload Form display, shown as a link to the actual .pdf document.
Select the Save Form icon.
Note: To associate a document other than a PDF form with an activity or correspondence template, you would follow the same steps above. You will not need to move on to the next set of instructions, as field mappings are not supported on other document types.
Refer to the Onboard Configuration Reference Manual for a description of each field.
Map Text fields (PDF Forms Only)
The following are the steps to map one field. Repeat per field mapping required.
Display the Primary Fields drop-down list, and select the field entity (Field Class from the Labels and Custom field’s configuration). If the field data:
Is collected on the associated Activity Type, those fields will be available for selection in the Primary Fields drop-down.
Is not collected on the Activity Type, select the Entity from the Primary Fields drop-down, and then move to the next step.
Display the Secondary Fields drop-down and select the system field you wish to map to this form. All available fields will display from the applicable Primary Field Entity selected in the Step 1.
Display the Map To drop-down list, and select the form field to which you want to map the system field.
Select the Save button by the Map To drop-down list to save the current mapping designation. Once this mapping is saved, the mapping information displays.
Repeat these steps for each additional field mapping required.
Select the Save Form icon.
Map Check Box Fields (PDF Forms Only)
Display the Primary Fields drop-down list, and select the field entity (Field Class from the Labels and Custom field’s configuration). If field data:
Is collected on the associated Activity Type, those fields will be available for selection in the Primary Fields drop-down.
Is not collected on the Activity Type, select the Entity from the Primary Fields drop-down, and then move to the next step.
Display the Secondary Fields drop-down, and select the system field you wish to map to this form.
Display the Map To drop-down list, and select the form field to which you want to map the system field.
Select the Save button by the Map To drop-down list to save the current mapping designation. Once this mapping is saved, the mapping information displays.
A Map Field hyperlink is added for the field.
Select the MAP Field hyperlink to display the Data Mapping For Check Box callout window. Use this callout window to specify the values for which the check box will be enabled (selected) in the form field.
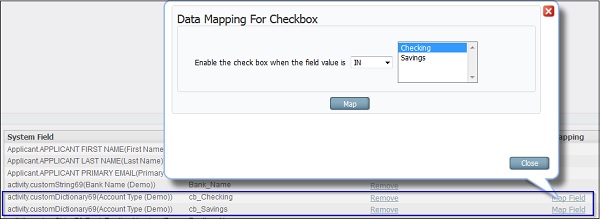
Within the Data Mapping For Check Box callout window, the Enable the Check Box when the Field Value Is field contains two values in its down-down:
IN: Specifies that the check box will be selected for the value selected in the adjacent box.
NOT IN: Specifies that the check box will be selected for the values that are not selected in the adjacent box.
Select the Map button. Note: If using the IN option for multiple check boxes, you must map the field for each check box and select only a single value in the list box. For example, you would map once using the combination IN Checking; map a second time for the combination IN Savings.
Repeat these steps for each additional field mapping required.
Select the Save Form icon.
Modify an Existing Form
Use the Show statement to filter the list of forms displayed in the list pane.
Select the name of the form you wish to modify. The details of the selected form display (Field Mappings and hyperlink to Uploaded form).
Map additional fields, if necessary.
Remove mapped fields by selecting the Remove hyperlink.

Delete a form (if it is not currently in use).
Best Practice: If a form cannot be deleted, you can inactivate it to prevent it from being used inadvertently. To inactivate a form, clear the Active check box.
ANNUAL FORM UPDATES (New PDF version, keep existing field mappings):
Organizations often have form versions updates on an annual basis. If you have a newly updated form version, but the field mappings need to remain unchanged, perform the following steps to retain existing mappings and prevent field mapping rework.
Copy fields from an existing form to the clipboard:
Use the Show statement to filter the list of forms displayed in the list pane.
Select the name of the form you wish to modify.
Select Upload Form hyperlink to open the current version of the form in use.
Place the form in Edit Mode (Tools/Edit).
Once in Edit Mode, right-click the PDF and choose Select All. All form fields should show as selected.
Right-click again, and choose Copy (or Ctrl C).

Paste fields from Step 1 onto a new PDF form version:
Open the PDF version of the form you wish to update.
Place the form in Edit Mode (Tools/Edit).
When prompted with the message [Currently, there are no form fields in this PDF. Do you want Acrobat to detect form fields for you?], select No.
Paste (Ctrl V) form fields from the clipboard (Fields from step 1) onto new PDF version, and rearrange/realign fields appropriately on the PDF.
Save your newly edited PDF file.
Specify the Document Path (or Browse and attach the newly saved version).
Select Upload to upload the form version. If the upload was successful, the updated form name will display in the Upload Form display, shown as a link to a document.
Double check all field mappings and make any applicable modifications.
Select the Save Form icon.
BASIC WORKFLOW CONFIGURATION REGARDING FORM ATTACHMENTS
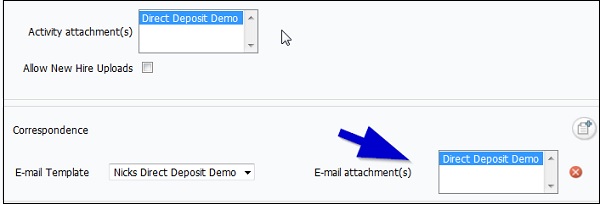
When you create a workflow step using an activity type that contains an associated form attachment, the document will become available to be selected as an attachment for the activity. Different activity types will display forms differently.
GENERIC_FORM: This TS Template Type will display the form to the new hire for eSignature/Date OR a non eSignature confirmation.
NO_TEMPLATE: This TS Template Type will display the form as an attachment available in the Related Documents section within the Talent Suite activity screen.
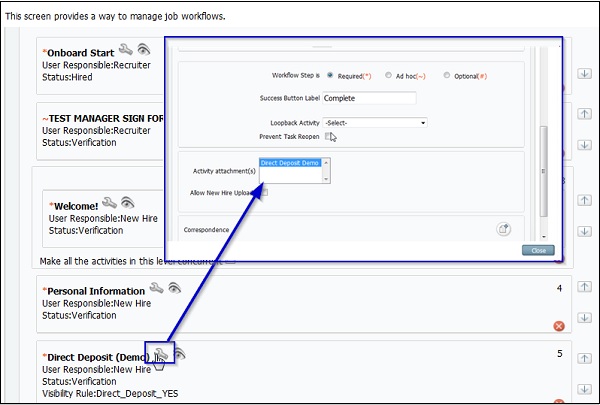
If a correspondence template is also associated to that same activity type, the document will also be available to be selected as an Email Attachment.
Note: It is always recommended to complete ALL form maintenance in your Staging environment and complete testing to confirm all form display and data mapping actions are correct before moving configurations into the Production environment.