- 28 Feb 2024
- 2 Minutes to read
- Print
- DarkLight
Configuring Onboard Manager so Users Can Access/View Reports
- Updated on 28 Feb 2024
- 2 Minutes to read
- Print
- DarkLight
Abstract
Onboarding managers with access rights can view reports by selecting the Reports link from the Onboard Manager navigation menu.
Access to Reports in the Onboard Configuration application is based on configuration.
Figure 68. Report link in Onboard Manager navigation menu (launching Onboard Configuration application)
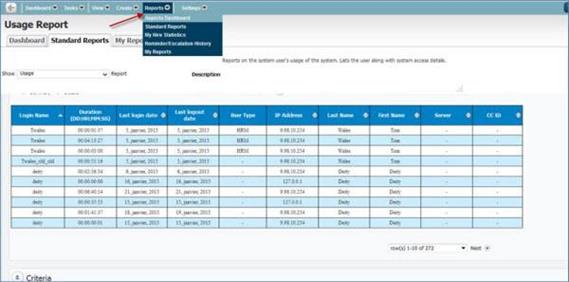
Once onboarding managers select the Report link, they are logged onto the standalone Onboard Configuration application, and the reporting tool is available for use.
Figure 69. Access Reports (Global Toolbar)
Note
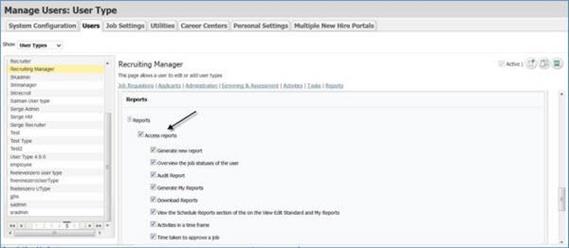
Access to the reporting tool will depend upon the logged in user's capability status which is configured in the Reports section of the User Types screen as shown in the following figure.
Figure 70. Access Reports Permissions
Note
By default, the Reports setting is turned ON.
In the Global Toolbar, display the Settings menu and then select Settings.
Select the Users tab.
Display the Show drop-down list and then select User Types.
Select the desired User Type from the User Type list pane to display the page for the User Type selected (for example, Recruiting Manager).
Scroll to the Reports section.
Select the Access Reports check box and then select the check box(s) for the applicable types of reports for that User Type.
Select the Save icon
 to save changes.
Once reports are configured, onboarding managers do the following to access reporting: Onboard Manager > Report link > standalone Onboard > Reports > My Reports tab.
Configure all columns and fields as required, then run the report. Note: When working with My Reports, selecting any custom/ad hoc report titles from the Show statement (such as any custom reports created by the logged in user) displays the report in the edit mode by default. It's suggested to use the Run Report button to load the report data faster. Use the Save and Run button to change reporting fields, or to reschedule the report. Custom reports are editable only by the creator of the report.
Create/export I-9 acceptable receipts report. When new hires provide a receipt as a placeholder for their pending List A/B/C documents, this information is now exportable and reportable. Onboarding managers with reporting permissions can create new reports or update existing reports. To utilize I-9 acceptable receipts reports, onboarding managers use: Report menu item in Onboard - Manager > Onboard > Reports > My Reports tab > Content and Sort Selection pane > Choose Fields to Add to Report field > Receipt (ReviewDocument).
Schedule report time. Reports can be scheduled not just at the client level, but also at the report level in My Reports. For all reports, the Schedule is copied from System Settings by default. Onboarding managers can change the Schedule setting on a report-by-report basis. Onboarding managers can schedule reports to run daily, weekly, monthly, once, or not at all. If they choose daily, weekly, monthly, or once, then they can further select a report processing time. To schedule report time, onboarding managers use: Report menu item in Onboard - Manager > Onboard > Reports > My Reports tab > Schedule Report pane > Schedule field.
