Abstract
Product: Data Insight Tool
Create A New Report
There are two ways to create a new report in Data Insight Tool:
Create a New Template creates a new blank template.
Copy Template creates a new template with the settings from the existing template. Copying a template is useful if the new report has minor differences between the existing report, and the existing report is still needed.
The Data Insight Tool is replicated three times per day. Depending on when you run the report, results might not reflect the previous 8 hours of activity within the system.
Data Insight Tool refreshes are affected by Daylight Savings time changes. Data is refreshed at 12am , 8am , and 4pm EST during Winter Time, and 1am, 9am, and 5pm EDT during Summer Time.
Relevant eLearning
Process
Create A New Report.
Select Create New Template, or select a template, and select Copy Template.
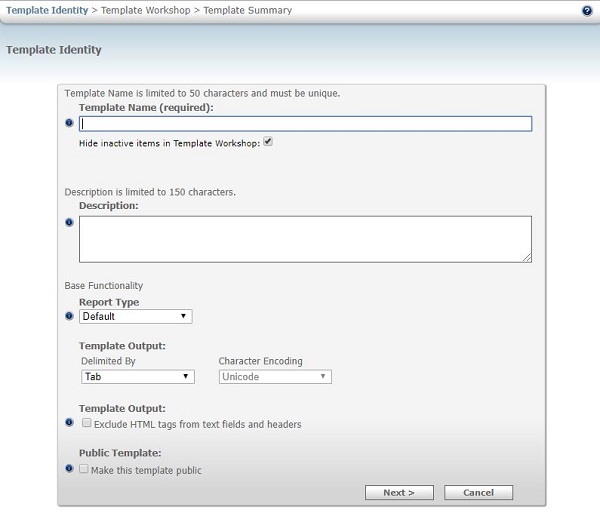
Insert a unique template name and description in the Template Identity window.

The Hide inactive items in Template Workshop field is checked by default. If you need to filter off of options or items that were inactivated in your system, uncheck this box. Note that once you move past this screen you cannot go back and change this checkbox selection. Also, when copying a template you cannot change this selection. If the need arises to filter an existing report on inactive values then a new report template would have to be created to deselect the Hide inactive items in Template Workshop field.
Set the Report Type by using the pull-down menu. The Report Type filters reports in the functional area selected. The Default report type generates reports with current functions.
The Requisitions report type returns all req rows regardless of whether candidates are attached to a requisition or not.
The Working Folder report type returns all folder rows regardless of whether there are any candidates in the folder.
The Default report type generates reports with current functions.
Typically, the Report Type of Default is used when building reports in the Data Insight Tool.
Set the Template Output requirements.
Delimited by: Tab or Comma delimited. Comma delimited may be more useful to use for reports that is sent to an SFTP site.
Character Encoding: Selectable if Comma delimited is selected. Options include Unicode and ANSI.
Exclude HTML tags from text fields and headers: If your organization uses HTML tags in text fields or headers of forms, you might want to check this box. For example, HTML tags in a Job Description can be automatically removed, making the output of the report easier to read.
Check Make this template public if other users in your organization require access to this report. If Public Template is unchecked, only the user that creates the report has access to it.
Select Next.
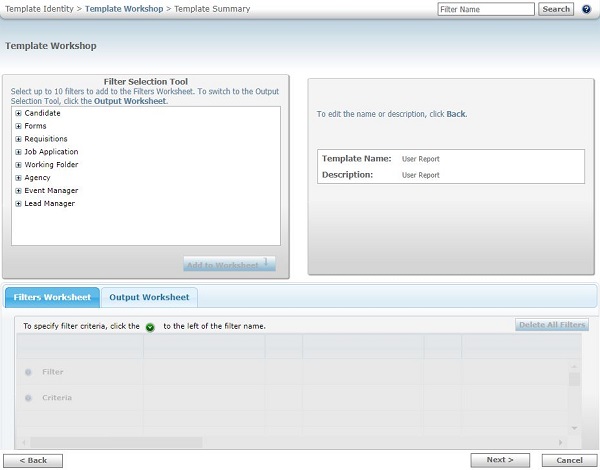
The Template Workshop opens. Select up to 10 filters to be added to the Filters Worksheet.
Filters and Outputs can be added for Candidate, Forms, Requisition, Job Application, or Working Folder fields. Filters and Outputs for Agency Manager, Event Manager, and Lead Manager can be added if the report is being run on these programs.
Choosing the correct filter fields is critical.
Filters and Outputs can be searched by using the search box.
Filters and Output fields are added to the worksheet in the order in which they are selected.
The more filters that are added to a report, the narrower your report results.
It is recommended to select at least one filter field when creating a report.
Selecting the appropriate filters allows the user to get the report promptly, and reduces any chance of delays.
Filters are Static or dynamic. A dynamic filter is a filter with no filter criteria selected for it. Criteria must be selected before the report is run. This reduces the amount of time that would be needed to edit the report each time the filter needs to be adjusted.
To create a static filter, use the down arrow to add Criteria to the filter value. Select the criteria, and select Save.

Select Add to Worksheet.
Select Output Worksheet and select the Output files.
Select only the required Output fields.
You must select at least one output field.
You can select a maximum of 75 fields.
You cannot select the same field twice.
You can add one or several fields at a time.
Selecting a large number of output fields can result in the report taking more time to run.
Select Reorder Columns to change the order of the columns on the output.
Note
Your content goes here
Cross-functional output fields can delay the report generation. For Example:
Candidate Name and requisition ID are cross functional fields as they are not in the same functional group.
Job title and Job Description are NOT cross functional fields as they are from the same Requisitions group.
Select Add to Worksheet.
Customize the output field’s name by clicking in the New Name section and typing the new name.
Select Next.
The Template Summary opens. Review the summary and select a save option by using the pull-down menu.
Your organization might be configured to deliver the report by using an FTP server, and have a Delivery Type: FTP. If your organization has multiple FTP sites, you might have to select the specific FTP site for delivery.
Select Save to save the template, or Back to make further changes.
The template is created.
Edit Existing Reports.
Select the report, and select Edit Template.
Update the template name, description, Base Functionality and outputs as needed in the Template Identity window.
Select Next.
The Template Workshop opens. Add or remove filters and outputs as needed.
To remove filters or outputs, select the field name X.
If adding new filters or outputs, select the filters or outputs, and select Add to Worksheet.
Select Next.
The Template Summary Opens. Review the summary and select a save option by using the pull-down menu.
Select Save to save the template, or Back to make further changes.