- 28 Jun 2024
- 8 Minutes to read
- Print
- DarkLight
Create and Manage Interviews
- Updated on 28 Jun 2024
- 8 Minutes to read
- Print
- DarkLight
Abstract
Create and Manage Interviews
Create and Manage Interviews
Interview Manager can be enabled in BrassRing on Cloud to manage candidate interviews.
Interview Manager can be used to create 1 on 1, Series, and Panel Interviews. All interviews in Interview Manager are for a single candidate.
1 on 1 interviews involve a single interviewer.
Series interviews involve several, consecutive interviews with different interviewers.
Panel interviews involve a team of interviewers, all participating in the same time slot.
Interview Formats that can be used include:
Phone: For phone call interviews.
Video: For video call interviews where the candidate is required to appear on-screen.
Text/Chat: For a text-only interview that uses a text service.
In person: For interviews where the candidate must attend on-site.
Other: Insert the interview format into the Interview Details.
The interview details update depending on the interview format selected.
Processes:
Create a 1 on 1 Interview
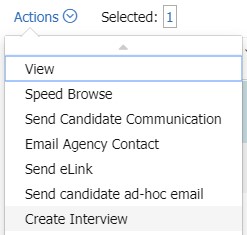
From a list of candidates in a req, select a candidate and select Actions → Create Interview. Alternatively, open a candidate’s Talent Record from within a req and select Actions → Create Interview.

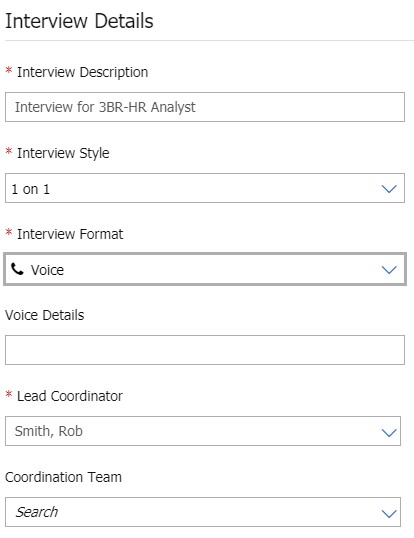
The Create Interview window opens. The Interview Description is prepopulated with the req number and job title. Edit the Interview Description if needed.

Select 1 on 1 for Interview Style.
Select an Interview Format.
Insert the details of the interview.
Select a Lead Coordinator. This field uses the type-ahead feature. Insert the first few letters of the lead coordinator’s name, and select the lead coordinator from the list provided.
Select the members of the Coordination Team. This field uses the type-ahead feature. Insert the first few letters of the coordinator’s name, and select the coordinator from the list provided.
Multiple coordination team members can be added.
Coordination team members must be selected and appear in the coordination team section to be included. Entering a coordination team member’s name in the field and not selecting it, does not include the team member.
To remove any selected team members, select the x icon for that coordinator.
Set the Schedule of the interview. Interview schedules can be confirmed by interviewer availability, candidate availability, or a date and time can be selected.

To review the interviewer’s availability before proposing times to a candidate, select Verify interviewers availability first.
Select Ask for candidate availability first to coordinate the best interview time for the candidate within a certain date range.
Select a Date Range for the candidate to choose from. After the candidate replies with their availability, the interview times can be coordinated with the interviewer’s schedule.
If an interview has already been scheduled, select Confirmed date & time. (already decided)
Insert the date, time, and Time zone of the scheduled interview.
Select an Interview Duration. If needed, select Manage Schedules to see the interviewers’ schedules in the system.
Select the interviewer by inserting the first few letters of the interviewer’s name, and selecting the interviewer from the list provided. Alternatively, enter a non-system user’s email address by selecting +Add non-system user.
Insert any Comments as needed.
Select Create Interview.
Select Send Invites to open a communication template window, or select Done to close the notification without sending invites. For more information on sending invites, see Send Invites.
Create a Series of Interviews
From a list of candidates in a req, select a candidate and select Actions → Create Interview. Alternatively open a candidates Talent Record from within a req and select Actions → Create Interview.

The Create Interview window opens. The Interview Description is prepopulated with the req number and job title. Edit the Interview Description if needed.

Select Series for Interview Style.
Select an Interview Format.
Insert the details of the interview.
Select a Lead Coordinator. This field uses the type-ahead feature. Insert the first few letters of the lead coordinator’s name, and select the lead coordinator from the list provided.
Select the members of the Coordination Team. This field uses the type-ahead feature. Insert the first few letters of the coordinator’s name, and select the coordinator from the list provided.
Multiple coordination team members can be added.
Coordination team members must be selected and appear in the coordination team section to be included. Entering a coordination team member’s name in the field and not selecting it, does not include the team member.
To remove any selected team members, select the x icon for that coordinator.
Confirmed date & time (already decided) is automatically selected for Series interviews. Insert the date for the series of interviews.
Select the time for the first interview in the interview series, then select a Time zone.
Select + Add Interviewer.
Select the interviewer by inserting the first few letters of the interviewer’s name, and selecting the interviewer from the list provided. Alternatively, enter a non-system user’s email address by selecting +Add non-system user.
Set the interview Duration.
Select Save.
Repeat steps 10 - 12 for each interview in the series. Each interview starts at the end time of the previous interview. Different interviewers and durations can be selected for each interview. Select the Edit icon to edit an interview in the series. Select the remove icon to remove an interview from the series.
Insert any Comments as needed.
Select Create Interview.
Select Send Invites to open a communication template window, or select Done to close the notification without sending invites. For more information on sending invites, see. Send Invites
Create a Panel Interview
From a list of candidates in a req, select a candidate and select Actions → Create Interview. Alternatively, open a candidates Talent Record from within a req and select Actions → Create Interview.

The Create Interview window opens. The Interview Description is prepopulated with the req number and job title. Edit the Interview Description if needed.

Select Panel for Interview Style.
Select an Interview Format.
Insert the details of the interview.
Select a Lead Coordinator. This field uses the type-ahead feature. Insert the first few letters of the lead coordinator’s name, and select the lead coordinator from the list provided.
Select the members of the Coordination Team. This field uses the type-ahead feature. Insert the first few letters of the coordinator’s name, and select the coordinator from the list provided.
Multiple coordination team members can be added.
Coordination team members must be selected and appear in the coordination team section to be included. Entering a coordination team member’s name in the field and not selecting it, does not include the team member.
To remove any selected team members, select the x icon for that coordinator.
Set the Schedule of the interview. Interview schedules can be confirmed by interviewer availability, candidate availability, or a date and time can be selected.

To review the interviewer’s availability before proposing times to a candidate, select Verify interviewers availability first.
Select Ask for candidate availability first to coordinate the best interview time for the candidate within a certain date range.
Select a Date Range for the candidate to choose from. After the candidate replies with their availability, the interview times can be coordinated with the interviewer’s schedule.
If an interview has already been scheduled, select Confirmed date & time. (already decided)
Insert the date, time, and Time zone of the scheduled interview.
Select an Interview Duration. If needed, select Manage Schedules to see the interviewer’s schedule in the system.
Select + Add Interviewer. Insert the first few letters of the interviewer’s name, and select the interviewer from the list provided. Alternatively, enter a non-system user’s email address by selecting +Add non-system user.
Select Save.
Repeat this process for all interviewers on the panel. If needed, select Manage Schedules to see the interviewer’s schedule in the system.
Insert any Comments as needed.
Select Create Interview.
Select Send Invites to open a communication template window, or select Done to close the notification without sending invites. For more information on sending invites, see Send Invites.
View Interview Details

To view interview details, select Menu → Candidates → Manage Interviews.
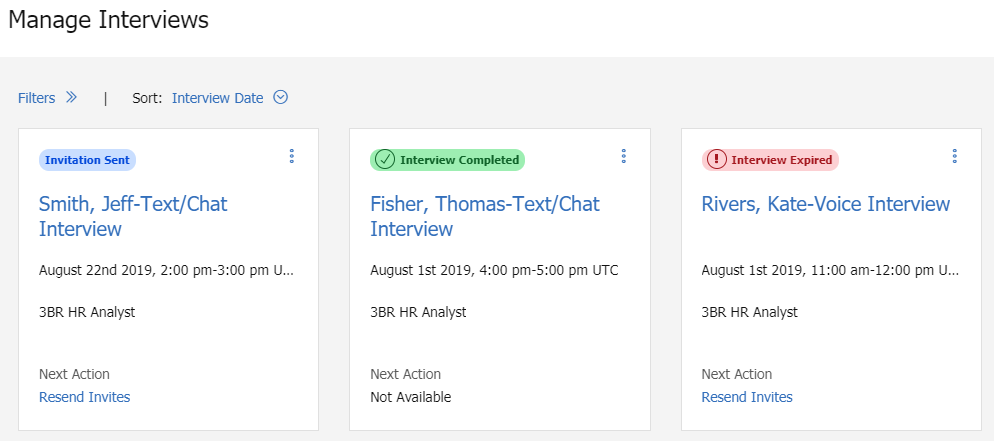
The Manage Interviews window opens.
Each interview has the details of the interview, a status and a suggested Next Action.
Filter the interviews by selecting Filters and entering the filter details.
Sort the view of the interviews by selecting the Sort arrow, and selecting a sort criteria.
To view the details of an interview, select the Interview Name or select the three dots menu → View Interview Details. The Interview details page contains a timeline of the interview, the details of the interview, the details of the candidate, the interviewers, and a To-Do list.
To manage the To-Do List:
Select an item to mark it as complete. The text appears with a strikethrough.
To add a new To-Do item, enter the To-Do item in the Add to-do text box and select the plus icon.
To remove a To-Do item, select the three dots menu → Remove.
To edit a To-Do item, select the three dots menu → Edit.
Cancel An Interview
Interviews can be canceled from any status except Completed or Canceled.
To cancel an interview, select Menu → Candidates → Manage Interviews.
Select the three dots menu → Cancel Interview.
The Cancel Interview window opens. The system determines who needs to be notified of the cancellation based on the communications that were sent when creating the interview.
If no interview invites were sent, select Cancel Interview to cancel the interview or select back to return to the Manage Interview window.
If a candidate or interviewer was sent an invite to the interview:
If a candidate was notified of the interview, a candidate communication is required. The candidate is automatically selected in the Notify Candidate section with the candidates status. Select a Candidate Communication. This field uses the type-ahead feature. Insert the first few letters of the invite name, and select the invite from the list provided.
Update the communication template as needed. Use the formatting options to format the communication as needed.
Select Preview to preview the message, and select Edit communication to return to the edit view.
Select Browse to upload any attachments to the communication.
If an interviewer was notified of the interview, an interviewer communication is required. The interviewer is automatically selected in the Notify Interviewers section with the interviewers status. Select an Interviewer Communication. This field uses the type-ahead feature. Insert the first few letters of the invite name, and select the invite from the list provided.
Update the communication template as needed. Use the formatting options to format the communication as needed.
Select Preview to preview the message, and select Edit communication to return to the edit view.
Select Browse to upload any attachments to the communication.
Select Cancel Interview to send the communications and cancel the interview, or select back to return to the Manage Interview window.
The user is prompted to send a notification to the recipients, who have already been informed about the interview.
If a candidate notification is determined, there will be a Candidate communication section.
If an Interviewer notification is determined, there will be an Interviewer communication section.
Beside each name, the current interview status of the recipient will be displayed, giving the ability to coordinator to decide if they want to send a notification or not.
(For ex: If the interviewer's status is, "Invite Sent", they can opt out of sending a notification, whereas if the status is "Invitation Accepted", they would prefer sending the notification.)
