- 07 Mar 2024
- 6 Minutes to read
- Print
- DarkLight
Creating a New Migration
- Updated on 07 Mar 2024
- 6 Minutes to read
- Print
- DarkLight
Abstract
Product: Self Service Data Migration Tool
Creating a New Migration
After the Admin Settings are configured at a client level, the next step is to create a new migration request. The migration request is where data is selected in the Access database for migration (as a file) and then validated and loaded into BrassRing. When migrating all Candidate-related data or HR Status, Candidates and Requisitions need to be migrated before migrating or validating Candidate Forms or Notes, or HR Statuses. Additionally, Candidates and Requisitions need to exist in BrassRing if migrating Forms, Notes, or HR Statuses for related Candidates.
After creating a new migration, there are three required tasks to complete for every new migration request.
Generate Schema – Generates an Access DB file and upload it at the SFTPaddress that is specified in Admin settings.
Validate Data – Asks for the Access DB schema with data as the input and validates it. Generate an error report to view discrepancies.
Load Validated Data into BrassRing – Loads validated data into BrassRing and completes the process.
Creating the New Migration

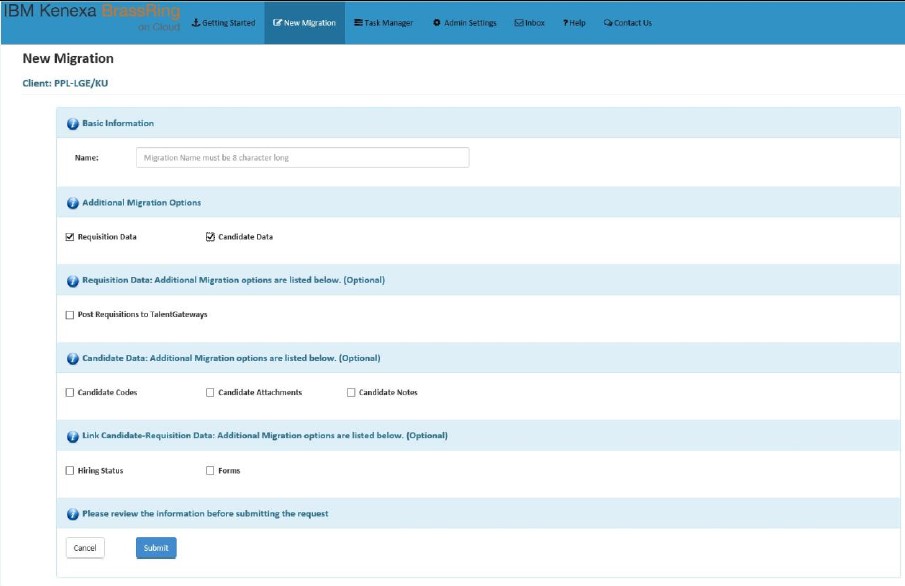
Select New Migration.
Insert a unique identifier name for this migration request. A maximum of 8 characters are allowed that can include alphanumeric characters and the _ symbol. Other special characters are not accepted.
Insert additional migration options as needed:
Select Requisition Data to migrate requisition data to the Access database.
Select Candidate Data to migrate candidate data to the Access database.
Select Post Requisitions to Talent Gateways to fill Talent Gateway Postings option in the Access database. Post Requisitions to Talent Gateways appears after Requisition Data is selected.
Select Candidate Codes to fill Codes column in the Access database. Candidate Codes appears after Candidate Data is selected.
Select Candidate Attachments to fill the Attachments column in the Access database. Candidate Attachments appears after Candidate Data is selected.
Select Candidate Notes to fill Notes column in the Access database.
Select Hiring Status to migrate all HR status information of candidates
Select Forms to migrate the Candidate forms available for the client.
Select Submit. The system creates a new migration request.
Generate the Schema
Select Task Manager.
Select the Migration Name.
Select Generate Schema.
It takes approximately 20 minutes to generate. When the status updates to In Progress, the request is in the queue. In Progress does not indicate that the generation process has started. If there is more than one migration type, all with the same Migration Name, the schema generates for all. The Status at the end of the process updates to Complete for all migration types under a common Migration Name.
Status indicators:
When the schema generation starts, the Status indicator updates to Schema Generation in Progress.
When the schema generation is complete, the Status indicator updates to FTP Upload in Progress.
When the schema is uploaded to the FTP address, the Status indicator updates to Complete which means the schema is ready in the Access database for further action.
When the schema generation is unsuccessful, the Status indicator turns to Failed.
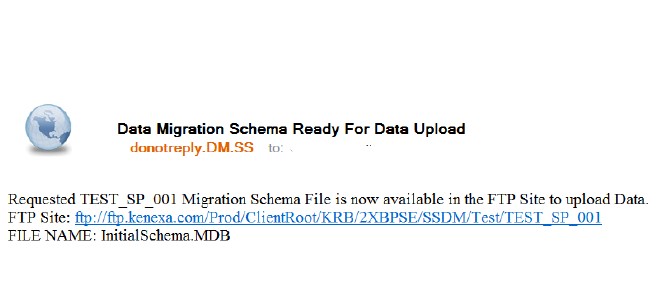
An email notifying the task status is sent to the email addresses that were specified in Admin settings. The standard default name of the schema file is InitialSchema.ZIP.

Validate the Data
Before validating the data, a compressed file containing the data to be migrated into BrassRing needs to be created and manually uploaded to the SFTP address.
Preparing the compressed file
Select the InitialSchema.ZIP file at the SFTP Address that is specified in Admin Settings → Migration Settings and download the file.
Extract the file to view the schema. Enter the password to open the file. This is the password that was generated under Admin Settings → Migration Settings section in the Encryption Key field. The file gets extracted. After the file is extracted, the file extension changes from *.zip to *.MDB. Ensure that the tool that is used for file extraction supports AES 256 encryption.
Insert the required data into the Access DB tables and save. If there are attachments to migrate, create a sub folder that is named Attachments and upload a compressed and password protected file containing all attachments to this folder at the SFTP address, specifying the attachment file names in the Access database. For large volumes of attachments, multiple compressed files can be uploaded to the Attachments sub folder.
Upload the Access Database file at the SFTP address specified in the Address field of Admin Settings → Migration Settings. The file needs to be a .zip file with password protection. Use the same auto-generated password that was used to extract the file to protect this file.
The compressed file is now ready for validation.
Validating data
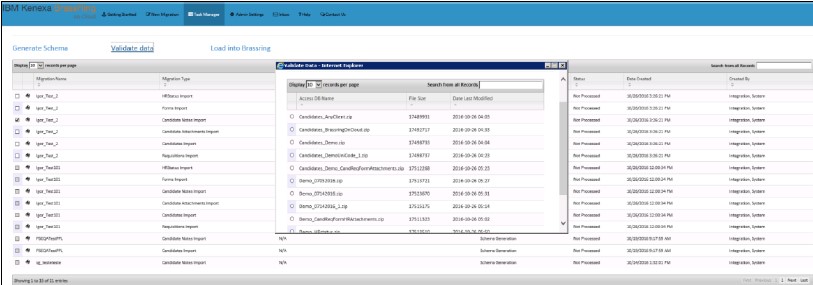
Select Task Manager.
Select the Migration Name to validate.
Select Validate Data. A notification window opens and lists all the compressed files available at the specified Address (SFTP) location.

Select the Access DB Name with the data.
Select Submit. In the Task Manager screen, the Action Type column updates to Data Validation and Status to Not Processed. This indicates that the validation request is in the queue. It can take two or 3 minutes for the processing to begin. The status changes to In Progress and after the validating is done, the status changes to Complete or Failed.
Addressing Failed Status
Select Task Manager.
Select the Migration Name and select the binoculars icon next to it. This generates an error report. The report contains two tabs, Properties and Migration Type.
Properties tab has the nature of migration and client details information.
Migration tab has the actual error details of data in the Access database.
Migration ID – This is for Infinite internal reference.
Element – Refers to the row number in the Access database.
Identifier – Refers to the field name in the Access database. for example: Candidate Type in Candidates table.
Description – Details of the data, which is not valid.
Added on – The data and time when the validation took place.
.png)
Open the report and look for discrepancies. Look for the Identifier column in the error report and find the same corresponding column in the Access database. Verify that the data in both columns tally. Correct the values if different.
For example, if the Candidate type is invalid, cross verify whether that Candidate Type exists in BrassRing by checking Workbench. To correct this error, add the missing or invalid Candidate Type as a new Candidate Type in Workbench or note the existing valid Candidate Types in Workbench and include one of those as the valid candidate type in the Access database file.

Rezip the Access database file with the corrected data and upload it to the SFTP address. For more information, see Preparing the zipped file
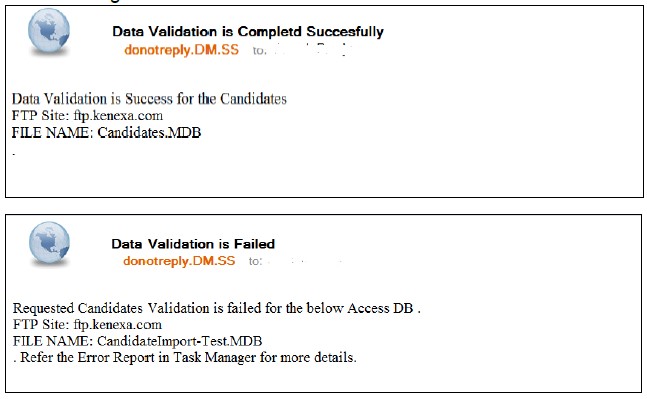
In the Task Manager, select the Migration Name and select Validate Data. Repeat the Validating data process until the validation Status field displays Complete. An email notifying the validation status is also sent to the email addresses specified in Admin settings.

Loading Data Into BrassRing
To load the successfully validated data into BrassRing, in the Task Manager, select the Migration Type and select Load into Brassring.
The Action Type updates to Data Migration. The Status displays Not Processed to indicate that the request is in the queue and progressively changes to Loading Data in Progress and finally to Complete. Select the binoculars icon to view the Status report with a count of successful and failed records.
Verifying Migrated Candidates and Requisitions in BrassRing
Migrated Candidates can be verified in BrassRing by using the new candidate ref number that is located in the Candidate Mapping Report. The Candidate Mapping report contains old Candidate reference and new Candidate reference number in BrassRing and can be downloaded from in BrassRing by selecting Menu → Reports → Candidate Mapping.
Requisitions can be verified in BrassRing by using the old req number as optional req number or by using new AutoReqid. The Requisition Mapping report contains old reference and new BrassRing AutoReqid and can be downloaded in BrassRing by selecting Menu → Reports → Requisition Mapping.
