Abstract
Product: Workbench
Custom Field Validation
This page describes the Custom Field Validation process, shows how to read custom fields, and includes examples of custom fields.
Process
Configure the custom validation
Custom field validation can only be configured for Text and Numeric field types.
Select Tools → Forms → Candidate Forms.
Select Administer Form fields for the candidate form.
Select the Edit field attributes pencil for the form field.
Select Save and Continue >>.
Select Custom by using the Input Validation pull-down menu.
Select Configure.
Create an alphanumeric or numeric template, or select a pre-defined template.

To create an Alphanumeric validation format:
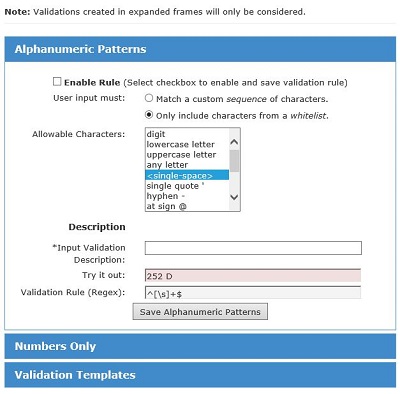
Select Alphanumeric Patterns.
Select Enable Rule.
Select whether the User input must match a custom sequence of characters or only include characters from a whitelist. As of BrassRing Release 19.03.11, the comma , and hashtag #, are added to the list of allowable characters for field validation.
For Match a custom sequence of characters, define the custom string by selecting the character from the pull-down menu, entering the amount of those characters in the Count field and selecting Insert. Repeat this process until the sequence is created. Select Remove to remove a character. The Sequence section auto-populates based on user selection.
For Only include characters from a whitelist, define the custom string by selecting the Allowable Characters. Hold CTRL and select the characters to select multiple characters.
Insert an Input Validation Description.
The Try it out field is used to test a validation before saving it. If the string matches the validation, the text box turns green, if it does not match the validation, it turns red.
Select Save Alphanumeric Patterns.
To create a Numeric validation format:
Select Numbers Only.
Select Enable Rule.
Select whether the User input must be: Any number, a number with X digits, or a number between a range.
For a number with X digits, enter the amount of digits.
For A number from, enter the range of numbers by using the pull-down menus.
Select any Other Requirements as needed.
Insert an Input Validation Description.
The Try it out field is used to test a validation before saving it. If the string matches the validation, the text box turns green, if it does not match the validation, it turns red.
Select Save Numbers Only.
To select a predefined Validation template or to create a Custom Template:
Select Validation Templates.
Select Enable Rule.
Select a Standard template type by using the pull-down menu, or select Custom and add your custom validation in the field.
Insert an Input Validation Description.
The Try it out field is used to test a validation before saving it. If the string matches the validation, the text box turns green, if it does not match the validation, it turns red.
Select Save Validation Templates.
Select Save.
Note
Infinite provides the ability to add custom validation rules. However, support for writing the validations is not provided by Infinite. Regex validation rule writing is clients' responsibility. Documentation and training videos are available on the internet for writing Regex validation rules.
Read Custom Validation Rules
Rule Icons and descriptions:
^ Start of validation rule.
$ end of validation rule.
\d digit.
[$] $ symbol is required.
[£] £ symbol is required.
[%] % symbol is required.
\.\ decimal is required.
\.\d{#} decimal with a fixed number of digits after.
\.\d{#,#} decimal with a range of digits after.
\d{#} a number with # digits.
(#|[#]?/d{1,1}) a number from # to #.
[a-z] lower case letter.
[A-Z] upper case letter.
[a-zA-Z] any letter.
(,\d{3}) require commas for thousands.
\s single-space.
['] single quote.
[\-] hyphen.
[@] @ sign.
[\.] period.
[\(] open parenthesis.
[\)] closed parenthesis.
[/] forward slash.
[\\] backslash.
(0[1-9]|[12][0-9]|3([01]) day (dd).
(0[1-9]|1[012]) month (MM).
(\d{4}) year (YYYY).
(\d{2}) year (YY).
Examples
^[$]\d{1,3}(,\d{3}) *(\.\d{2})$
This validation: is any number/digit, requires commas (for thousands), a decimal (with 2 digits after it), and a $ symbol at the front.
Example use: Salary field.
Valid Entry Example: $30,000.00.
^\d{7}$
This validation: is any number/digit, requiring 7 digits.
Example use: 7 digit employee ID.
Valid Entry Example: 5228475.
^([\d]){1} ([A-Z]){1}([\d]){4}$
This validation: looks for the pattern of one digit, one upper case letter, and four digits.
Example use: Infinite Employee ID format.
Valid Entry Example: 1G5521.
^[a-zA-Z]+$
This validation: allows any letter.
Example use: Any field that the client wants letters only, no special characters, such as an availability field.
Valid Entry Example: Monday and Friday.