Abstract
Product: Workbench.
Custom subpanels
Custom subpanels are specialized Candidate Results panels that are launched from the My Open Reqs or All Open Reqs tab. They display the candidates, or a subpanelsset of candidates, that are filed to a requisition folder. The subpanels are designed to guide and encourage process compliance for candidate processing and workflow, so they generally have limited actions and filter options. Custom sub have no standard configuration. They are configured to meet the needs of your organization, and as many subpanels can be configured as needed.
Custom subpanels might be used to have specific Hiring Manager subpanels for reviewing or interviewing candidates. These might be simplified panels so that the candidates presented, the actions to be taken, and the forms to be used are straightforward and require little training.
The columns chosen should help further the purpose of the panel. For a screening process, they might be the key columns for quick consideration of what candidate to review: Candidate Type, TG Score, City/State, HR Status Info, Notes, Education, and Employment Info. These are columns that the person screening might want to sort by, or review, before deciding for which candidates to open their Talent Record and perhaps read their resume or CV.
Actions can be limited in the subpanel. The actions that are chosen are specific to your organizations process for candidates at a particular point in that process. For example, for a subpanel showing candidates in the screening stage, adding notes or screening forms can be added and creating an offer document can be excluded.
Forms can be excluded or only limited forms can be added to the panel.
Subpanels launch with the same placement as the Candidate Results panel.
There are three steps to configuring Custom Subpanels:
Configure the custom subpanel.
Enable custom subpanel on All Open Reqs or My Open Reqs Tab.
Map the custom subpanel to a User Type.
Examples of Custom Subpanels
Hiring Manager Review
Includes only candidates who have passed Recruiter screening
Output fields include experience and education
Actions and forms are related to scheduling interviews
Hiring Manager Interviewing
Includes candidates in interview stages
Output fields include phone numbers, fields from HM review forms, phone screen forms
Actions and forms are appropriate for interviewing
Interview Scheduler
Includes candidates in interview scheduling statuses
Output fields include phone numbers, fields from HM review forms, phone screen forms
Actions and forms are appropriate for interviewing
Assessment Review
Includes candidates in statuses around assessments
Output fields include assessment info
Actions and forms are appropriate for assessments
Event scheduling
Includes candidates in statuses around Event Manager
Output fields from Event results form
Output fields from forms that are configured with Event Manager internal event form or Candidate facing registration form settings checked
Actions (Send to Event Manager) and forms appropriate for assessments
College recruiting
Includes only candidates in college recruiting HR statuses
Output fields include education
Actions and forms appropriate for college recruiting
Accessing the Custom subpanel
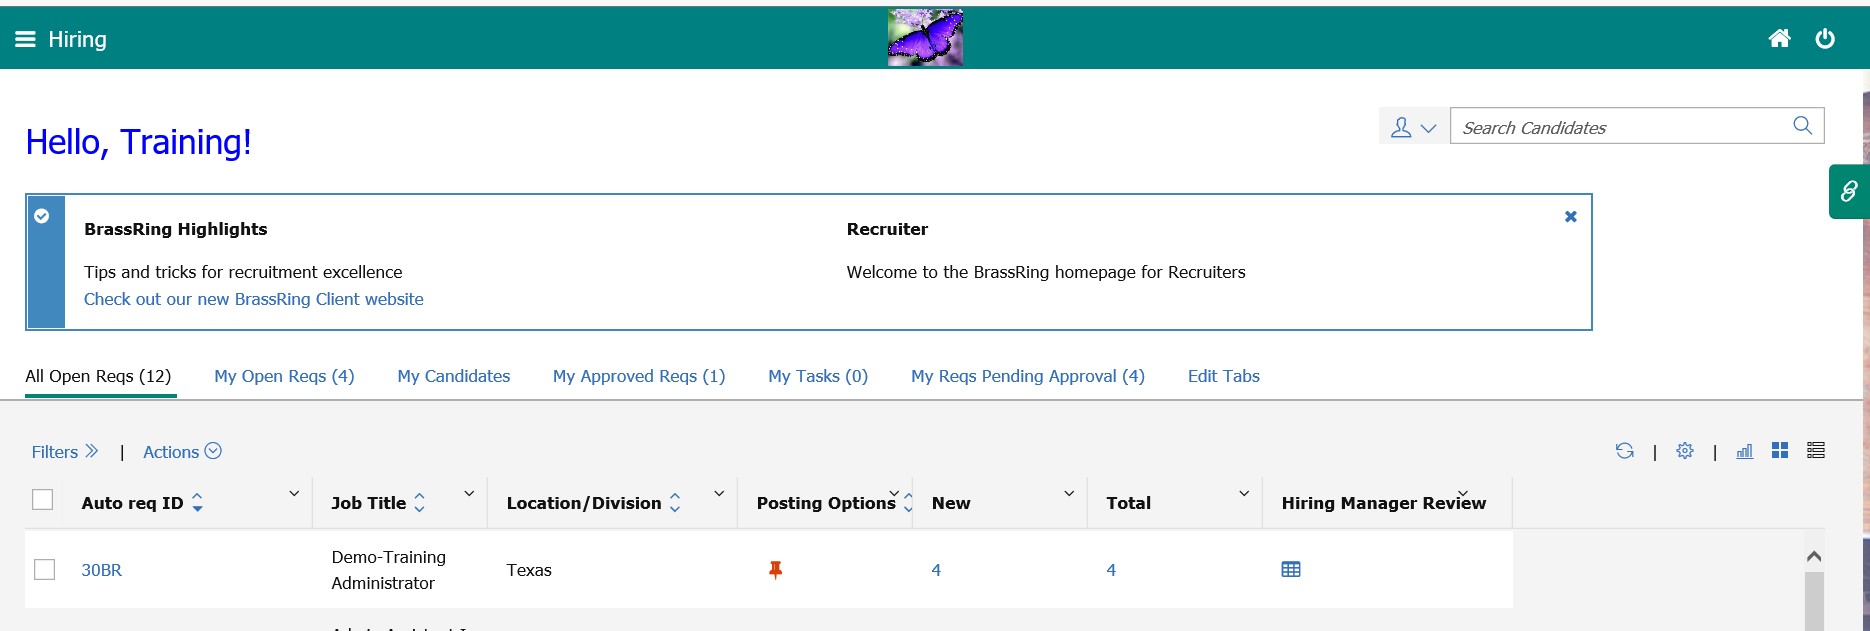
The subpanel can be accessed in the My Open Reqs or All Open Reqs tab on the BrassRing home page, depending on the configuration. The user selects the Custom subpanel icon. In the example, the Hiring Manager Review is the custom subpanel.
Process:
1. Configure the Custom subpanel
Select Tools → Settings → Panel Configuration.
Select the Administer configuration icon on the Custom Subpanel row.

Select Actions → Add New Configuration.
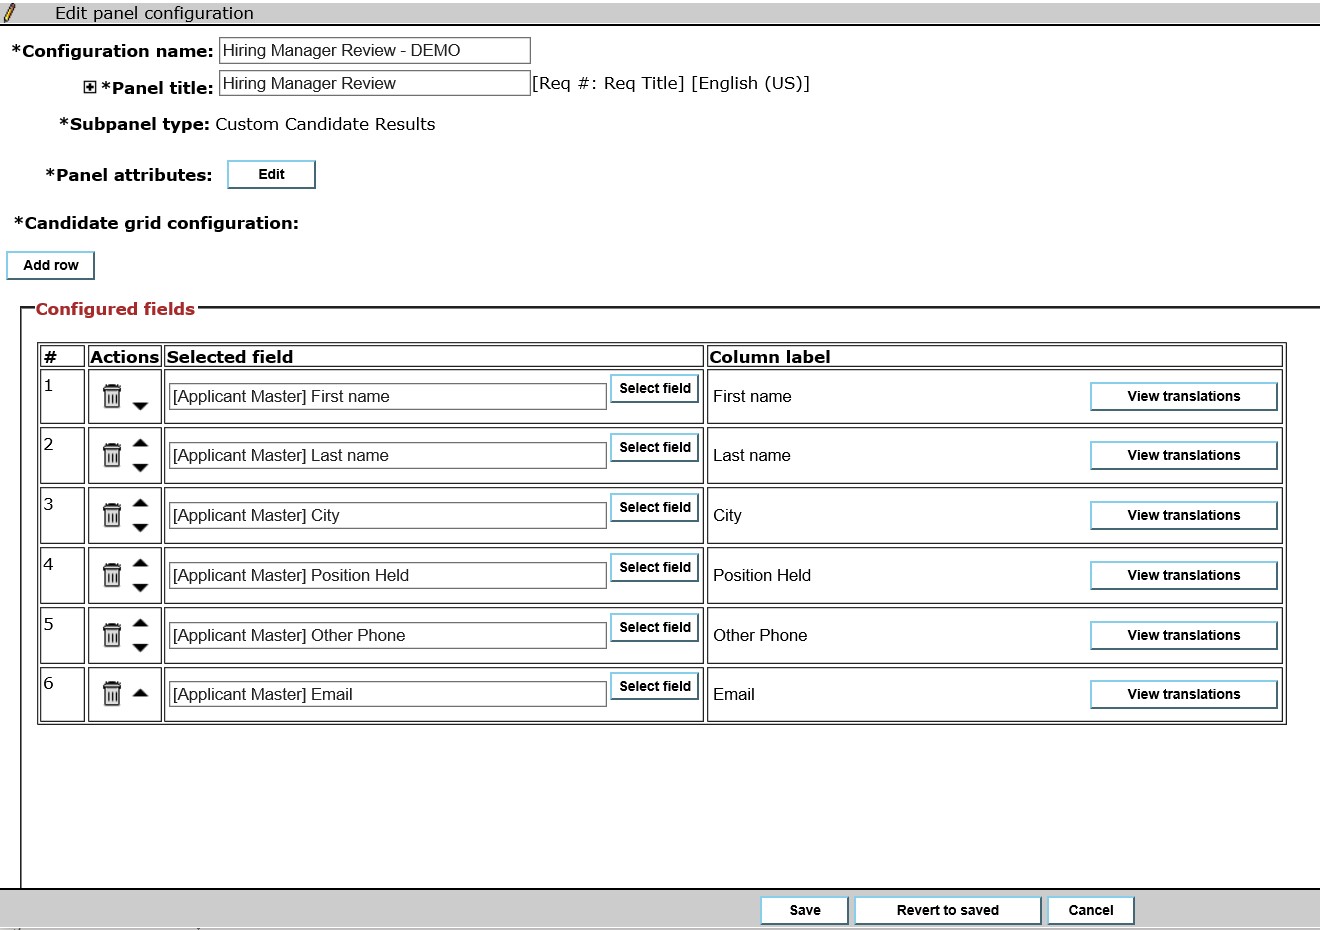
Enter the Configuration name and Panel title. Panel title includes the ReqID: req title and is translatable to all purchased locales.
Select Custom Candidate Results.
Select Edit for Panel attributes Edit button.
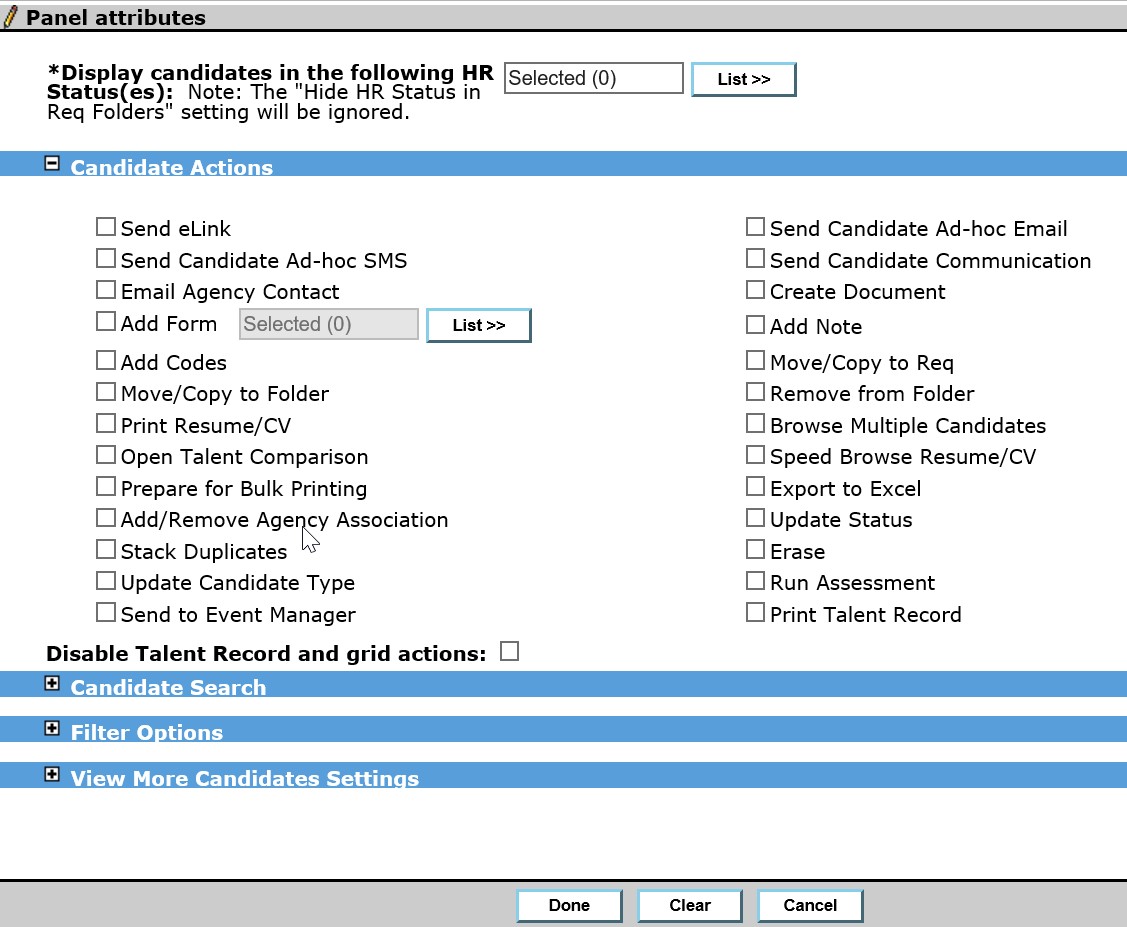
For Display candidates in the following HR Status(es), select one or more HR statuses of the candidates to be displayed in the subpanel, by selecting List>>, adding HR statuses to the Selected column and selecting submit.
Expand the Candidate Actions list and select the actions that users can access in the subpanel. Users must have the appropriate privileges to see the action on the panel.
If Add Forms is selected, select the forms that appear for selection by using the List>> options.
Select Disable Talent Record and grid actions to see the candidates and column data with no actionable links.
Expand the Candidate search section.
Select Enable database candidate searching to enable the other settings.
Check Auto pass search by Req Code to have the req ID automatically inherited into the search criteria REQ CODE field. This is useful only for clients without auto-file or insta-file that is turned on. Otherwise, anyone with the req code is already in the req folder.
The View Candidates settings controls the number of candidates that are returned in the search that are filed to the req when the search is completed and the user is ready to view search results. The results are returned in descending order of last date loaded. Based on that sorting, the first sequential candidates is selected and filed to the Req based on your Number selection.
Select an HR status to which candidates that are selected from the search results are filed to in the File and update HR status to field. The selection must be one of the HR statuses that is selected in the Display candidates in the following HR status(es) setting.
It is recommended to hide the Candidate Search and Saved Searches user privilege. For more information, see Search User Privileges.
Expand the Filter Options and select what filtering can be displayed in the panel’s Filter menu. Select HR Status, Candidate Type, or both. If neither is selected, the Filter menu does not display.
Expand View More Candidates Settings and enable the View More Candidates Action if needed. This setting brings currently filed candidates into the panel to aid recruiters in choosing candidates from an unreviewed status in a more impartial manner. The candidates that are selected are automatically promoted to a configured HR status (such as Active, To Be Reviewed, or Recruiter Review) to document that they were selected by using this function. The candidates that remain in the prepromotion status therefore have not been reviewed.
Select one or more HR statuses that compose the Source Pool of candidates to retrieve from. The HR statuses that are selected for the source pool cannot be selected in the Display candidates in the following HR Status(es) setting.
Select the Primary sorting options for the candidates by using the pull-down menu. Select whether the sort is Ascending or Descending. Optionally secondary and tertiary sorting options can be selected.
Configure the View more Candidates action.
Select a Selection Method by using the pull-down menu.
Select the Number of candidates that are promoted from the source pool to the custom subpanel by using the pull-down menu.
Select the HR status to update the candidates to by using the List>> button. This must be one of the HR statuses that is selected in Display candidates in the following HR Status(es).
For example, 20 candidates can be promoted taking every 5th candidate. The 1st, 5th, 10th, 15th, and so on, candidates are promoted until the system has reached 20 candidates. If not enough candidates remain in the source pool to fully execute the configured Number of candidates and Selection method, then the system uses a sequential selection method to promote the top X number of candidates (according to the source pool sort configured). For example, if Number of candidates = 10, Selection method = Every 5th candidate, and number of candidates remaining in the Source Pool = 42, the system promotes the top 10, per sort, candidates in the Source Pool.
Select Done, then select OK in the notification window.
2. Enable Custom subpanel on All Open Reqs or My Open Reqs Tab
Select Tools → Settings → Panel Configuration.
Select the Administer configuration icon for the All Open Reqs, or My Open Reqs as needed.
In the Administer panel configuration window, select Actions → Add new configuration.
In the Configuration Name field,
Insert a Configuration name. There is a character limit of 255. HTML cannot be entered into this field.
Insert the Configuration Name into the Panel Title.
If needed, select Allow users to edit panel display options.
In the configured fields section, several fields are prepopulated, select the Actions → Delete icon to delete any unwanted fields.
Use the Actions → Arrows to arrange the fields in a different order.
The View translations field is used to view the column label in other languages, if available.
To add a new field, select Add row.
Select Select field in the new row.
Select the field in the Available section, and select Add.
Select Submit.
Select Save.
3. Map Custom subpanel to User Type
Select Tools → Users → User Types.
Select the User type to have the custom subpanel and select Actions → User Type panel mapping.
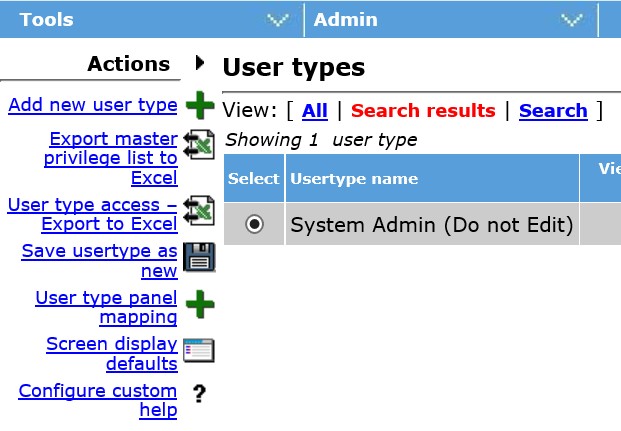
Select the custom subpanel by using the Configuration pull-down menu for All Open Reqs or My Open Reqs as needed.
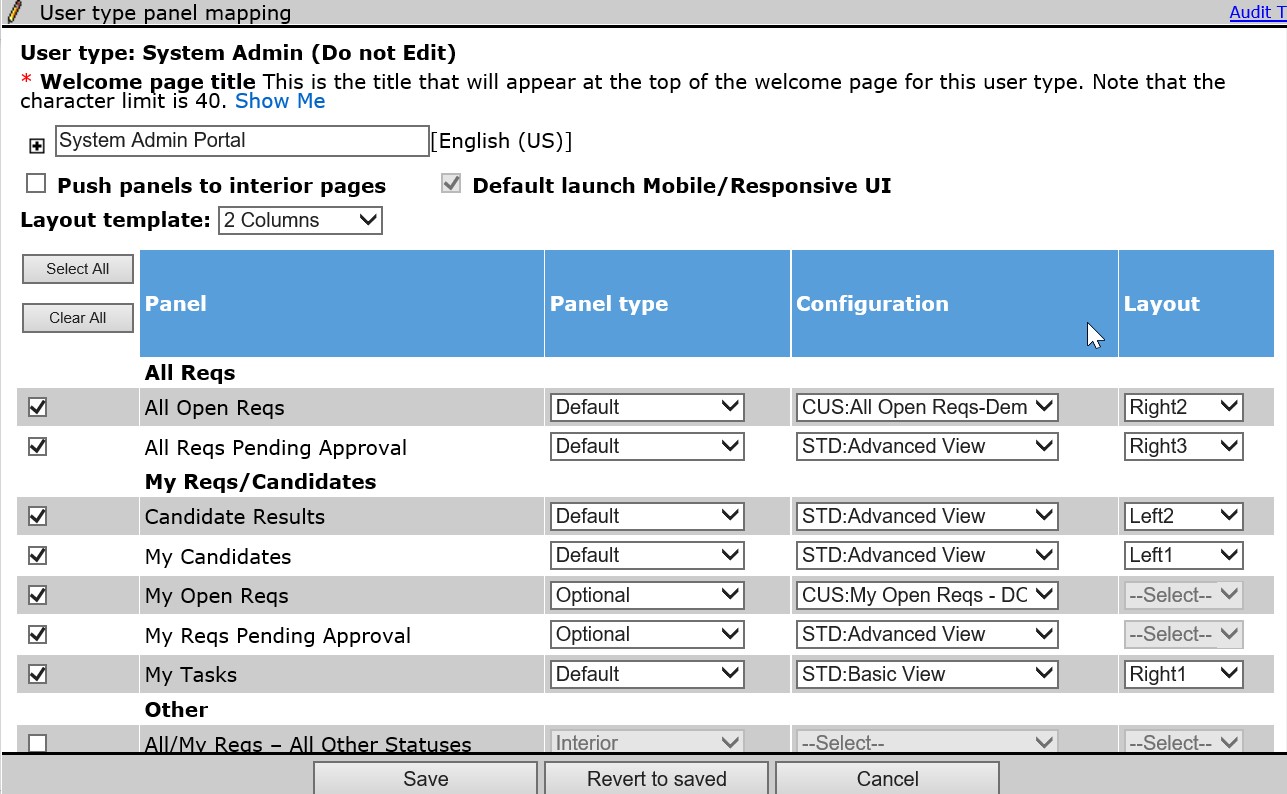
Select Save.