Abstract
Product: Workbench
Configure Evergreen Requisitions
There are six steps to configuring Evergreen Requisitions:
Client Setting
Req Field and Form
Automation Manager Trigger – Evergreen Archive
User Type Privileges
Evergreen Archive Custom Subpanel
Push/Pull RAM Triggers
Notes
Archive Folder Limitations:
If a candidate is archived on the same date they apply, autofiler does not recognize that they had already been added to the req folder, so the system adds them to the primary folder during the nightly processing. Best practice is to archive candidates that are at least one day old.
The Archive Folder is not currently available from the home page of the New Responsive UI. It is under consideration to be added in the future. Users can access the Archive folder from the interior BR pages.
To convert existing requisitions to Evergreen reqs:
Enable the client setting and add the new custom req field to the appropriate req templates. The field is created automatically when the setting is turned on, and does not need to be created.
Use the Mass Req Update feature to update the requisitions and set this field to Yes.
Enter a maintenance ticket requesting that existing postings for Evergreen reqs are updated so the Days to Remain Posted is set to (infinite symbol).
Enable User Types as needed.
Configure Automation Manager Evergreen Archive trigger.
Relevant eLearning
Process
1. Enable the Client Setting
Client Settings can only be enabled by an Infinite team member. To enable the setting contact your Infinite representative. When enabled, Workbench creates a standard custom req field, database name: EvergreenReq, that can be added to a req form. BrassRing users can have the opportunity to mark the req as an evergreen requisition.
2. Configure the Requisition Field
Enabling the Client Setting creates a new standard custom req field named Evergreen Requisition. This field can be added to select req forms and used to indicate whether a req is to be treated as an evergreen req or not.
It is recommended to only add this field to reqs forms that are to be used to recruit for high volume positions
In Workbench, select Tools → Forms → Req Forms.
Select the Administer Req fields icon for a req form.
Select the Req fields.
Add the Evergreen Requisition Req Field to the Form, and select Save.
Select Form Layout.
Move the Evergreen Requisition Req Field to the appropriate location on the Req Form.
Select Save.
Optionally enable the Req form attribute setting Enforce final status of all candidates: Exclude “Evergreen” requisitions to allow evergreen reqs to be closed out, even though not all candidates are in a final disposition status.
Select the Edit Req Form Attributes icon.
Enable Enforce final status of all candidates: Exclude “Evergreen” requisitions.
Select Save.
3. Configure the Automation Manager Trigger
The Archive function allows users to reduce the number of candidates in evergreen req folders without having to remove them altogether. Archiving can be done automatically when a candidate meets the criteria of the Automation Manager trigger: Evergreen Req – Candidate Archive.
Regardless of the selections on the Trigger Attributes tab, in all cases, the archiving impacts Reqs with the Evergreen Req field set to Yes. Once the req form is selected in the Automation Manager Archive trigger, the Evergreen Req field cannot be removed from the req form. Additionally, the template itself cannot be inactivated.
When the trigger runs:
If no archive folder yet exists for a req (of selected req template and with EvergreenReq field = Yes), the trigger creates an archive folder.
Candidates in reqs that meet the trigger criteria are moved from the req folder to the associated archive folder (along with associated candidate data).
HR Status history for candidates that are archived for the req are no longer be displayed in the Action Log or HR Status history screen. When unarchived, the history is restored.
Forms continue to be displayed and available for the req, similar to when a candidate is moved from a req folder.
The candidate continues to be found in Search but they are not found in the Req folder.
If the candidate already has an archive record, in the event of Apply → Archive → Reapply → Archive, then any old entries in archive folder is overwritten during the archive process for a candidate.
To create the trigger, in Workbench, select Tools → Automation Manager → Admin → Add new trigger.
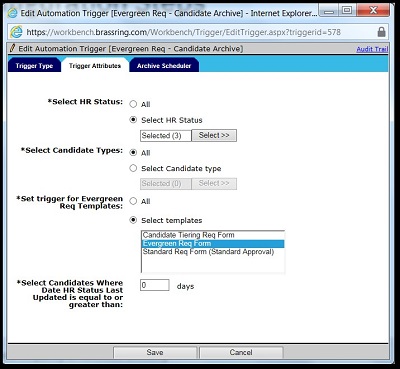
Select Trigger Attributes.
Select the HR Statuses for the trigger to run on by selecting Select>> and selecting the appropriate HR Statuses.
Set Select Candidate Types as All.
Select Select templates → Evergreen Req Form for Set trigger for Evergreen Req Templates.
Insert 0 in Select Candidate Where Date HR Status Last Updates is equal to or greater than:.
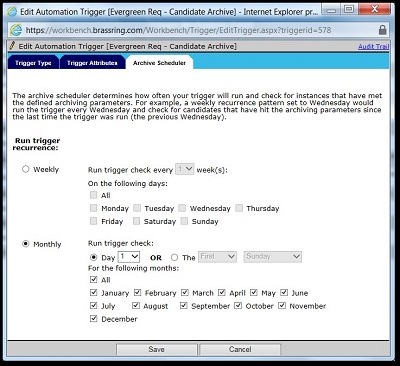
Select Archive Schedule.
Select Monthly.
Select 1 for Day.
Select All in For the following months.


4. Configure User Type Privileges
To view archive folders or unarchiving evergreen reqs, enable the following user type privileges. Users must also have the ability to view the originating req folder in BrassRing in order to view the associated archive folder.
Select Tools → Users → User Types.
Select Edit Type Permissions.
Enable the following User Permissions:
Reqs 2 → All reqs – view Evergreen req archived folder. Enabling this setting allows users to view all evergreen req archive folders.
My Reqs 2 → My reqs – view Evergreen req archived folder. Enabling this setting allows users to view their own evergreen req archive folders.
Candidate Actions 3 → Candidates - Reinstate from Evergreen archive folder (un-archive). Enabling this setting allows users to unarchive candidates that are associated with evergreen reqs who have been archived.
5. Configure the Evergreen Archive Custom Subpanel
To access the Archive folder, you must complete this step; even if you are using the New UI. A new Evergreen Archive custom subpanel is available when Evergreen Req is enabled. You can optionally edit the panel’s title or remove configured fields, and configure it to launch from My Open Reqs or All Open Reqs.
To edit the panel, in Workbench, select Tools → Settings → Panel Configuration.
Select the Administer Configuration icon for the Custom Subpanel panel. On the resulting Administer panel configuration screen, the Evergreen Archive subpanel cannot be inactivated or selected for Save configuration as new.
Select the Edit icon for Evergreen Archive to change the editable fields.
Configuration name = “Evergreen Archive”. Non-editable
Panel title = “Evergreen Archive” as a default
Subpanel type = “Evergreen Archive”. Only one subpanel of this type is available per client.
Candidate grid configuration has following fields by default, which are the only fields that can be selected. You can remove the fields from the panel configuration:
[Panel standard] Name
[Panel standard] HR Status
[Panel standard] Date Last Viewed
[Panel standard] Date Archived (available only for Evergreen Archive panel configuration)
Select Save.
The only action available from the Evergreen Archive subpanel is Reinstate. This action is available only for users with the user type privileges Candidate Actions 3 → Candidates – Reinstate from Evergreen archive folder (un-archive) privilege.
6. Configure the Push/ Pull RAM Triggers
To configure the Evergreen Archive subpanel to launch, select the Evergreen Archive subpanel for one of the columns on All Open Reqs or My Open Reqs panels
In Workbench, select Tools → Settings → Panel Configuration.
Select the Administer configuration icon for All Open Reqs, or My Open Reqs panel.
Select the Edit icon for the All or My Open Reqs configuration.
On the Edit panel configuration screen, select Add row.
Select Evergreen Archive subpanel and select Submit.
Select Save.