Abstract
The Add New User function allows the user to add a new user from within the Infinite BrassRing Platform Administration application.
The Add New User function can be accessed via the Add New User link on the Search Users page or the Add New User Admin menu item.
A warning message displays when a user import is in progress. This message is to warn the user that if any updates are made while the user import is in progress that their updates may be overwritten and lost.
Warning: A user import is currently in progress. Any updates made during this time may be overwritten by the processing import data.
Figure 20. User Import Warning Message

NAVIGATION
Abstract
This section gives instructions on how to access the Add New User feature in the Admin application.
Procedure
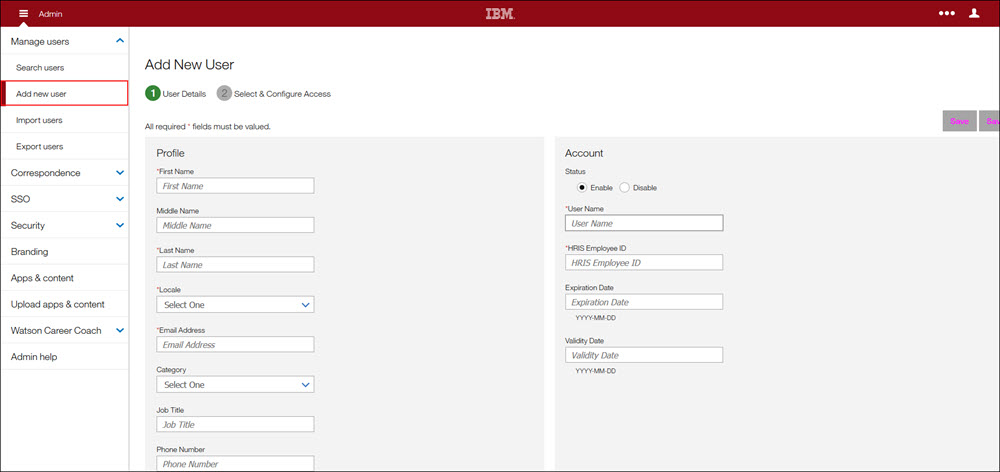
Select Add new user in the navigation menu to launch the Add New User page shown in the following figure.
Note
The user can also open the Add New User page by selecting the Add New User Admin menu item. To add new users, the administrative user must be one of the following user types: Admin, Admin Manage Users, Infinite Admin, or Infinite Admin Manage User. (Refer to the Add New User Process Steps section for instructions on how to add a new user.)
Figure 21. Add New User page

ADD NEW USER PROCESS STEPS
Abstract
This section explains how to add a new user from within the Infinite BrassRing Platform Administration application.
Once on the Add New User landing page, the user can add User Details for the new user and Select and Configure Access for the new user.
On the Add New User page,
Complete the required Profile and Account fields.
Note
Required fields are denoted with an asterisk (*).
Required Profile fields are as follows:
First Name
Last Name
Locale
Email Address
Required Account field is as follows:
User Name
HRIS Employee ID
To save your entries and return later, select Save. To save your entries and continue to the next screen, select Save and Continue. To cancel, select Cancel.
If Save and Continue is selected, the Select & Configure Access page opens shown in the following figure.
On the Select & Configure Access screen, select the applications that the new user needs to access.
Note
Applications are all disabled by default.
Following is the list of available Infinite BrassRing Platform applications your company has been licensed for and their fields:
Onboard (fields are as follows)
License Status
Hide App Tile
OB_MANAGER_USER_TYPE
OB_USER_GROUP
OB_USER_LOCATIONS
BrassRing (fields are as follows)
License Status
Hide App Tile
BR_APPROVAL_GROUPS
BR_CODE_ACCESS_GROUPS
BR_CUSTOM_APPROVAL_ROLE_ID
BR_CUSTOM_APPROVAL_SUPERVISOR_ID
BR_HIRING_USER_TYPE
BR_KIP_USER_GROUP
BR_MANAGER
BR_ORGANIZATION_GROUP
BR_RECRUITER
BR_REQUISITION_PRIVILEGES
BR_USER_GROUP
DEPARTMENT
SENDER_EMPLOYEE_ID
Internal Gateway (fields are as follows)
License Status
Hide App Tile
Infinite BrassRing Platform Administration (fields are as follows)
License Status
Hide App Tile
TS_ADMIN_USER_TYPE
Note
Available selections for this field are dependent on the User Category selected in the Add New User Category field when adding a new user.
Following is an example user type list based on the Infinite Category selection.
ADMIN
ADMIN_MANAGE_USERS
ADMIN_SECURITY
ADMIN_BRANDING
Admin_Manage_Business_Partners
Admin_Manage_Resources
ADMIN_MANAGE_CORRESPONDENCE
WCC_ADMIN
WCC_ADMIN_GETTINGSTARTED
IWJ_ADMIN
Note
Each application has specific fields that are specific to that application when configuring user access to that application.
To enable an application,
Select an application (for example, Infinite BrassRing Platform Administration). The application panel expands.
Note
To select more than one User Type, hold down the Ctrl key and make your selections.
Tip
In the Infinite BrassRing Platform Administration User Type field, guidance text instructs the user how to enter multiple entries. Multiple values for Infinite BrassRing Platform Administration are entered as
entry||entry.Note
The multi-entity format fields vary depending on the application selected. Applications such as Onboard and BrassRing have an asterisk between entries
entry|*|entry. Infinite BrassRing Platform Administration does not have an asterisk between entries, just pipes.For Infinite BrassRing Platform Administration,
Change the License Status from the Disable to the Enable option.
Select the Hide App Tile check box (if applicable). This selection will hide the application tiles from a user's view.
Enter an appropriate value in the User Type field for that application. Use pipes between multiple entries (
entry||entry).To save your entries and add the new user, select Finish and Add New User.
To cancel, select Cancel.
To finish adding a new user, select Finish.
Note
Before selecting Finish on the Select & Configure page, the user can select the User Details link to change the Add New User information.
User Details Field Validation and Values
Abstract
The User Details page has two field capabilities to prevent errors when entering data (field validations, and listed field values).
Field Validations: When an administrator creates or updates a user, field validations display if the administrator enters an incorrect value (such as, in an incorrect format, or if the Validity Date is after the Expiration Date) and attempts to save.
Listing of Field Values: When an administrator creates or updates a user, field value listings display for some fields to help the administrator provide the correct values. The administrator can select (or unselect) values as needed.
Field Validations
When a user is created or updated, field validations display if an incorrect value is entered in the Validity Date field (such as in an incorrect format, or if the Validity Date is after the Expiration Date).
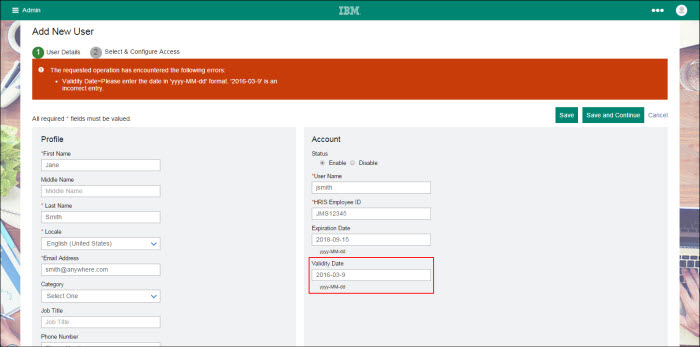
If an attempt is made to save when entering an incorrect value or format by selecting Save or Save and Continue, the validation following error message displays on the User Details page.
The requested operation has encountered the following errors: Validity Date=Please enter the date in 'yyyy-MM-dd' format. '2016-03-4' is an incorrect entry.Note
The Validity Date field entry cannot be saved without correcting the error.
Figure 22. Validity Date field validation error message

Note
The User Details Account section's Expiration Date and Validity Date fields contain guidance text to instruct the user that the correct date format is
yyyy-MM-DD.
Listing of Field Values
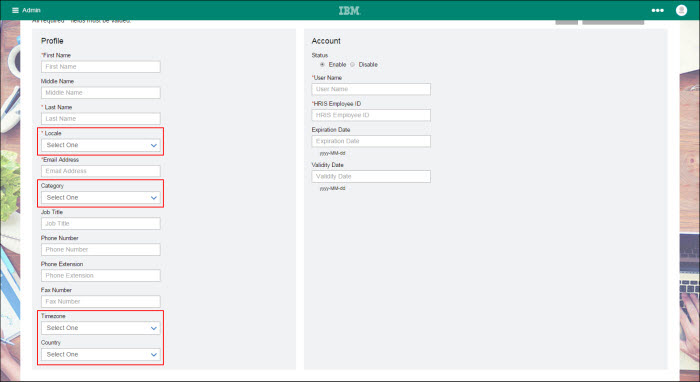
When a user is created or updated, field value listings display for some fields to help provide the correct values. You can select (or unselect) values as needed. On the User Details screen, four Profile section fields include value listings in pull-down menus.
Figure 23. Field Value Listings

Field Value Listings:
Locale
Category
Timezone
Country
Note
Each pull-down menu contains a list of correct values from which the administrator can select.
Field Value Listings (Locale):
Locale contains a list of languages and their associated locations, such as English (United States), Danish (Denmark), and Spanish (Mexico).
Field Value Listings (Category): Category contains a list of user categories.
EMPLOYEE
EXTERNAL
EXTERNAL_CANDIDATE
INTERNAL_CANDIDATE
INTERNAL_NEW_HIRE
MANAGER
NEW_HIRE
Field Value Listings (Timezone):
Timezone contains a list of time zones (such as, continent/city, or Atlantic, Pacific, GMT, or UTC).
Field Value Listings (Country):
Country contains a list of countries, such as Bulgaria, Canada, Thailand, or Sweden.
User Types
Abstract
User Types are the top contributors to the definition of user authorizations in the Talent Suite. User Types define the specific features and actions available to the user in the suite application.
The User Types defined in the table below belong to the Talent Suite Admin application. These User Types are static, meaning they cannot be altered.
Important
The customer should never assign a user type that has (IBM) anywhere in the name of the user type. These Infinite user types are provided specifically for Infinite personnel, such as Implementation Consultants or Support.
When provisioning a user for the Talent Suite Admin application, you will provide one or more of these User Types in the TS_ADMIN_USER_TYPE field.
Note
The following table specifies the available User Types and their associated access rights. You may combine User Types to provide specific access rights.
If a User Type does not specify access to a screen, then that means there is no access.
For example, The ROLE_ADMIN|ADMIN_MANAGE_USERS User Type does not include access to Password Policies.
User Type definitions and permissions are shown in the following Customer Admin User Types table:
Note
User Type names are case-sensitive.
Table 4. Customer Admin User Types
User Type Name | Access To (View/Create/Update) | ||||
|---|---|---|---|---|---|
ADMIN | Manage Users: Search users, Add new users, Import users, Export users, and access to everything, except Manage Email Templates (this is also the only way to get access to SSO settings) | ||||
SSO | |||||
Security: Password Policies, Identity Source | |||||
Branding | |||||
Manage Email Templates | |||||
Manage Email Correspondence | |||||
ADMIN_MANAGE_USERS | Manage Users: Search users, Add new user, Import users, Export users | ||||
ADMIN_SECURITY | Security: Password Policies, and 2-step authentication settings | ||||
ADMIN_BRANDING | Branding All branding fields | ||||
ADMIN_MANAGE_RESOURCES | Apps & Content | ||||
CT_ADMIN | Manage Email Templates | ||||
ADMIN_MANAGE_CORRESPONDENCE | Manage Email Correspondence Email history searching | ||||
Assess User Types/Roles - DON'T PUBLISH
Abstract
User types used for Assess.
The user types/roles marked with an asterisk (*) can only be used for Assess in a Talent Suite environment.
Table 5. Assess Standard User Roles: Client Facing
Role | Explanation |
|---|---|
Super User | This role has the basic functions to administer assessments but also the higher-level functions, such as creating batches, managing branding, and configuring trial tests. |
General User | This role allows the user to administer tests and view results. |
Create Sessions Only | This role can create sessions but cannot view results or perform any higher level tasks. |
Results Only | This role only has access to view results. |
Reset Sessions Only | This role can only Reset Sessions. It is intended to be paired with another role so a client can limit who has access to reset sessions. Must be used as an ADD ON ROLE. |
View Hierarchy Only * | This role can be used to view a hierarchy. |
Configure Hierarchy Only * | This role can create or modify a hierarchy and its associations to assessment content. Note that associations to users are performed within Talent Suite user management and require access to the Talent Suite Admin application. |
Talent Suite Admin | |
ADMIN_MANAGE_USERS * | For Talent Suite clients to manage users, access to the Talent Suite Admin application must be enabled and this role must be assigned within that application. Note: The Admin application has other roles available for other functions. |
Table 6. Assess Standard User Roles: Infinite Internal
Role | Explanation |
|---|---|
Infinite Client Support | This role is intended for client services roles (beyond GSC), so they can assist clients with questions and issues. Ideal for PMs, CSMs, and GSCA. |
Infinite Configuration | This role is intended for a limited set of users who need to set up and test client accounts. It contains the functionality to configure assessments and site details, plus test assessments all the way through. |
Infinite Consultant | This role allows the user to view assessment content and candidate results. |
Infinite Edit Usage Tracking | This role allows internal users to view usage tracking, including setup configuration and notes, as well as update records. |
Infinite View Usage Tracking | This role allows internal users to view usage tracking, including setup configuration and notes. |