Abstract
Create and Manage Interviews
Create and Manage Interviews
Interview Manager can be used to manage candidate interviews in BrassRing on Cloud. 1 on 1, Series, and Panel interviews can be created and all interviews in Interview Manager are for a single candidate per req.
Any comments entered when creating an interview are visible on the Interview Details page.
Users must have a My Reqs relationship with a req to create an interview. Users must be selected as a Recruiter or Manager, or added to the Req team for a req to be able to create interviews for that req.
Build 20.09.08. After the interview date passes the Interview Status automatically updates to Completed, if the was interview scheduled and confirmed by all participants, or Expired, if the interview was not confirmed by all participants.
The interview status is updated to Complete after the end time of the interview to allow interviews to be rescheduled if the applicant does not show after the start time of the interview.
Completed interviews can be canceled. The Cancel option is available for up to 48 hours after the end of interview end time.
An Interviews tab is available to be added to the BrassRing home page. The interviews tab can be configured to display a card view or grid view. The grid view can be customized to display fields such as Interview Style, Interview Description, Candidate Language, and Req Title. The tab can be added by selecting Edit tabs on the home page.
Candidate Email and Talent Gateway Profile Requirements
If candidate has no Talent Gateway profile or email address, an interview cannot be created for this candidate.
If candidate has an email address, but no Talent Gateway profile, such as candidates added by using the Add Candidate process, then interview communications cannot be sent that include the [Candidate Zone URL] token. The [Candidate Zone URL] must be removed before sending.
If candidate has a Talent Gateway profile, but no email address, then the interview communication page displays a warning message, but allows the communication to be sent. The candidate can access the communication on the Talent Gateway.
Interview Types, Formats and Statuses
Interview Types:
1 on 1 interviews involve a single interviewer.
Series interviews involve several, consecutive interviews with different interviewers.
Panel interviews involve a team of interviewers, all participating in the same time slot.
Interview Formats:
Phone: For phone call interviews.
Video: For video call interviews where the candidate is required to appear on-screen.
Text/Chat: For a text only interview that uses a text service.
In person: For interviews where the candidate must attend on site.
Other: For Other type interviews the format of the interview can be entered into Interview Details.
The details of the interview differ depending on the interview format selected. For example: for Phone interview formats, Phone Details can be entered.
Interview Statuses:
Interview Statuses include:
Candidate Availability Requested
Candidate Availability Received
Candidate Availability Declined
Invitation Sent
Invitation Accepted - Candidate
Invitation Declined - Candidate
Invitation Declined - Interviewer
Interview Completed
Expired
Interviews automatically expire if:
The start time of the scheduled interview is past and not all participants have confirmed, for example if invitations are not sent, declined, or not responded to. This applies to any interview schedule type.
The start time of last time slot is past and interview was not scheduled. This applies to Ask candidate first or Verify interviewers availability first schedule types regardless of whether candidate availability request was sent or replied to by the candidate.
Interviews are automatically updated to On Hold status if a req status is updated to On hold, Cancelled, Closed or Deleted, or the candidate is moved to a Final HR Status category.
Interview Manager Frequently Asked Questions
Relevant eLearning
Processes:
Create a 1 on 1 Interview
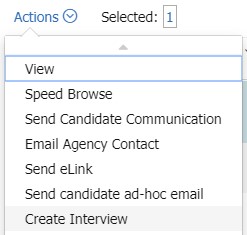
From a list of candidates in a req, select a candidate and select Actions → Create Interview. Alternatively open a candidates Talent Record from within a req and select Actions → Create Interview.

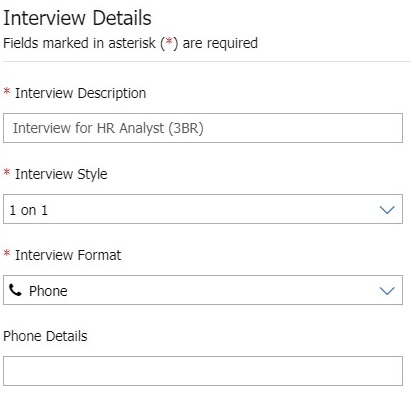
The Create Interview window opens. The Interview Description is prepopulated with the req number and job title. Edit the Interview Description if needed.

Select 1 on 1 for Interview Style.
Select an Interview Format.
Insert the details of the interview, for example: the phone number or office address.
Select a Lead Coordinator. This field uses the type-ahead feature. Insert the first few letters of the lead coordinators name, and select the lead coordinator from the list provided.
Optionally, select the members of the Coordination Team. This field uses the type-ahead feature. Insert the first few letters of the coordinators name, and select the coordinator from the list provided.
Multiple coordination team members can be added.
Coordination team members must be selected and appear in the coordination team section to be included. Entering a coordination team members name in the field and not selecting it, does not include the team member.
To remove any selected team members, select the x icon for that coordinator.
Set the Schedule of the interview. Interview schedules can be confirmed by interviewer availability, candidate availability, or a date and time can be selected.


To review the interviewers availability before proposing times to a candidate, select Verify interviewers availability first.
To coordinate the best interview time for the candidate within a certain date range, select Ask candidate first.
Select a Date Range for the candidate to choose from. After the candidate replies with their availability, the interview times can be coordinated with the interviewers schedule.
If an interview has already been decided, select Confirmed date & time. (already decided)
Insert the date, time, and Time zone of the scheduled interview.
Select an Interview Duration. If needed, select Manage Schedules to see the interviewers schedule in the system.
Select the interviewer by inserting the first few letters of the interviewers name, and selecting the interviewer from the list provided. Alternatively enter a non-system user’s email address by selecting +Add non system user.
Insert any Comments as needed.
Select Create Interview.
If Verify interviewers availability first is selected for the schedule, select Manage Schedule.
On the calendar, select the possible interview times where the selected interviewer is available and select Save.
The Review Time Slots window opens, review the selected times, and select Save schedules.
The send Candidate Availability Request window opens. For more information on sending invitations, see Send Invitations and Confirm Attendance for an interview. The candidate communication includes the time slots that are selected, and the candidate can choose the interview time.
If Ask candidate first is selected for the schedule, select Request Candidate Availability to open a communication template window. For more information on sending invitations, see Send Invitations and Confirm Attendance for an interview.
If Confirmed date & time. (already decided) is selected for the schedule, Select Send Invitations to open a communication template window. For more information on sending invitations, see Send Invitations and Confirm Attendance for an interview.
Select Done to close the notification without sending invitations.
Create an Interview Series
From a list of candidates in a req, select a candidate and select Actions → Create Interview. Alternatively open a candidates Talent Record from within a req and select Actions → Create Interview.

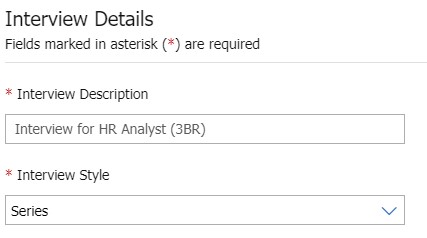
The Create Interview window opens. The Interview Description is prepopulated with the req number and job title. Edit the Interview Description if needed.
Select Series for Interview Style.

Select an Interview Format.
Insert the details of the interview, for example: the phone number or office address.
Select a Lead Coordinator. This field uses the type-ahead feature. Insert the first few letters of the lead coordinators name, and select the lead coordinator from the list provided.
Optionally, select the members of the Coordination Team. This field uses the type-ahead feature. Insert the first few letters of the coordinators name, and select the coordinator from the list provided.
Multiple coordination team members can be added.
Coordination team members must be selected and appear in the coordination team section to be included. Entering a coordination team members name in the field and not selecting it, does not include the team member.
To remove any selected team members, select the x icon for that coordinator.
Set the Schedule of the interview. Interview schedules can be confirmed by interviewer availability, candidate availability, or a date and time can be selected.

To review the interviewers availability before proposing times to a candidate, select Verify interviewers availability first.
Select + Add Interviewer. Insert the first few letters of the interviewers name, and select the interviewer from the list provided. Alternatively enter a non-system user’s email address by selecting +Add non system user.
Select an interviewer Duration.
Select Save and repeat these steps for all interviewers in the series.
If needed, select Manage Schedules to select times when the interviewers are available. For series interviews with multiple interviewers, the time slots selected must be sequential.
To coordinate the best interview time for the candidate within a certain date range, select Ask candidate first.
Select a Date Range for the candidate to choose from. After the candidate replies with their availability, the interview times can be coordinated with the interviewers schedule.
Select an Interview Duration.
Select + Add Interviewer. Insert the first few letters of the interviewers name, and select the interviewer from the list provided. Alternatively enter a non-system user’s email address by selecting +Add non system user.
Select an interviewer Duration.
Select Save and repeat these steps for all interviewers in the series. The Interview Duration automatically updates if the sum of the Interviewer Durations exceed the set Interview Duration.
If an interview has already been scheduled, select Confirmed date & time (already decided).
Insert the date, time, and Time zone of the scheduled interview.
Select + Add Interviewer. Insert the first few letters of the interviewers name, and select the interviewer from the list provided . Alternatively enter a non-system user’s email address by selecting +Add non system user.
Select an interviewer duration.
Select Save and repeat these steps for all interviewers in the series. If needed, select Manage Schedules to select times when the interviewers are available. For series interviews with multiple interviewers, the time slots selected must be sequential.
Select the Edit icon to edit an interviewer in the series. Select the Remove icon to remove an interview from the series. The interviewer order can be changed by dragging the interviewers into the order required.
Insert any Comments as needed.
Select Create Interview.
Select Send Invitations to open a communication template window, or select Done to close the notification without sending invitations. For more information on sending invitations, see Send Invitations and Confirm Attendance for an interview.
Create a Panel Interview
From a list of candidates in a req, select a candidate and select Actions → Create Interview. Alternatively open a from within a req and select Actions → Create Interview.

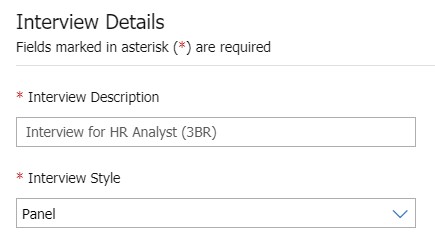
The Create Interview window opens. The Interview Description is prepopulated with the req number and job title. Edit the Interview Description if needed.
Select Panel for Interview Style.

Select an Interview Format.
Insert the details of the interview, for example: the phone number or office address.
Select a Lead Coordinator. This field uses the type-ahead feature. Insert the first few letters of the lead coordinators name, and select the lead coordinator from the list provided.
Optionally, select the members of the Coordination Team. This field uses the type-ahead feature. Insert the first few letters of the coordinators name, and select the coordinator from the list provided.
Multiple coordination team members can be added.
Coordination team members must be selected and appear in the coordination team section to be included. Entering a coordination team members name in the field and not selecting it, does not include the team member.
To remove any selected team members, select the x icon for that coordinator.
Set the Schedule of the interview. Interview schedules can be confirmed by interviewer availability, candidate availability, or a date and time can be selected.

To review the interviewers availability before proposing times to a candidate, select Verify interviewers availability first.
To coordinate the best interview time for the candidate within a certain date range, select Ask candidate first.
Select a Date Range for the candidate to choose from. After the candidate replies with their availability, the interview times can be coordinated with the interviewers schedule.
If an interview has already been scheduled, select Confirmed date & time. (already decided)
Insert the date, time, and Time zone of the scheduled interview.
Select an Interview Duration. If needed, select Manage Schedules to see the interviewers schedule in the system.
Select + Add Interviewer. Insert the first few letters of the interviewers name, and select the interviewer from the list provided. Alternatively enter a non-system user’s email address by selecting +Add non system user.
Select Save.
Repeat this process for all interviewers on the panel. If needed, select Manage Schedules to see the interviewers schedule in the system.
Select the Edit icon to edit an interviewer in the series.
Select the remove icon to remove an interview from the series.
Insert any Comments as needed.
Select Create Interview.
If Verify interviewers availability first is selected for the schedule, select Manage Schedule.
On the calendar, select the possible interview times where the selected interviewer is available and select Save.
The Review Time Slots window opens, review the selected times, and select Save schedules.
The send Candidate Availability Request window opens. For more information on sending invitations, see Send Invitations and Confirm Attendance for an interview. The candidate communication includes the time slots that are selected, and the candidate can choose the interview time.
If Ask candidate first is selected for the schedule, select Request Candidate Availability to open a communication template window. For more information on sending invitations, see Send Invitations and Confirm Attendance for an interview.
If Confirmed date & time. (already decided) is selected for the schedule, Select Send Invitations to open a communication template window. For more information on sending invitations, see Send Invitations and Confirm Attendance for an interview.
Select Done to close the notification without sending invitations.
View Interview Details
To view interview details, on the BrassRing home page, select the Interview tab.
In the Interview tab;
Each interview has the details of the interview, a status and a suggested Next Action.
Filter the interviews by selecting Filters and entering or selecting the filter.
To view the details of an interview, select the Interview Description. The Interview details page opens with a progress bar of the interview, the details of the interview, the details of the candidate, the interviewers, and a To-Do list.
Edit an Interview's Details
Certain interview details might not be editable after options are selected or invites are sent. For example: the interview time cannot be changed after the invitation is sent, or the interviewer cannot be changed after they have accepted the interview.
To edit an interview's details, on the BrassRing home page, select the Interview tab, and select the interview title to open the interview details.
To edit the Interview Details window, select the edit icon to open a field for editing. Edit the field as needed and select Save.

To edit the interviewers or the interview duration, select Manage Interviewers. Select the pencil icon for the interviewer, select the new interviewer and duration as needed, then select Save. Select Back to return to the interview details.

Update the field as needed and select Save.
Cancel An Interview
Interviews can be canceled from any status except Completed or Canceled.
To cancel an interview, on the BrassRing home page, select the Interview tab, and select the interview title to open the interview details.
Select the Interview Description.
Select Cancel Interview.
The Cancel Interview window opens. The system determines who needs to be notified of the cancellation based on the communications that were sent when creating the interview.
If no interview Invitations were sent, select Cancel Interview to cancel the interview, or select back to return to the Manage Interview window.
If a candidate or interviewer was notified of the interview, a communication is required. For more information see Send Interview Cancellations on the Send Invitations and Confirm Attendance for an interview page. Select and edit the communications as needed, and select Cancel Interview.
Reschedule an Interview
Build 20.09.08. Interviews can be rescheduled if they are of Schedule type Confirmed Date and Time and in a status of:
Invitation Sent
Invitation Accepted - Candidate
Invitation Declined - Candidate
Invitation Declined - Interviewer
Interview Scheduled
Reschedule action is disabled for the interviews in the following Interview Statuses:
Invitation Pending (in this case, "Manage Schedules" action displays instead)
Canceled (no edits are allowed at this status)
Completed (no edits are allowed at this status)
On-Hold (no edits are allowed at this status)
To reschedule an interview, on the [BrassRing home page Interview tab],
Select an interview and select Actions → Rechedule Interview.
Select the interview title to open the interview details, and select Reschedule Interview.
Depending on the status of the interview:
If the interview is scheduled or expired, select the new date and time of the interview.
If the candidate has declined an interview due to their availability,
Select Reschedule the interview by selecting a new time slot to select other time slots for the candidate to select from.
Select Restart the process by requesting updated candidate availability to restart the interview request process.
Select Save.
The [Send Invitations ]window opens. Select and update the communication templates as needed for the interviewer and candidate.
Select Send Invitations.
Manage the To-Do List:
On the BrassRing home page, select the Interview tab, and select the interview title to open the interview details.
Select an item to mark it as complete. The text appears with a strikethrough.
To add a To-Do item, enter the To-Do item in the Add to-do text box and select the plus icon.
To remove a To-Do item, select the three dots menu → Remove.
To edit a To-Do item, select the three dots menu → Edit. Edit the To-Do item as needed and select Save.