- 22 Feb 2024
- 15 Minutes to read
- Print
- DarkLight
Maintaining Apps & Content Settings
- Updated on 22 Feb 2024
- 15 Minutes to read
- Print
- DarkLight
Abstract
Please note: Adding new business partners is no longer supported.
The client must already have an agreement with the Business Partner prior to performing Full-page App License steps.
The Infinite BrassRing Platform Administrator must have ADMIN_MANAGE_BUSINESS_PARTNERS role to be able to add a license to a Infinite BrassRing Platform Client or Delete a license.
The Open HR App Setup and Support steps have been completed for the Business Partner enablement in the Infinite BrassRing Platform
The Admin application allows the user with the user type of ADMIN_MANAGE_RESOURCES to configure Business Partner Apps & Content settings for the Infinite BrassRing Platform. The apps that display here are the apps that have been licensed for you by IBM.
The following sections describe specific Apps & Content settings and configurations.
Navigation
Abstract
This section describes navigation steps to access the Apps & Content functions in the Admin application.
From the Admin app,
Select Apps & Content in the navigation menu to launch the configuration settings shown in the following figure. The Apps & Content page opens.
Figure 132. Apps & Content landing page
.png)
Note
Full page applications are listed on the Apps & Content screen. The purpose of showing the full-page application on Apps & Content list is to show that this application is provisioned for the tenant. The business partner application name (as in Gatekeeper) is shown in parenthesis under the Label shown in the Name column. If the application name is longer than 16 characters, up to 16 characters will be shown followed by "...".
Continue to the Apps & Content Configuration section for configuration steps.
Apps & content configuration
Abstract
The application list that displays here contains the business partner applications your company has been licensed for by IBM. An Application Admin can edit an application and choose from predefined locations where that application will display on the Homepage. When an application is enabled for a spot on the Homepage, and the user is provisioned for that application, then it will display on the Homepage for that user in that configured spot.
The configuration steps in the following sections enable the placement of an application in either Dashboard Spot 1, Dashboard Spot 2, Dashboard Spot 3 or Dashboard Spot 4.
The Location column lists the spot in which each Business Partner application is located, and is also sortable. The Location column also communicates if the application is activated or not. If an application has a location then that means the application is activated for the client. If the application has no location then it is disabled.
The location on the Home page depends on whether it is enabled as Dashboard Spot 1, Dashboard Spot 2, Dashboard Spot 3 or Dashboard Spot 4. (For example, if both Dashboard Spot 1 and Dashboard Spot 2 are enabled, they will both display on the page side by side. Portlets are ordered in columns. The actual number of columns depends on the width of the screen (breakpoints) a minimum of 1 and a maximum of 4.
Note
What the user sees depends on which Business Partner application has been enabled and user authorization permissions. If there are multiple In-page applications enabled for the same content spot, the first In-page application the user has access to will be displayed in this spot.
Activating a Full-page App License
Abstract
This section describes configuration steps for an Infinite Application Licensed Admin to add access to a Full-page App License for the current tenant.
To add a Business Partner Application,
Select Full-page App from the Integration Type dropdown list.
Select Activate new license. This opens the Activate Full-page App License page.
Figure 133. Select Full-page App and select Activate new license
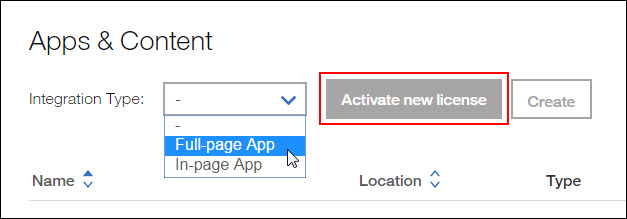
Figure 134. Activate Full-page App License page
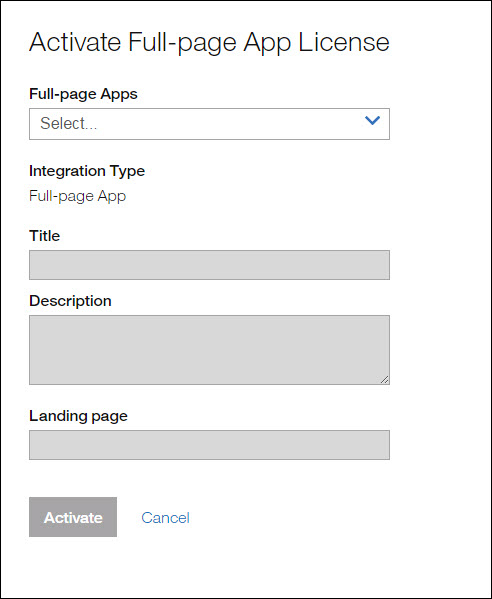
Select the applicable Full-page app that was uploaded to the Infinite BrassRing Platform from the Full-page Apps dropdown list. The Activate Full-page App License page opens with the information for the selected Full-page App.
Figure 135. Select Full-page app from Full-page Apps dropdown list
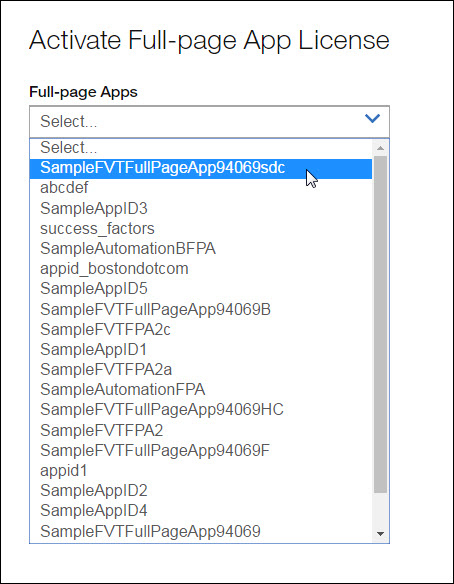
Figure 136. Activate Full-page App license Title and Description fields
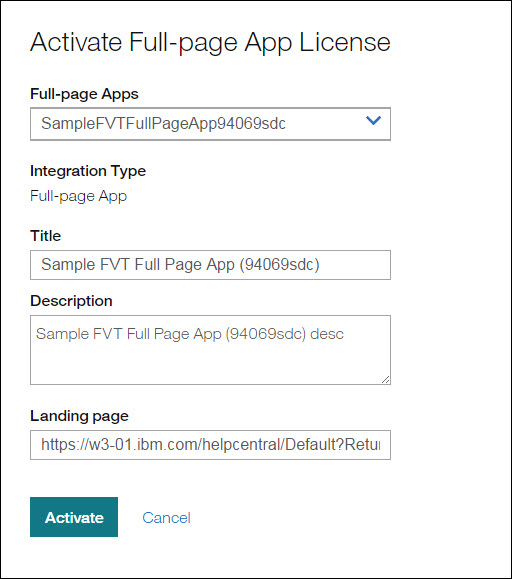
Enter a title label and description for the Full-page app in the Title and Description fields.
Note
The Title is an optional step, the user can use the default value already in place for the Title field. When the name is changed in the Title field (also known as the label for the application) and then saved, the Application Launcher navigation bar displays the new Full-page app title.
Figure 137. New title displays on the Application Launcher navigation bar

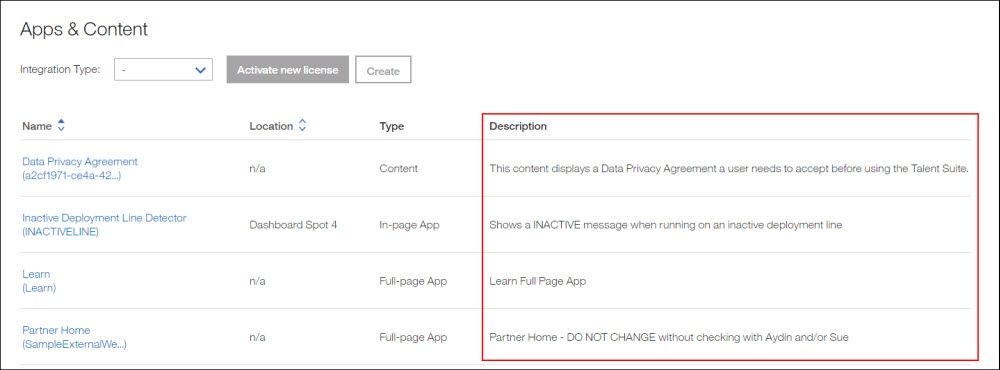
When a description is entered in the Description field, it displays in the Description column on the Apps & Content landing page.
Description column on the Apps & Content landing page
The Landing page field contains the URL for that client. Before Selecting Submit, verify that the landing page URL is correct for this client.
To verify on the Full-page App Edit page,
Place your cursor in the Landing page field and scroll to the end of the URL address inside the field to view the entire URL address.
Note
For the Landing page field, Refer to the Business Partner enablement in the Infinite BrassRing Platform located at Introduction to validate and confirm if the partner solution supports multi tenancy by keeping the default URL or if the URL needs to be updated for this client.
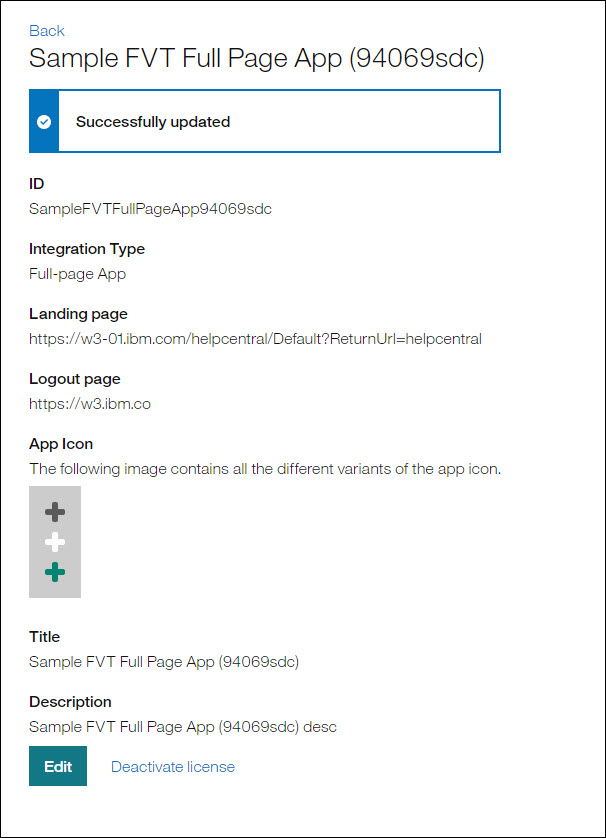
Select Activate to activate the selected Full-page app or Cancel to exit without saving. Upon successful completion, the enabled application page displays.
Figure 138. Successfully enabled Full-page application
Note
The application is now recognized as a valid client and is immediately available to the client in the Gatekeeper system. Any changes that are made in any of these fields will only affect this client.
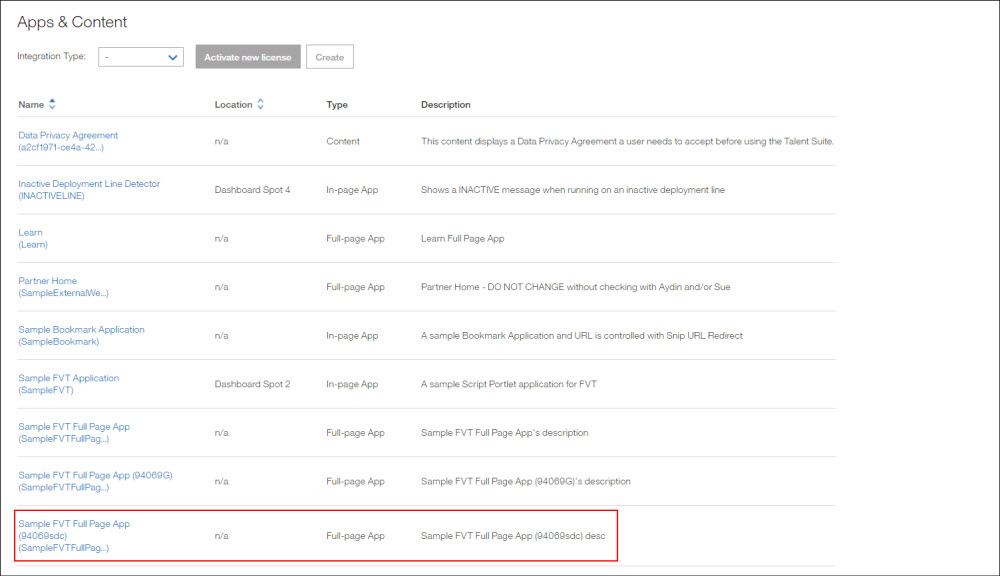
Select the Back link to navigate back to the Apps & content landing page. The newly enabled Business Partner application will be shown in the list of applications.
Figure 139. Newly enabled Business Partner app in list of applications
Once a user is fully set up,Refresh the page.
Select the Application Launcher icon
 to launch the Application Launcher navigation bar. The new enabled application will display just prior to the Amin application icon on the Infinite BrassRing Platform navigation bar.
Note
The person who adds the application in the Infinite BrassRing Platform will see the application right away in the Application Launcher navigation bar and is also licensed for the application automatically in Gatekeeper.
Figure 140. New Business Partner application available on Infinite BrassRing Platform navigation bar
.png)
Once the Full-page app has been added,
Provision (give license to) the users to have access to the application using the User Management process.
Follow the steps in the Manage Users, Add New User Process Steps section of this guide to add new users for the application.
Once the User Management, Add New User function has been completed,
Cross check the application to make sure all the user provisioning requirements have been met. They will see the full-app in the app launcher
Editing a Full-page App
Abstract
An admin can go to the Admin Apps & Content screen, locate the Full Page App that needs to be edited for a client, select the name of the app and then select the Edit button to edit that Full-page App.
On the Full-page App Edit screen, the partner Full-page App title can be changed for a tenant for each supported Language in the list as well as the Title, Description and Landing page URL.
Note
Before making any changes to the Landing page URL, the admin should consult with the partner integration product manager as well as the documentation provided by the partner since this would impact what page would be displayed when selecting this partner app icon for this tenant.
Optional:
On the Apps & Content screen, select Full-page App name from the list of applications.
On the selected Full-page App screen you opened, select Edit. The Full-page App Edit screen opens.
Figure 141. Edit button on Full-page App screen
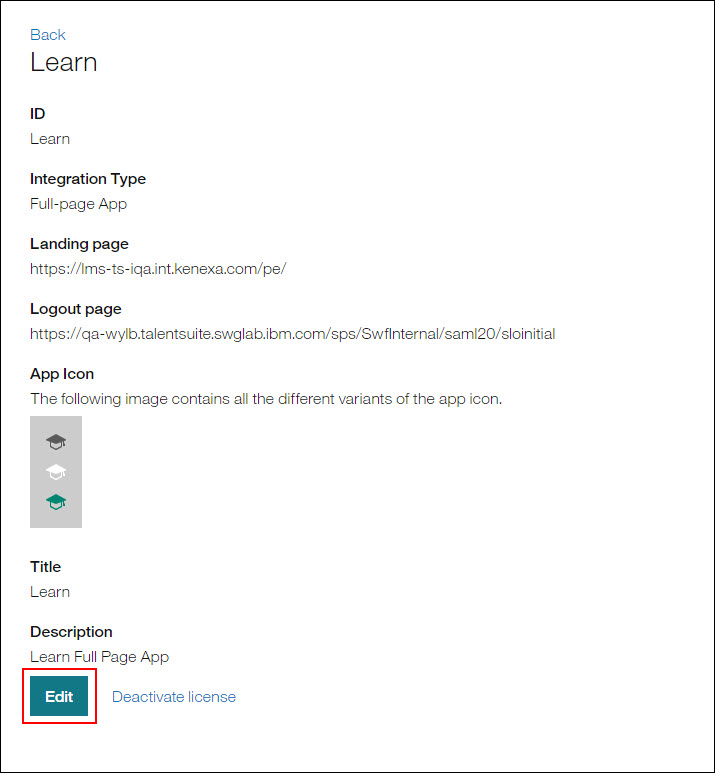
Figure 142. Full-page App Edit screen
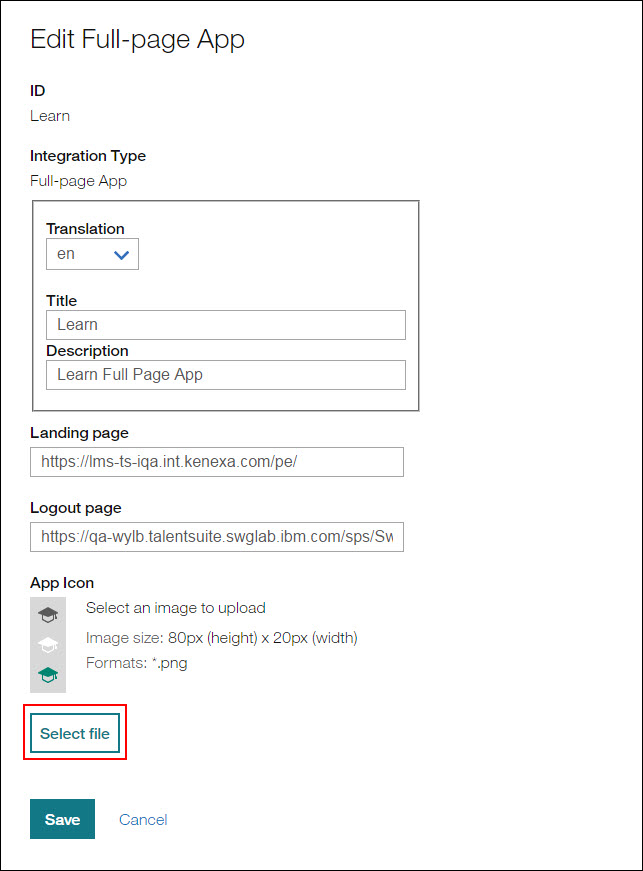
Edit the Translation language, Title, Description, and Landing page for the Full-page App as needed.
When setting up different translation languages for a client in the Translation field, select the applicable languages, then select Save.
Note
When the name is changed in the Title field (also known as the label for the application) and then saved, the Application Launcher navigation bar displays the new Full-page app title.
When a description is entered in the Description field, it displays in the Description column on the Apps & Content landing page.
For the Landing page field, please validate and confirm if the partner solution supports multi tenancy by keeping the default URL or if the URL needs to be updated for this client.
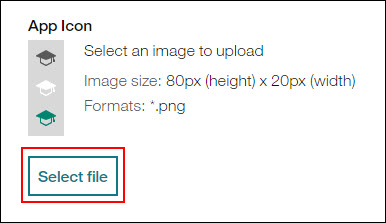
To change the App icon image,
Select the Select file button in the App icon section. The Open dialog window opens.
Figure 143. Full-page App Edit - Select icon
In the Open dialog window,
Navigate to and select the new image you wish to use to replace the existing icon.
Select Open. The new icon image now displays in the App Icon section.
Select Save to save changes or Cancel to exit without saving.
Creating a Full-page Application
Abstract
This section describes configuration steps for an Infinite Application Licensed Admin to create a Full-page Application for the current tenant.
The Create Full-page App feature allows users to create a Full-page App with the User Interface (UI) instead of uploading a .csv zip file using the “Upload apps & content function”.
The given fields allow users to adjust their settings just as they would using the .csv zip file upload method in “Upload apps & content”.
Table 68. Create Application Sections and Fields
Section/Field | Description |
|---|---|
App Type | This the application is a [Full-page App] selected on the Create Application page. |
App ID | This is the Identifier of the new application, which is required to be unique. |
Integration | Integration is the way the application is integrated within the Infinite BrassRing Platform (for example, the “iFrame App” which has an “Include Styles” attribute). The new application will have Infinite BrassRing Platform styles available, if chosen. |
WAI script tag | The new application has to integrate this tag into its markup to enable the application to correctly display within the Infinite BrassRing Platform. |
Landing page | The URL entered will be displayed after a user selects the application tile. |
Logout URL | A URL to be called within the Infinite BrassRing Platform logout process, ensuring the user is also logged out from the applications. |
App Icon | The image to be displayed within the application launcher. An image can be selected by selecting the Click to select link in the box or the Select file button. |
Features |
|
Translation | The language you want to use for the application is selected from the dropdown list. |
Title | The Title for the application is entered in the selected language (to be displayed in the [App launcher], and the [Apps and Content] list). |
Description | The description for the application is entered in the selected language (to be displayed in the [Apps and Content] list). |
To create a Full-page App,
From the Apps & Content page, select Full-page from the Add field dropdown list.
Select Create. This opens the Create Application page.
Figure 144. Select Full-page app and select Create
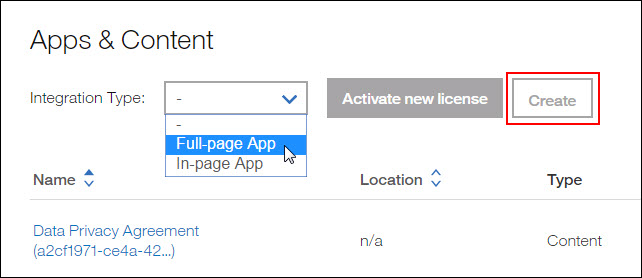
Figure 145. Create Application page
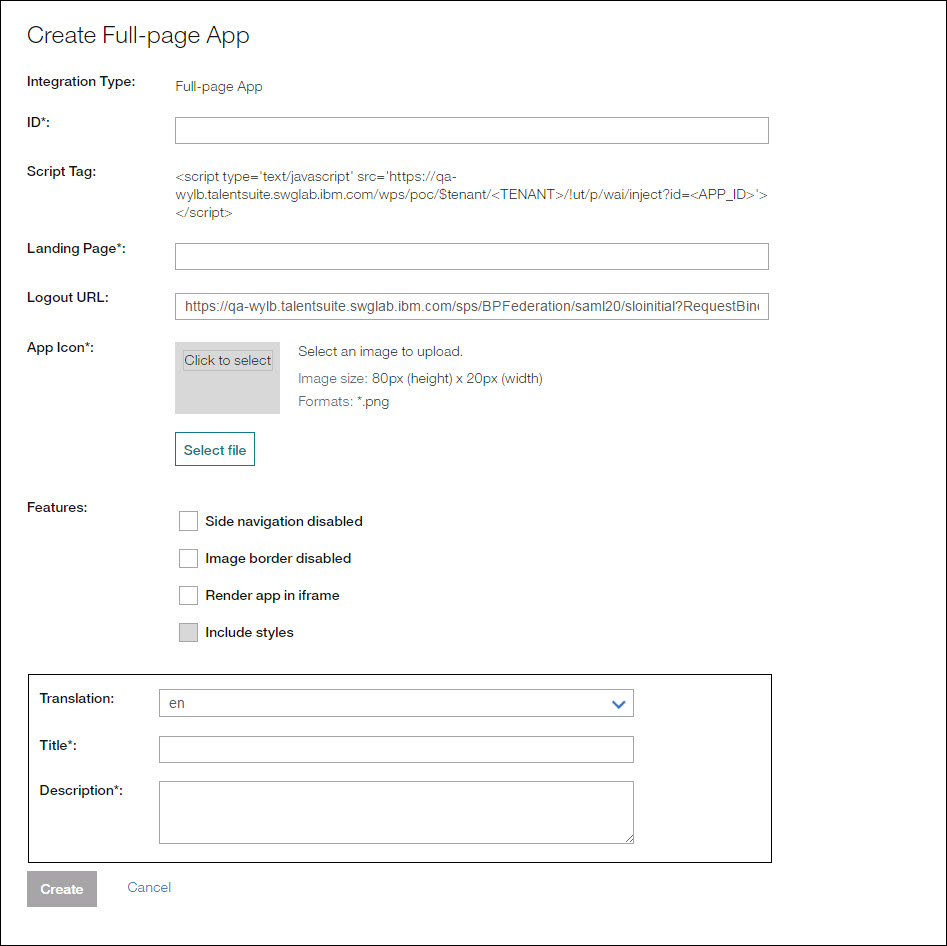
Enter the application ID in the ID field.
Note
This is the Identifier of the new application, which is required to be unique.
In the [Features] section, select the Render app in iframe checkbox. The Include Styles attribute checkbox then becomes visible.
Note
Features is the way the application is integrated within the Infinite BrassRing Platform (for example, the “Render app in iframe” which has an “Include Styles” attribute). The new application will have Infinite BrassRing Platform styles available, if chosen.
Figure 146. Features section

In the Landing page field, enter the URL to be displayed after a user selects the application tile.
To change the App icon image,
In the [App Icon] section, select Click to select or Select file and select and image to upload an icon image. The [Open] dialog window opens.
Note
The maximum image size 80px (height) x 20px (width). The format must be *.png.
Figure 147. App Icon section - Select Click to select or Select file

In the [Open] dialog window,
Navigate to and select the new image you wish to use to replace the existing icon.
Select Open. The new icon image now displays in the App Icon section.
Select Create to save changes or Cancel to exit without saving.
In the [Features] section,
Select one or both of the following check boxes.
Side navigation disabled
(If selected, the application won't have a hamburger menu on the top left corner.)
Image border disabled
(If selected, the application will not have the space between browser window and the white page background (which shows that branding image).
Figure 148. Features section

In the Translation field, select the language you want to use for the application from the dropdown list.
Figure 149. Translation field
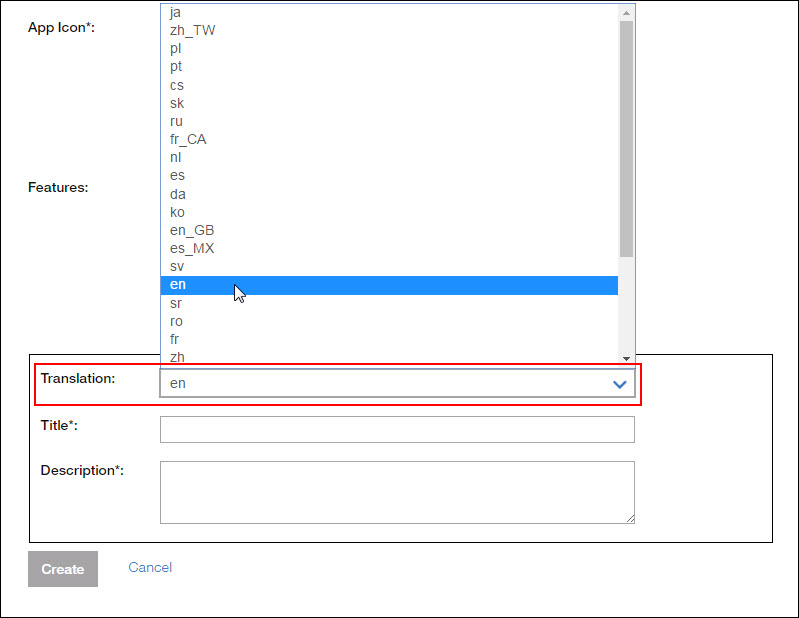
In the Title field, enter the Title for the application in the selected language (to be displayed in the [App launcher], and the [Apps and Content] list).
In the Description field, enter the description for the application in the selected language (to be displayed in the [Apps and Content] list).
Select Create to create a Full-page app or Cancel to exit without saving.
Activating an In-page App
Abstract
This section describes configuration steps for an Infinite Application Licensed Admin to add access to an In-page App for the current tenant.
On the Apps & Content page,
Select In-page from the Integration Type drop-down list.
Select Activate new license. This opens the Activate In-page App License page.
Figure 150. Select In-page App and select Activate new license
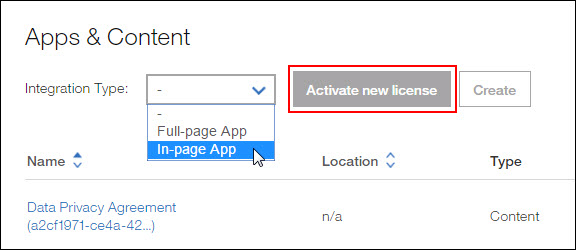
Figure 151. Activate In-page App License page
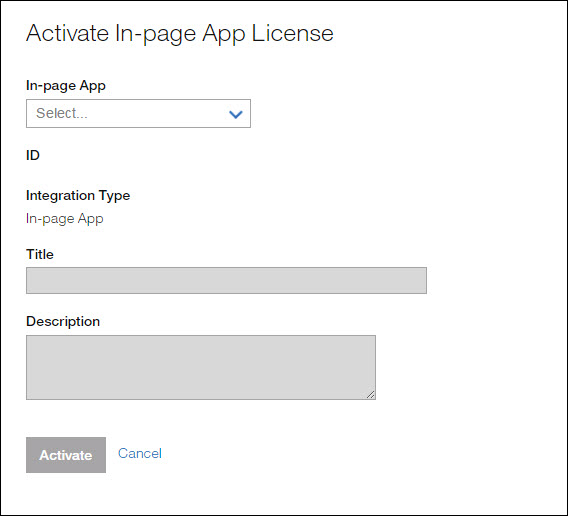
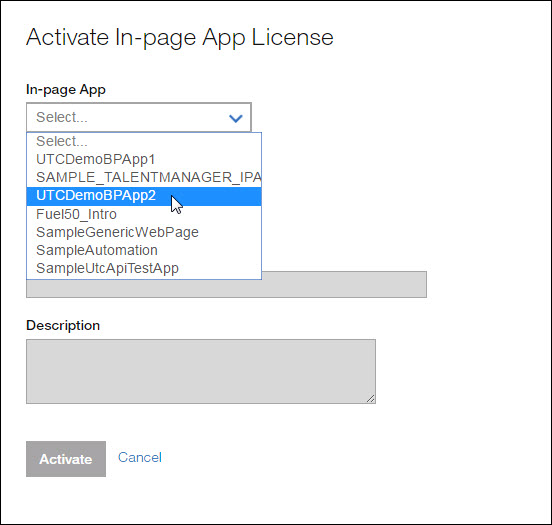
Select the Business Partner application from the In-page App dropdown list. The Activate In-page App License page re-displays with the Title and Description fields pre-populated and Placement Dashboard Spot options available to select.
Figure 152. Activate In-page App License page, In-page App selection
To overwrite the default title and default description of an application for the current tenant, enter an application title in the Title field and a description in the Description field.
Note
Currently overwriting the Title and Description is supported for English only. The Title and Description will be displayed in the Apps & Content list.
Scenario,
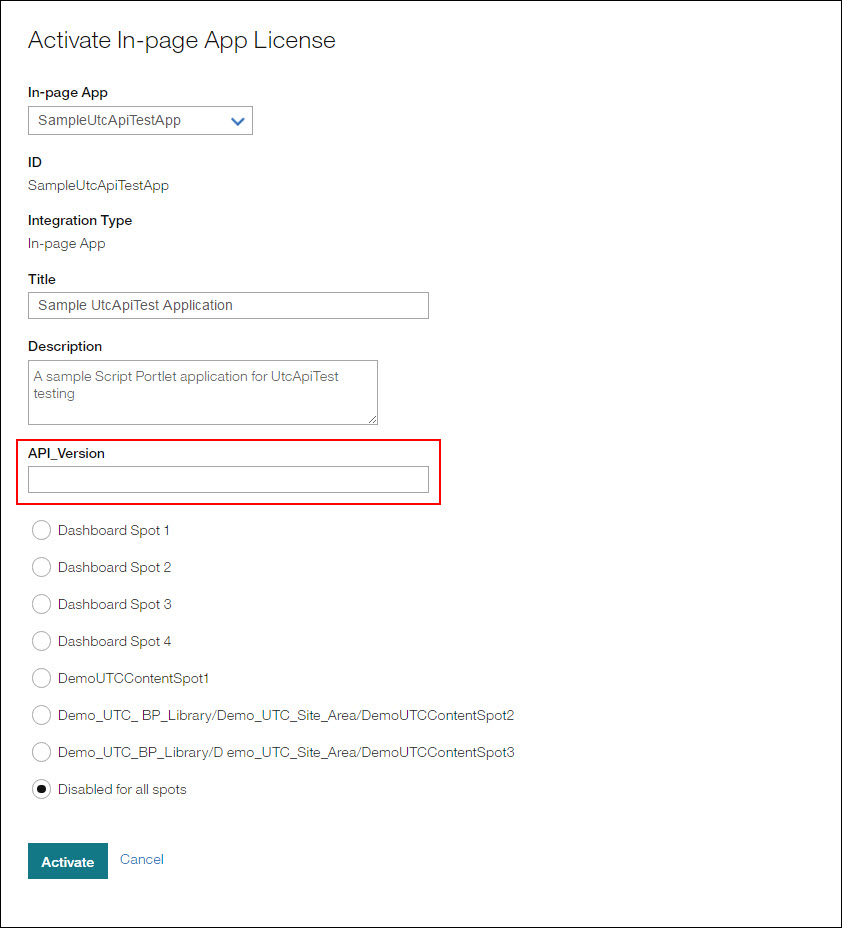
If, and only if, a portlet based partner application requires additional values that are unique/specific to the Infinite BrassRing Platform Tenant the portlet application is being enabled to, there might be additional boxes to fill out.
Note
In this case, values MUST be entered into those fields.
When and/if this happens, the partner application documentation must contain further help and/or guidance for filling those values in correctly.
The following SampleUtcApiTestApp Application figure shows an example of one additional attribute for testing this concept.
Figure 153. SampleUtcApiTestApp Application
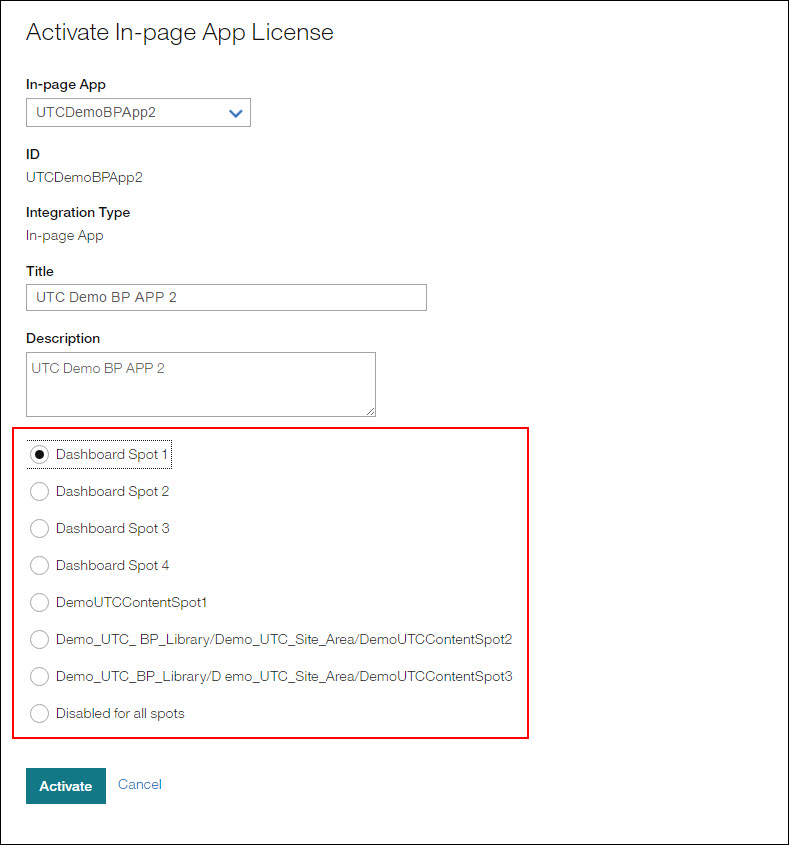
Select one of the following Dashboard Spot option choices:
Dashboard Spot 1
Dashboard Spot 2
Dashboard Spot 3
Dashboard Spot 4
Disabled for all spots (This option will remove enablement for the selected application from the Home page view.)
Figure 154. Activate In-page App License page, Select Dashboard Spot
Select Activate to activate the application or Cancel to exit out of the Activate, In-page App process.
Note
If more than one In-page App is available for selection, the user can select the additional In-page App from the In-page App dropdown list and make the applicable changes to that In-page App.
Editing an In-page App
Abstract
This section describes configuration steps to edit and enable an existing In-page App, and select placement.
To edit an existing Business Partner Application,
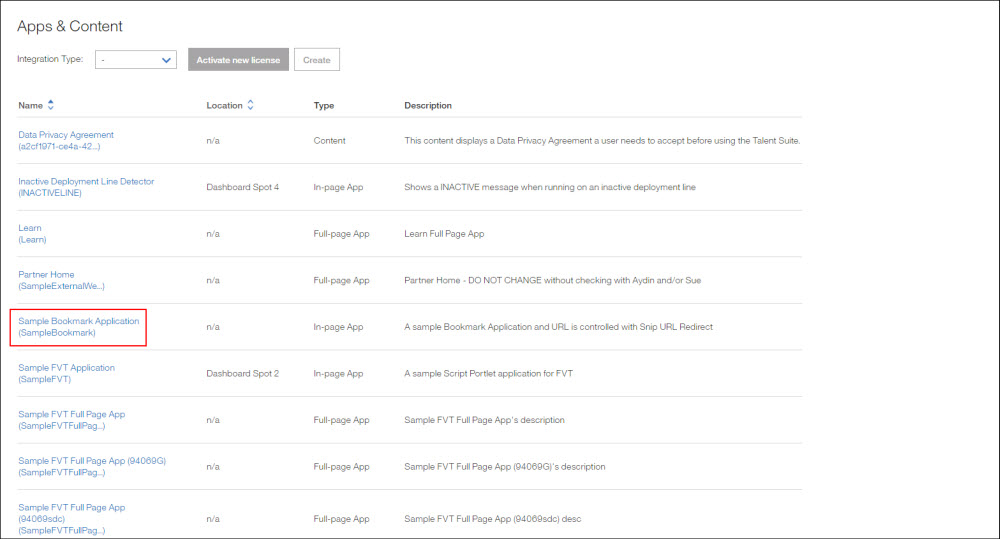
Select the applicable Business Partner application link. The In-page App page for that Business Partner application opens.
Figure 155. Select Business Partner Application link to edit
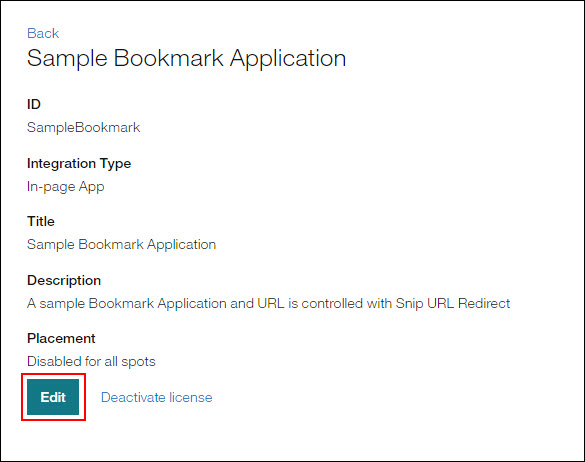
Select the Edit link. The Edit In-page App page opens with the Title and Description fields pre-populated and the current Placement Dashboard Spot previously selected for that Business Partner application.
Figure 156. Edit link to edit Business Partner Application Dashboard Spot placement
On the Edit In-page App page,
Select the new Dashboard Spot Placement for the Business Partner application.
Figure 157. Edit In-page App page, Select Placement
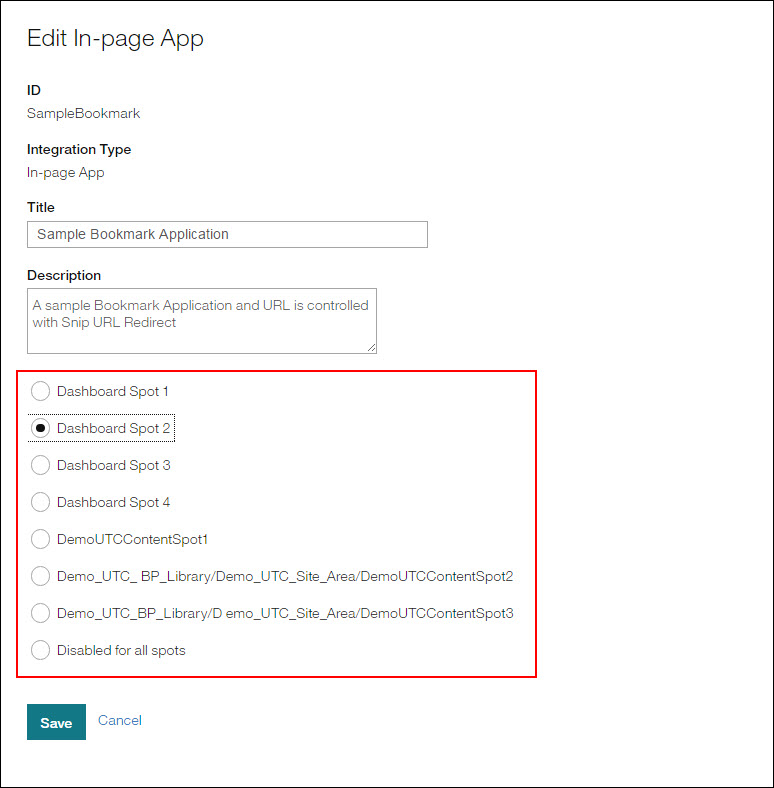
Select Save to save the application changes or Cancel to exit out of the Edit, In-page App process.
Placement of the Portlets
Abstract
This section describes the placement of portlets on the Home page as Spots.
Portlets are ordered in columns. The actual number of columns depends on the width of the screen (breakpoints) a minimum of 1 and a maximum of 4.
The placement of the portlets are as follows, assuming the user has access to the (LayoutPortlet) portlet which renders all 4 content spots.
Spot 1 → Spot 2 → Spot 3 → Spot 4
Note
The portlets will be placed either next to each other in one row, or 2/3 rows based on the user's browser page width.
Spot 1
Spot 2
Spot 3
Spot 4
Following are the four possible column variations with 4 content spots:
Figure 158. 1 Column
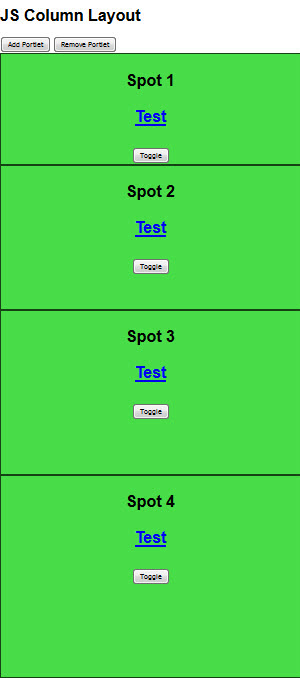
Figure 159. 2 Columns
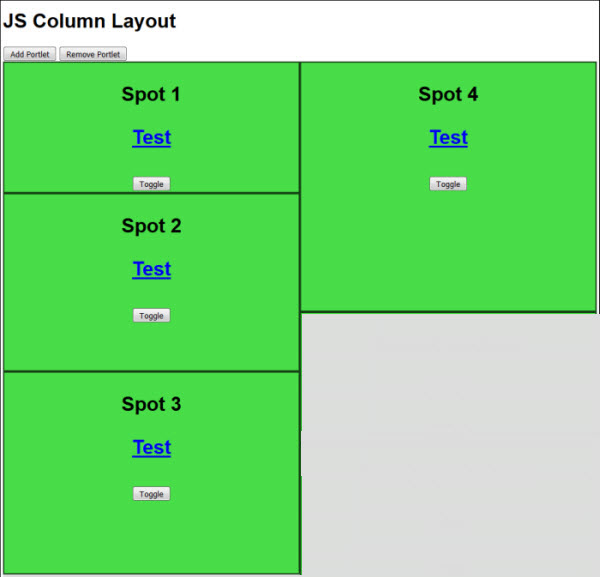
Figure 160. 3 Columns
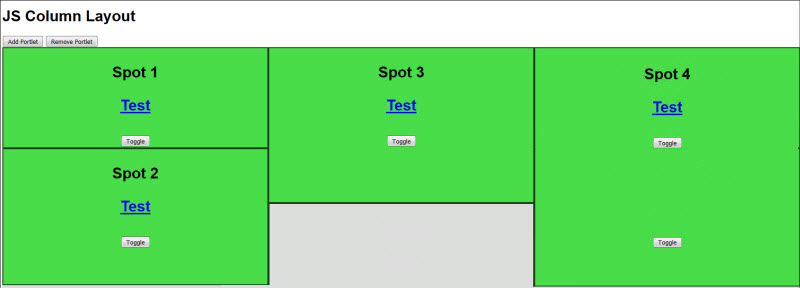
Figure 161. 4 Columns

How to Deactivate a Business Partner App License from the Tenant
Abstract
This section describes configuration steps for an Infinite Application Licensed Admin to Deactivate a Business Partner App License for the current tenant.
To Deactivate an application license from the client,
Navigate to the Apps & content landing page and select the link of the application you wish to delete from the list of applications.
Once on the application page, select Deactivate license to deactivate the license for that tenant. A message verification window opens with the prompt Are you sure you want to deactivate the license for the Full-page App Partner Home (<appname>)? Any customization will be permanently lost..
Figure 162. Deactivate application license
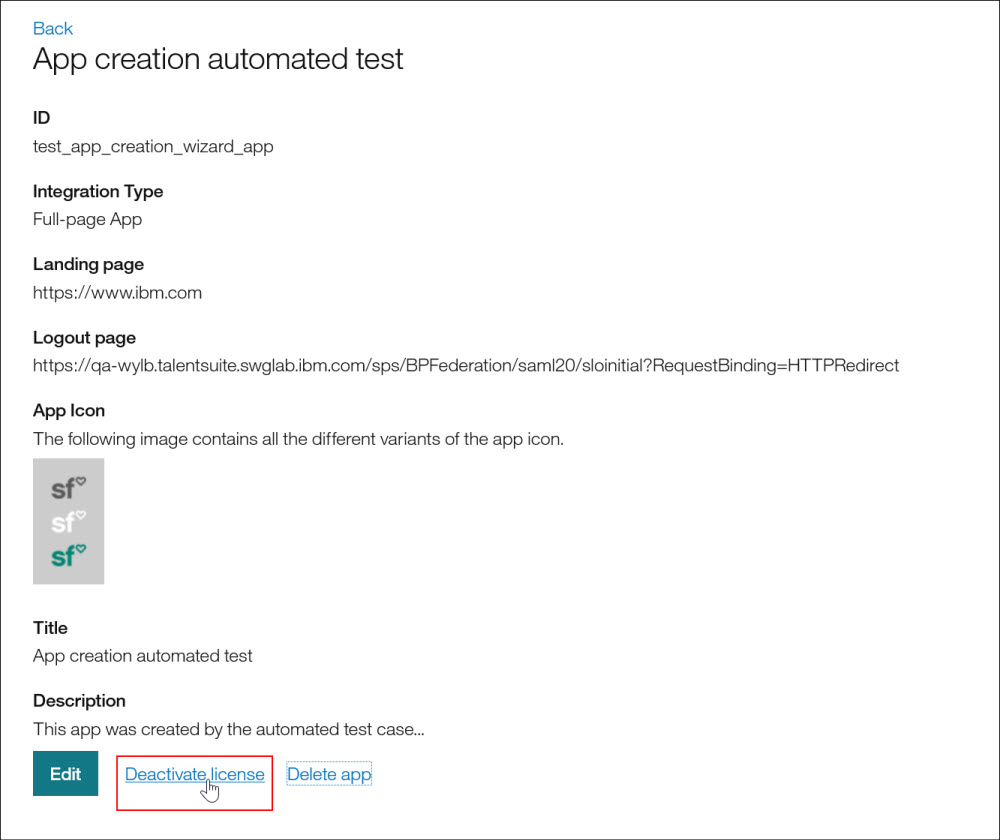
Figure 163. Deactivate App License? message
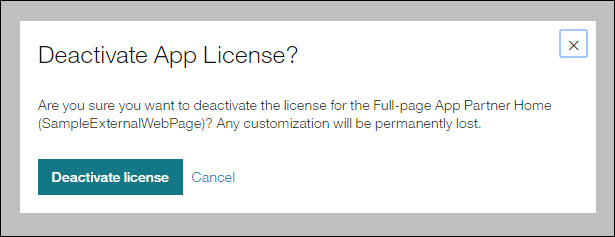
Select Deactivate license. The application license is then removed from the client.
Important
The application is not deactivated, only the license is deactivated.
Check the application list on the Apps & content landing page to verify it is no longer on the list and removed from the tenant.
Deleting In-page and Full-page Apps
Abstract
This section describes configuration steps for an Infinite Admin or Business Partner to Delete both In-page and Full-page Business Partner apps. Only the user who imported the application is allowed to the delete it.
The Delete app feature allows for the removal of unneeded In-page and Full-page Business Partner Apps. This feature can only be performed by the admin of the application and within the client that was used to create/upload the application. Upon deletion, the content of the deleted Business Partner apps will immediately be deleted from the Infinite BrassRing Platform environment; however, the definition of the application will still exist in Gatekeeper as DELETED_<appname>_<date>. The Gatekeeper team will periodically remove these application definitions in a later times.
Note
Deleted applications are no longer visible in the Infinite BrassRing Platform, and all client licenses are deactivated.
To delete an app,
Navigate to the Apps & content landing page and select the link of the application you wish to delete.
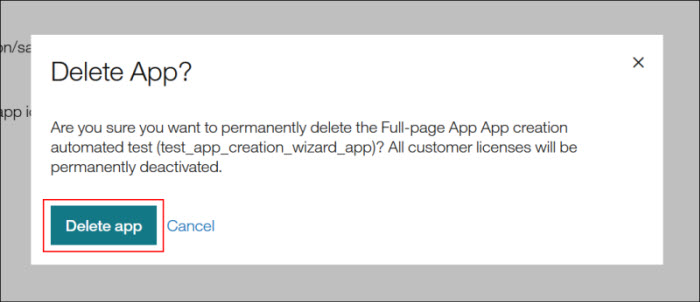
Once on the application page, select Delete app to delete the In-page or Full-page app. A message verification window opens with the prompt “Are you sure you want to permanently delete the Full-page App creating automated test (<appname>)? All customer licenses will be permanently deactivated.”.
Select Delete app to continue with deletion of the Business Partner In-page or Full-page app.
Figure 164. Delete application
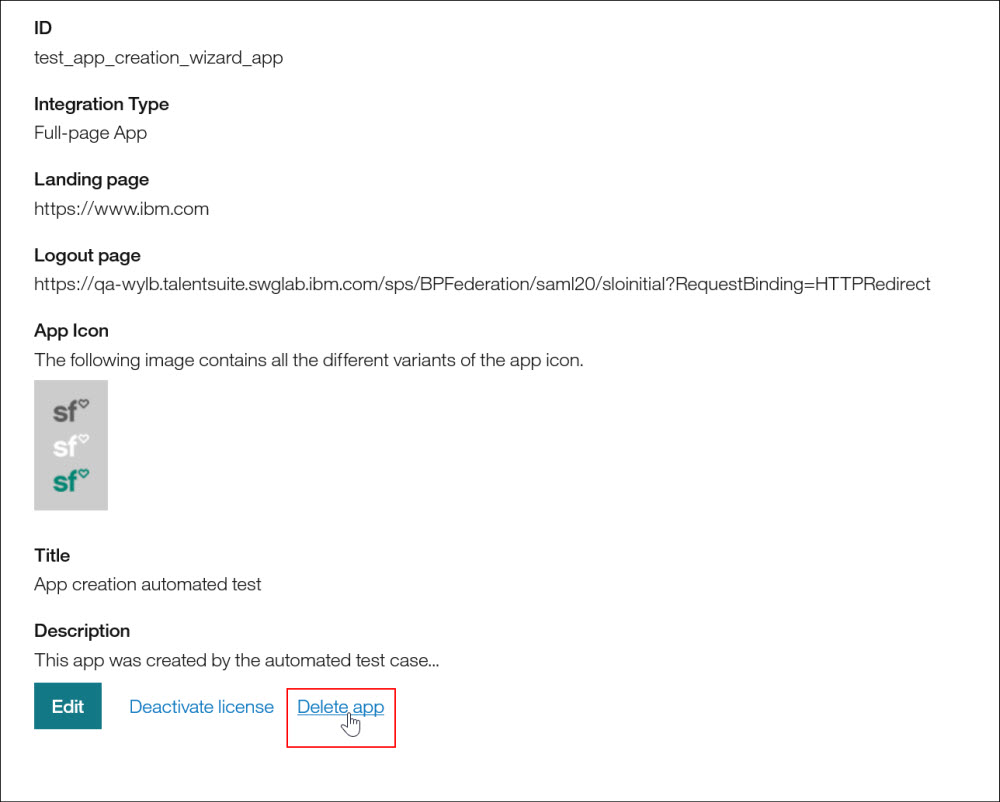
Figure 165. Delete App? message
