- 07 Mar 2024
- 7 Minutes to read
- Print
- DarkLight
Managing Mappings
- Updated on 07 Mar 2024
- 7 Minutes to read
- Print
- DarkLight
Abstract
Product: Custom Approval Workflow.
Managing Mappings
The Export Mappings and Import Mappings functions facilitates mapping sequence codes and defining roles for sequences. Custom Approval Workflow generates an editable list of records that match specified criteria, including workflows, roles, organizational codes, and users.
Custom Approval Workflow exports the data as a compressed (gzip-encoded) file containing Microsoft Access tables (MDB format). The tables can be edited, recompressed, and imported back into Custom Approval Workflow.
Process
High-Level Steps Exporting and Importing Mappings
The following high-level procedure describes how to export mappings, edit the exported data, and import your changes back into Custom Approval Workflow. Each high-level step is described in greater detail in the topics that follow.
On the Export Mappings screen, specify criteria for the records to export, including workflows, roles, organizational codes, and users.
When Export Mappings is selected, Custom Approval Workflow generates an editable list of records that match criteria and sends the data to an email address you specify as a compressed (gzip-encoded) file containing three Microsoft Access tables (MDB format):
Description: Contains the criteria that was specified.
Update: Contains the exported records.
Errors: Contains any errors BCustom Approval Workflow encountered, on a record-by-record basis. This table is always included, even if it is empty.
Edit the data in the Update table, recompress the tables, and select Import Mappings to import them back into Custom Approval Workflow.
An email is sent to notify that the file was successful.
Custom Approval Workflow processes the records offline and then sends another email that describes the status of the import. If any errors were encountered during the import, the email message contains a compressed (gzip- encoded) file containing three Microsoft Access tables (MDBformat):
Description: Contains the criteria that you specified.
Update: Contains the exported records. Use the data in the Errors table to edit to the records that caused import problems.
Errors: Contains any errors Custom Approval Workflow encountered, on a record-by-record basis.
Fix the problem records in the Update table, rezip the tables, and select Import Mappings to import them back into BrassRing Custom Approval Workflow.
If necessary, repeat step 6 until all the records have been successfully imported.
Creating Export Mappings
Specify the criteria for returning records by accessing Custom Approval Workflow and selecting the Admin tab.
Select System Export Mappings. To see the currently specified criteria at any time, select Show criteria.
Select the workflows to work with. By default, all workflows are selected.

Select one or more codes for which to find associated sequences. The lowest level code available to see the assigned sequences must be selected. For example, if your organization has three levels, Company, Business Unit, and Department you must select codes for all three.
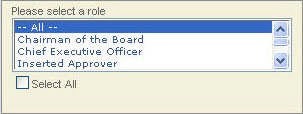
Select one or more roles from the roles list. Select Select All to select all roles.

Use one of the following methods to specify the users for the criteria. You can specify user criteria with only one of these methods per request.
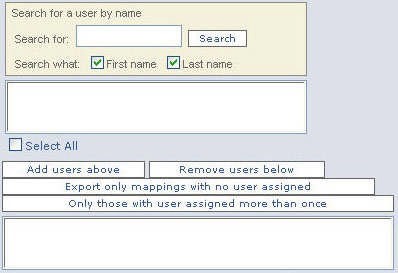
To find records for which specific users are assigned to the roles selected in Step 5, select one or more users, then select Add users above to specify the users as part of the criteria. To remove users from the criteria, select Remove users below. Selecting no users is equivalent to selecting them all.
To find records for which the roles selected in Step 5 are mapped to a specified organizational code combination but no users are assigned to those roles, select Export only mappings with no user assigned.
To find records for which any one user is assigned to more than one of the roles you selected in Step 5, select Only those with user assigned more than once.

To see how many records the specified criteria matches, select Just get count.The number of records that match the criteria display. Select OK. See Exporting the Records, for details about exporting the records that match your criteria.
Exporting the Records
Specify criteria that determines which records to return.
Select Export Mappings.
A message opens with the number of records returned. Select OK to close the message box.
Custom Approval Workflow sends a compressed (gzip-encoded) file containing Microsoft Access tables to the email address that appears in the Delivery email box. By default, this is the email address for the BrassRing user who is currently logged in to this Custom Approval Workflow account. Different recipients email addresses can be entered in the Delivery email box. These additional email recipients are reset upon logging out. See Working with the Exported Records for details about working with the Access tables.
Working with Exported Records
After selecting Export Mappings an email is received with the subject line Your role map export. If there was a problem exporting the records, this message describes the problem. Select the link to access a compressed (gzip-encoded) file containing Access tables and then save the file to a local or network drive.
Extract the MDB file and open it in Microsoft Access. The MDB file contains three tables: Description, Errors, and Update. The three sections that follow describe each table in more detail.
Description Table contains the criteria was specified when you exported the records. Do not edit this table.
The Errors table lists errors, on a record-by-record basis. Do not edit the Errors table.

This table is always included, even if there are no errors.
If there are problems with the records, for example, after you have imported edited records back into BrassRing Custom Approval Workflow, the errors are listed.
Each record in the Errors table corresponds to a record in the Update table. Match the error to the appropriate record in the Update table based on the entry in the ID field. The Description field describes the problem with the corresponding record in the Update table.
The Update table is used to add, edit, and delete records.
For exports, the Update table received contains the exported records that match the criteria specified Custom Approval Workflow.
For imports with errors, the Update table received contains all the records that were attempted in the import, not just the ones with errors. Use the ID column in the Errors table to find records that need to be fixed and imported again.
The Update table contains the following columns:
Id: AutoNumber ID for this record. Use the ID column to match records to errors in the Errors table.
Workflow: Name of the workflow.
Company: Unique code that is assigned to each organizational unit at this level.
Company Desc: Descriptive name of the organizational unit.
Business Unit: Unique code that is assigned to each organizational unit at this level.
Business Unit Desc: Descriptive name of the organizational unit.
Department: Unique code that is assigned to each organizational unit at this level.
Department Desc: Descriptive name of the organizational unit.
Aggregate: If checked, the record specifies an aggregate assignment, that is, more than one user assigned to the same functional role mapped to a specified organizational code combination.
Role: The functional roles that are mapped to this record’s organizational code combination and assigned to the user specified by EmployeeId and Name.
EmployeeId: The employee ID for the user who is assigned to the corresponding role.
Name: The name of the user who is assigned to the corresponding role.
Sequence: The descriptive name of the code sequence.
IsDelete: If checked, delete the record upon import.
Keep the following points in mind when editing the records in the Update table:
An Employee ID value is required for each user. When you import the tables, Custom Approval Workflow returns an error for each record that does not include a valid Employee ID.
All records that are changed are treated as updates.
All new records added are treated as inserts.
All records for which IsDelete is selected are treated as deletes. Deleting the record from the table has no effect when the table is imported back into Custom Approval Workflow.
When the edits are complete, save the Update table and add it back to the compressed file downloaded from the Your role map export email message.
Importing Mappings
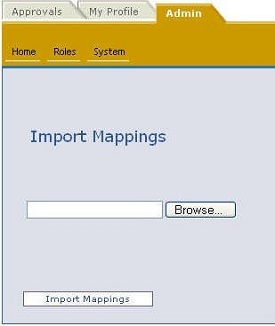
Once the exported records in the Microsoft Access tables have been edited, use the Import Mappings function to import them back intoCustom Approval Workflow. The Update table must be compressed back into the .GZ file downloaded. Only the .GZ file can be imported into Custom Approval Workflow.
Access Custom Approval Workflow and select the Admin tab.
Select System → ImportMappings.

Select Browse and select the .GZ file to import.
Select Import Mappings.
Custom Approval Workflow sends an email response that states if the file was received successfully. If the same .GZ file has already been imported, Custom Approval Workflow does not accept the import and returns an error in the email response. The records are processed offline and another email is sent that describes the status of the import. See Fixing Errors in Imported Records for details about working with the import responses.
