- 27 Feb 2024
- 3 Minutes to read
- Print
- DarkLight
Managing Multiple Filters
- Updated on 27 Feb 2024
- 3 Minutes to read
- Print
- DarkLight
Abstract
Any client with access to the Manage New Hires page in Onboard Manager can utilize filter features.
Introduction
Onboarding managers can not only create multiple filters (multiple searches), but can also easily use and manage them, including making one the default.
Filter Functionality
Both standard and client-specific custom filters can display on the Manage New Hires page, in Filters.
On the Manage New Hires page of Onboard Manager, filter functionality includes the following:
Filter Name
Save
Save New
Load
Manage (includes selection of one default filter)
Refine Results
Clear (existing functionality)
Filter Name
If onboarding managers saved a filter prior to the addition of the Default column on the Manage Saved Filters (Manage link), there will be a saved filter with the name [default]. When they log in, they will be at zero/ground state, and will see all the new hires they can access. They need to go to the Load Filters pop-up (via the Load link) and load it. They can rename it by going to the Manage Saved Filters pop-up (via the Manage link), then using the Rename link.
Once a default filter is selected, its name displays in the field.
SAVE
The Save link allows onboarding managers to save any changes made to the currently viewed filter.
SAVE NEW
The Save New link displays a Filter Name field, which allows onboarding managers to name a new filter. The name must be unique (per user). There is no limit for the number of filters that can be saved.
If the onboarding manager tries to save a filter:
With the same name as an existing filter, a message appears, informing the person that a saved filter with that name already exists.
Without a filter applied, a message appears, informing the person that the system is unable to perform the operation.
The newly created filter name displays in the Filter pane, along with Save, Save New, Load, Manage, and Clear links, and the Refine Results label:
LOAD
The Load link displays the Load Filters pop-up, which allows onboarding managers to view a list of their saved filters, then select that filter. The list of filters is sorted numerically, and then alphabetically (uppercase, then lowercase). In the Filter pane, the name of the selected filter displays in the Filter Name field.
MANAGE
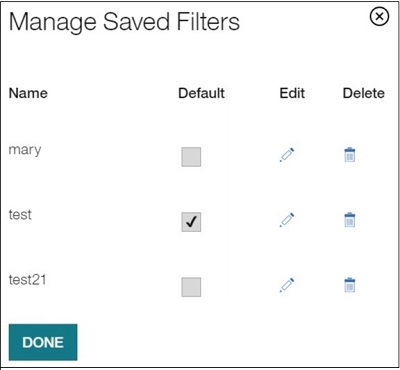
The Manage link displays a Manage Saved Filters pop-up, which allows onboarding managers to view a list of their saved filters, set one default filter, edit/rename them, and delete them.

The list of filters is sorted numerically, and then alphabetically (uppercase, then lowercase). When the Done button is selected, the pop-up just closes. There is no message, even if a filter was renamed.
To set one filter as the default, select a check box from the Default column. The default filter view is applied automatically whenever an onboarding manager navigates to the Manage New Hires page the first time after login. Note: If onboarding managers saved a filter prior to the addition of the Default column, there will be a saved filter with the name [default]. When they log in, they will be at zero/ground state, and will see all the new hires they can access. They need to go to the Load Filters pop-up (via the Load link) and load it. They can rename it by going to the Manage Saved Filters pop-up (via the Manage link), then using the Rename link.
With renaming, if the onboarding manager clicks outside the text box after the rename but doesn't select Done or X (in the window), the pop-up remains open but the editing is complete.
REFINE RESULTS
The Refine Results label indicates to onboarding managers that filter criteria can be edited/cleared, etc.
CLEAR
The Clear link allows onboarding managers to clear filter criteria in the currently viewed filter.
Note: If an error message occurs, it will remain until the onboarding manager closes it or until another action happens.
