- 28 Feb 2024
- 5 Minutes to read
- Print
- DarkLight
New Hire Profile Screens
- Updated on 28 Feb 2024
- 5 Minutes to read
- Print
- DarkLight
Abstract
The New Hire Profile screen allows for the configuration of either of the following Persona Based User Interface (PBUI) selections.
PBUI New Hire Profile (employee view)
PBUI New Hire Profile Manager View (manager view)
Accessing and Configuring a New Hire Profile View
Abstract
The PBUI New Hire Profile and PBUI New Hire Profile - Manager View can be configured to have Primary sections only instead of parent and child sections shown the following figures.
In the Global Toolbar, display the Settings menu and then select Settings.
Select the System Configuration tab, if not already selected, to display system configuration options.
Display the Show drop-down list and then select Field Sequence.
Select one of the following from the Page drop-down list to open the PBUI - New Hire Profile or PBUI - New Hire Profile Manager View page:
PBUI - New Hire Profile
PBUI - New Hire Profile Manager View
Figure 52. New Hire Profile View (primary sections only)
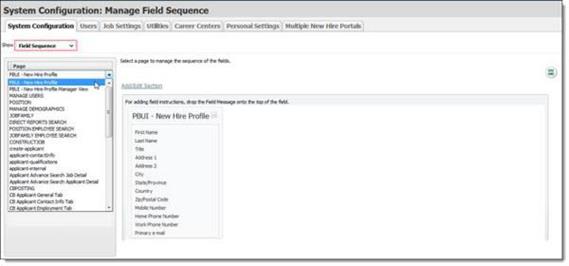
Figure 53. PBUI - New Hire Profile Manager View (primary sections only)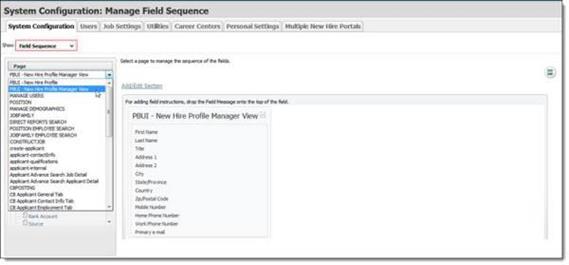
Adding, Removing and Reordering Fields
Abstract
This section describes how to add, remove, and reorder fields.
Tip
Customizing the instructional help text message for a field is done by dragging and dropping the Field Message from one pane on to the desired field in a section on another pane.
Note
Use the vertical field order, instead of the horizontal field order.
Fields can be added to a selected page by dragging them from the list pane into the work pane. Likewise, fields can be removed from a page by dragging them from the work pane into the list pane.
Fields can be reordered on the page by dragging them to new locations within the work pane. (If there are multiple sections on a page, you can drag fields between sections.) Note: There is a page refresh only after a user completes all the reordering.
Important
Your content goes here
Changes you make will be global and effective whenever a screen is accessed in edit mode.
For example:
If you add a field to the Construct Job screen, the field will be added to all existing job templates and will be effective the next time a job is created using a template. Likewise, if a job is in the Construction or Selection phase, the field will be added to the Job Details page but will not be effective until the user views the page in edit mode.
As you drag fields between panes or sections, a movement icon displays with your mouse pointer to indicate when you can release the mouse button to place the field. When the icon displays as back and forth arrows  , the field is in a transient location, and releasing the mouse button will not place the field. When the icon displays as a check mark
  , the field is in an acceptable location, and releasing the mouse button will place the field at the location of the mouse pointer. When the icon displays as this action cannot be performed
  , the field is in an unacceptable location and releasing the mouse button will not place the field.
Important
Some fields or sections cannot be modified. At this time there is nothing on screen that indicates whether a field or section can be modified. (If you try to modify a restricted field or section, your changes will not be saved.)
Figure 54. Instructional Help Desk Drag and Drop, Plus Vertical Field Order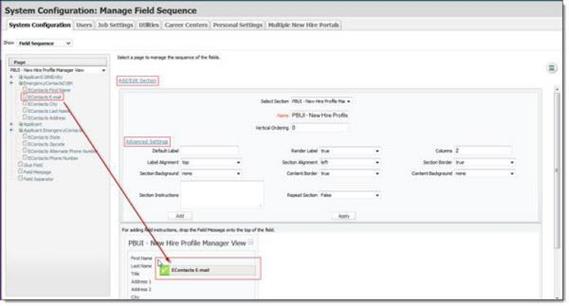
Note
When you add field message/instructions, the key and display text you provide here is auto stored in Manage Display Text as well.
How to Add, Remove and Reorder Fields
Abstract
To add, remove and reorder fields, complete the following steps:
Display the Manage Field Sequence screen.
In the list pane, display the Page drop-down list and then select the page with which you will work.
To add a field, expand the node for the appropriate entity in the list pane, drag the field from the list pane to the target location and then release the mouse button.
Tip
When you release the mouse button, the field will be placed at the location of the mouse pointer. (If you are having difficulty placing a field in a precise location, use the tip of the mouse pointer as a guide to the target location.)
To remove a field, drag the field from the screen into the list pane and release the mouse button.
Tip
You do not need to expand the node to which the field belongs. You can drag the field to any area in the list pane and the system will place the field with the correct entity.
To move a field to another location on the screen, drag the field to a new location and release the mouse button. Note: There is a page refresh only after a user completes all the reordering.
Select the Save icon
 to save changes.
Configuring the New Hire Profile for New Hire and Manager Views
Abstract
The New Hire view and Manager view of the New Hire Profile can be configured with sections, section headers, section instructional text and field instructional text.
Figure 55. Section added - New Hire Profile View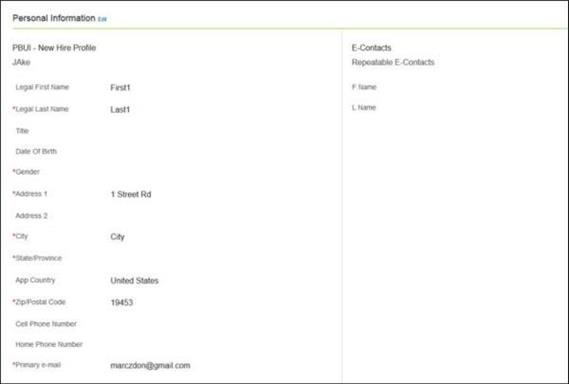
Each section can have a header and can optionally have section instructional text. The New Hire Profile can be configured with instructional text for a field as well, which displays when the user hovers over the field.
Figure 56. Section added - Manager View of New Hire Profile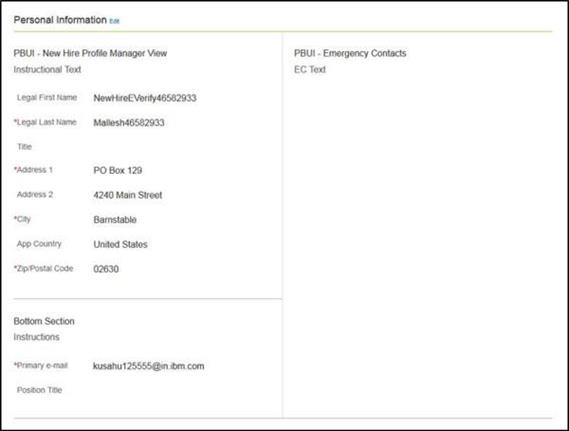
These configurations are done on the Manage Field Sequence screen by selecting System → System Configuration → Show, Field Sequences → Page, New Hire Profile or .New Hire Profile Manager View
Figure 57. Add Sections for New Hire Profile View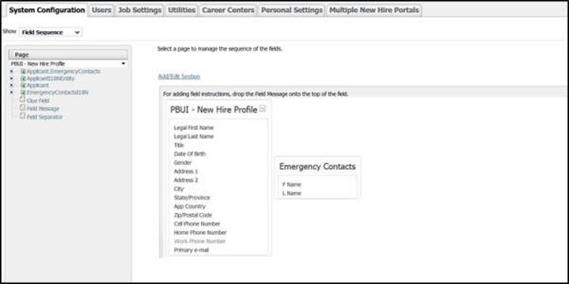
Figure 58. Add Sections for Manager View of New Hire Profile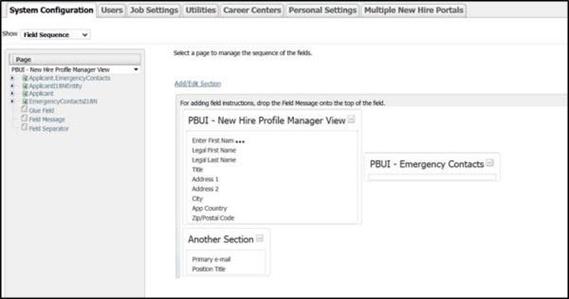
Configuring View New Hires Based on Job Location Permissions
Abstract
This section describes configuration steps that allow Talent Suite users to see new hires based on their location permissions.
Viewing new hires by job location is based on permissions. Job Location information can be set by the administrator, recruiter, or hiring manager while constructing a new job or editing an existing job record.
To switch back to standalone Onboard (and view the Job Requisitions and Activities categories), go to the Manage Users: User Type screen, and select the Show Legacy Capabilities check box. Note: There is no need to switch back to standalone Onboard. The New Hire Management category contains all needed functionality.
In the Global Toolbar, display the Settings menu and then select Settings.
Select the Users tab.
Display the Show drop-down list and then select User Types.
Select Admin from the Settings pane to display the Admin settings page.
For new hire management, select the New Hire Management link.
Figure 59. New Hire Management
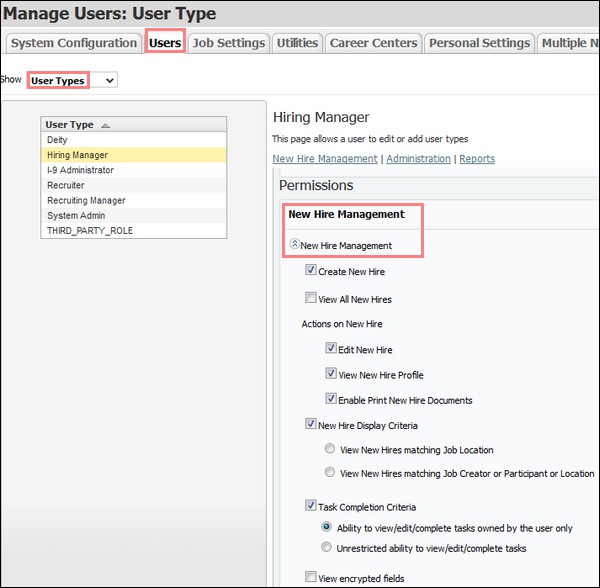
To enable the job locations capability, select the New Hire Display Criteria check box, and select either the:
View New Hires Matching Job Location option. When a logged in user is associated to a job location, the user can view only new hires whose job location matches the user's location.
View New Hires Matching Job Creator or Participant or Location option. When a logged in user is associated to a job creator, participant, or location, the user can view new hires related to the job, and new hires who share the user's location, whether or not they are part of the job. This user can view or edit any activity for any new hire on the Onboard dashboard.
Select the Save
 icon to save changes.
