Abstract
Product: Workbench
Social Media Configuration
The Social Media Integrations allow Candidates, Recruiters, or Non-System users to post reqs to their social networks, depending on your configuration.
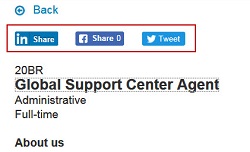
Candidates are able to post the req to their social media by selecting the appropriate Share button on the job details page of the Candidate Zone.

The process for Social Media Configuration is:
Create APPs/APIs in Social Media sites.
Enable Client Settings
Create Source Codes
Enter Social Media API Keys
Enable Talent Gateway Settings
Enable User Type Privileges
Talent Record Updates
Relevant eLearning
Configure Social Media
1. Create Apps/ APIs in Social Media Sites
Infinite does not control the vendor’s site or API function. For more information on configuring APIs or APP see the API and App Documentation.
2. Enable Client Settings
Client Settings must be enabled by an Infinite Representative. This section describes the Client Settings that are related to Social Media. Enable the appropriate client settings as needed.
Enable Social Media Integration: Turns on the overall settings for social media features. Clients can choose to enable one or more. Facebook, Google, LinkedIn, LinkedIn Referrals, Twitter
Enable social media integration with Talent Record: Enables clients to view a BrassRing candidate's most current talent profile side by side with their most current social media profile on the candidate's Talent Record. Note: clients need to configure their social media keys before to using this feature. This must be set to yes in order for users to view social media profiles from the Talent Record and for LinkedIn Cross-system awareness
Enable Social Media Integration-maximum allowed company accounts(1-25): Allows client to configure what is the maximum number of company accounts that can be used from within Brassring. (Infinite recommends 6.)
Enable Social Media Integration-maximum allowed personal accounts(1-25): Allows client to configure what is the maximum number of personal accounts(per user) that can be used from within Brassring (Infinite recommends 6.)
Dropbox Access for Mobile: Enables the ability for candidates to select attachments or resumes from their Dropbox account. Enabling this setting enables Dropbox across ALL Talent Gateways.
Dropbox App Key: Clients need to provide their unique Dropbox app key
Dropbox App Secret: Clients need to provide their unique Dropbox app secret key
Google - enable access for Google Drive & Google account (limited to Responsive Talent Gateways): Enables the ability for candidates to select attachments or resumes from their Google Drive account AND login with their Google profile.
Google API Key: Unique key given by Google for clients to be able to attach files from their Google drives. This is needed for BrassRing to authenticate and access files.
Google Client ID: Unique client ID provided by Google. Required along with API Key & secret key.
Google Secret Key: Unique Secret key provided by Google. Required along with API Key & Client ID.
3. Configure Source Codes
Create Source Codes for the social media sites. For more information on creating source codes, see Manage Source Codes.
4. Configure API Keys
Best practice is to create three different pairs of API Key & Secret Key combinations per environment.
Clients must create their own keys by using the company accounts. This might require coordination with the social media site owner for your organization.
Creation of the API key for LinkedIn is required to use the LinkedIn Cross-system Awareness feature.
After the keys are obtained, they need to be entered into Workbench.
Clients can leave the API fields blank for Facebook or Twitter to use the Infinite default keys.
LinkedIn keys are required.
The social media keys for Google and Dropbox are configured in the Workbench Client Settings. Client Settings can only be edited by Infinite team members.
To configure API Keys, select Tools → Settings → Social Media Configuration..
Select the Administer configuration icon for the social media site or setting.
Select the Source codes for the different posting options by using the List >> options.
Enter the API keys and the Secret Keys as needed.
Select Save.
5. Configure the Talent Gateway Settings
Updated Release 18.09.04.
Select Tools → Talent Gateways.
Select the edit icon for the Talent Gateway.
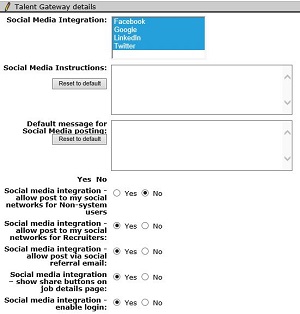
On the Talent Gateway details page, scroll to the Social Media Integration section.
Select the Social Media Integration types to activate. Hold the CTRL key to select multiple types.
Insert any Instructions or a Default message for Social Media posting.
Select Yes or No to allow Non-system users or Recruiters to post to their Social Networks.
Select Yes or No to show the social media share buttons on the job details page.
Social Media Integration: Facebook, LinkedIn, Twitter, and Google. This setting determines which social media sites to enable the process to post jobs to or allow candidates to use those features. The client setting for the social media site must be enabled first
Social Media Instructions: This text appears on the talent gateway when the candidate selects Social networking information to manage their social networks; map, or unmap, show, or hide public profile, etc.
Default message for Social Media posting: The text that is posted along with the apply URL when recruiters, candidates, or others post jobs from the gateway to a social media site. This can be customized at the time of posting.
Social media integration – allow post to my social networks for non-system users: This setting is used with the social referral email functions. If you decide to use that feature, this setting should be set to yes.
Social media integration – allow post to my social networks for Recruiters: This setting must be enabled if to allow recruiters to post open reqs to their personal or company accounts. Enabling this setting also turns on the ability for candidates to use their LinkedIn or Facebook profiles to create their profile on the Talent Gateway.
Social media integration – allow post via social referral email: This setting must be enabled to send jobs posted to this talent gateway by using the social referral email.
Social media integration – show share buttons on job details page: Enable this setting to allow candidates to share jobs on their social media sites by using the buttons.
Social media integration – enable login: This setting allows candidates to use their social media credentials to log in to the Talent Gateway instead of needing to remember their Talent Gateway credentials.

Select Save.
6. Configure the User Type privileges
Enable the appropriate User Type privileges. For more information on configuring User Type Privileges, see User Type Management. Social Media privileges are found in the Reqs 2 user privileges.
Social Networks – post to my accounts: Allows users to post jobs on social media sites to their personal accounts.
Social Networks – post to my pages: Allows users to post jobs to their personal pages created on Facebook.
Social Networks – send social referral email: Allows users to send the social referral email. This action becomes available in the Req Actions menu.
Social Networks – Source Information: Allows users to view the source information associated with the social referral email. This privilege makes the source link on the talent record ribbon viewable for users.
7. Talent Record Updates
The [Panel standard] Social Networks field must be added to the Talent Record ribbon. For more information on adding fields to Talent Records, see Talent Record Display and Print Page Header.
Configure Recruiter Referral Email
The E-mail type configuration client setting must be enabled by an Infinite Representative.
Enable the User Privileges for the Recruiter Referral Email. For more information on configuring User Type Privileges, see User Type Management. The Recruiter Referral Email privileges are in the Communications user privileges.
System E-mail templates - administer
System E-mail templates - view
Add the Social referral link to a communication template.
.png)
In BrassRing select Menu → Admin → Communications → Add system e-mail template.
Create the communication template as needed and select Add Social referral link.
Save the communication.