- 22 Feb 2024
- 6 Minutes to read
- Print
- DarkLight
Specifying Global Onboard Settings
- Updated on 22 Feb 2024
- 6 Minutes to read
- Print
- DarkLight
Abstract
You can specify global settings for Infinite Onboard. These settings affect both Onboard - Manager and Onboard - New Hire.
Specifying Onboard Welcome Message Labels and Text/Background Color (Home Page)
Abstract
You can specify/edit the welcome message labels that display on the Home page and the color of the text/background.
These labels are the same for both Onboard - Manager and Onboard - New Hire.
You can also:
Change the label in context of a specific language.
Export the labels to a zip file, and import the labels from a zip file.
Change the text/background color. Refer to the Default Theme Colors topic for more information about accessibility guidelines.
Welcome Message Label:

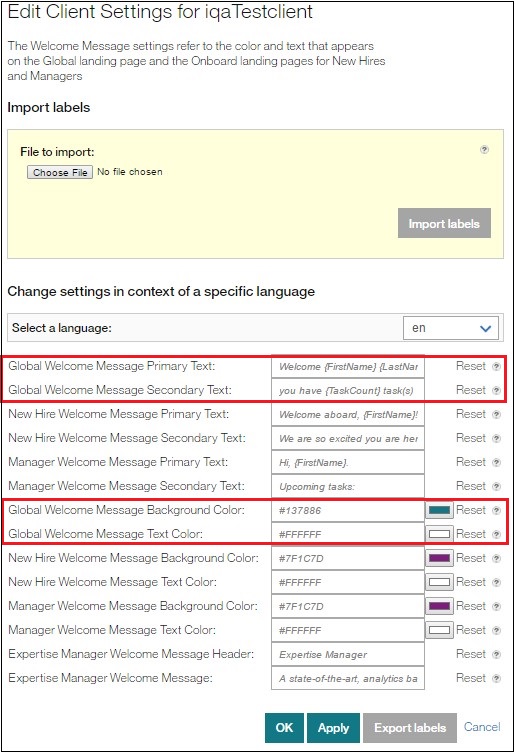
The Welcome Message Settings menu item displays a page that allows you to specify the welcome message labels that display on the Home page and the color of the text/background.

Select Welcome Message Settings in the menu to display a page that allows you to specify/edit the welcome page messages, change them to other languages, and import/export the labels via a zip file.
To edit the welcome message labels on the Home page, change them in:
Global Welcome Message Primary Text field. Main welcome message as it appears on the Home page. By default, it is:
Welcome {FirstName}{lastname}
Supported substitution variables: {FirstName}, {LastName}, {UserName}
Global Welcome Message Secondary Text field. Secondary welcome message as it appears on the Home page. Do not include URLs or HTML coding. By default, it is:
You have n task(s)
Supported substitution variables: {FirstName}, {LastName}, {UserName}, {TaskCount}
To edit the welcome message background color, change it in the Global Welcome Message Background Color field. (By default, it is aqua, #137886
 .)
.)To edit the welcome message text color, change it in the Global Welcome Message Text Color field. (By default, it is white, #FFFFFF.)
To change the display value for a specific language, use the Select a Language drop-down. The text in the various label fields changes to reflect the selected language.
To export labels, change a default label, and select the Export Labels button. A zip (compressed) file is created in the Downloads folder. The file name is based on the Client CName field. Once created, you can import this zip file.
To import labels, select the Browse button by File to Import, select the zip file (from the Downloads folder), and select the Import Labels button. The labels populate the fields on the page. (This zip file must first be created via the Export Labels button.)
If you select the Reset button, the default values are loaded.
If you do not want to save the entries you made, select the Cancel button. The Task List Labels page redisplays.
You need to select the Apply button or OK button to save the changes. If you:
Select the Apply button, a message informs you the settings were successfully saved, and you remain on the current page.
Select the OK button, the Task List Labels page redisplays.
To continue specifying/editing the settings, select a menu selection.
Specifying an Onboard Hero Image
Abstract
You can specify/edit the hero image that displays on the Onboard welcome page (Onboard - Manager Currently Onboarding page and Onboard - New Hire My Tasks page).
There is a default Hero Image but you can use your own image:

Supported Image File Types:
JPG
GIF
PNG
Size Restrictions: To speed performance, no image can exceed 1MB in size.
Onboard hero image:
Size: At or around 369W x 100H pixels at 72ppi. ??? New - At or around 350W x 100H pixels at 72ppi
Avoid Hero images that include text within the image itself.
The Hero image is centered within the space. The image scales its width and visible area depending on browser width, but the Hero space maintains a fixed height of 100px. Text that appears within an image could get truncated at certain browser widths.
There are accessibility and multi-language concerns when text appears within an image.
The Onboard - Images menu item displays a page that allows you to specify the hero image.

Select Onboard - Images in the menu to display a page that allows you to optionally specify the image you want to display as the hero image on the Onboard welcome page (Onboard - Manager Currently Onboarding page and Onboard - New Hire My Tasks page).
To upload an image, select the Browse button by Upload Onboard Hero Image. (There is a default for this optional image. If you do not specify a hero image, the default image is used.)
Once you upload an image, you can view it by hovering the cursor over the image preview icon
 . A thumbnail version of the image displays.
If you select the Reset button, any images you uploaded are cleared from the fields.
If you do not want to save the entries you made, select the Cancel button. The Task List Labels page redisplays.
You need to select the Apply button or OK button to save the changes. If you:
Select the Apply button, a message informs you the settings were successfully saved, and you remain on the current page.
Select the OK button, the Task List Labels page redisplays.
To continue specifying/editing the settings, select a menu selection.
Specifying eSignature Message Labels
Abstract
You can specify/edit messages associated with eSignatures (electronic signatures) that display on various task pages.
The message varies depending on whose eSignature is required:
Manager or New Hire
New Hire
Preparer or Translator (used with the I-9 task)
You can also:
Change the label in context of a specific language.
Export the labels to a zip file, and import the labels from a zip file.
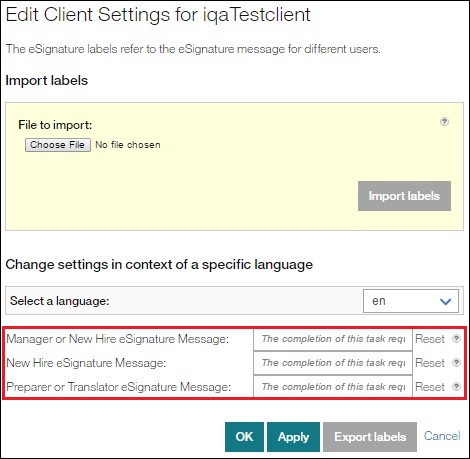
The eSignature Labels menu item displays a page that allows you to specify the messages associated with eSignatures.

Select eSignature Labels in the menu to display a page that allows you to specify/edit eSignature labels, change them to other languages, and import/export the labels via a zip (compressed) file.
To edit the labels, change it in the following fields:
Manager or New Hire eSignature Message. The eSignature message as it appears in the eSignature page for a manager or new hire if he/she owns the task:
The completion of this task requires your signature. Please use the space to draw your signature or upload an image file of your signature. The signature provided on this step will be applied to the generated PDF document.
New Hire eSignature Message. The Signature message as it appears in the eSignature page for a new hire if he/she owns the task:
The completion of this task requires the signature of the employee. Please use the space to draw your signature or upload an image file of your signature. The signature provided on this step will be applied to the generated PDF document.
Preparer or Translator eSignature Message (used with the I-9 task when a preparer or translator is needed). The eSignature message as it appears in the eSignature page for a preparer or translator if he/she owns the task:
The completion of this task requires the signature of the preparer or translator. Please use the space to draw your signature or upload an image file of your signature. The signature provided on this step will be applied to the generated PDF document.
To change the display value for a specific language, use the Select a Language drop-down. The text in the various label fields changes to reflect the selected language.
To export labels, change a default label, and select the Export Labels button. A zip (compressed) file is created in the Downloads folder. The file name is based on the Client CName field. Once created, you can import this zip file.
To import labels, select the Browse button by File to Import, select the zip file (from the Downloads folder), and select the Import Labels button. The labels populate the fields on the page. (This zip file must first be created via the Export Labels button.)
If you select the Reset button, the default values are loaded.
If you do not want to save the entries you made, select the Cancel button. The Task List Labels page redisplays.
You need to select the Apply button or OK button to save the changes. If you:
Select the Apply button, a message informs you the settings were successfully saved, and you remain on the current page.
Select the OK button, the Task List Labels page redisplays.
To continue specifying/editing the settings, select a menu selection.
