- 22 Feb 2024
- 6 Minutes to read
- Print
- DarkLight
Specifying Onboard - Manager Settings
- Updated on 22 Feb 2024
- 6 Minutes to read
- Print
- DarkLight
Abstract
You can specify settings that only affect Onboard - Manager.
Specifying Welcome Message Labels and Text/Background Color (My Tasks Page)
Abstract
You can specify/edit the welcome message labels that display on the My Tasks page and the color of the text/background.
You can also:
Change the label in context of a specific language.
Export the labels to a zip file, and import the labels from a zip file.
Change the text/background color. Refer to the Default Theme Colors topic for more information about accessibility guidelines.
Welcome message labels and text/background color:

The Welcome Message Settings menu item displays a page that allows you to specify the welcome message labels.
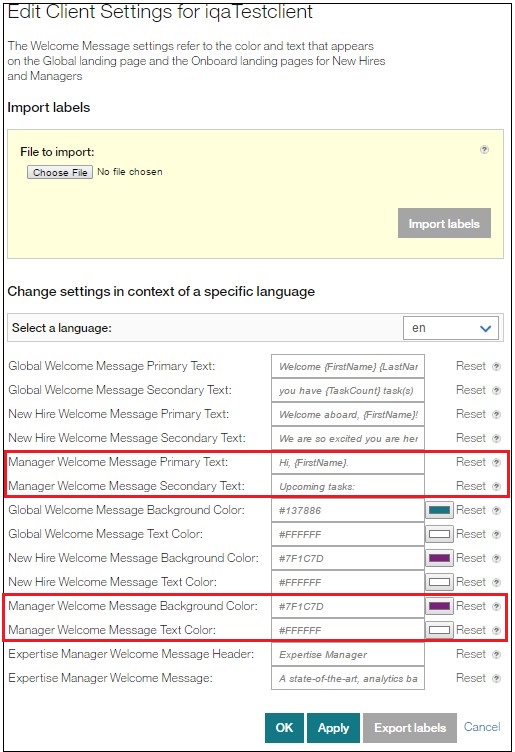
Select Welcome Message Settings in the menu to display a page that allows you to specify/edit the welcome page messages and background color; change them to other languages, and import/export the labels via a zip file.
To edit the welcome message labels on the My Tasks page, change them in:
Manager Welcome Message Primary Text field. Main welcome message as it appears on the Onboard - Manager home page. This is one line in length, 60 character maximum, including spaces, so if names are long, it is important to keep the preceding text short. Do not include URLs or HTML coding. By default, it is:
Hi, {FirstName}
Supported substitution variables: {FirstName}, {LastName}, UserName}
Manager Welcome Message Secondary Text field. Secondary welcome message as it appears on the Onboard - Manager home page. This is two lines in length, 120 character maximum, including spaces. Do not include URLs or HTML coding. By default, it is:
Upcoming tasks
To edit the welcome message background color, change it in the Manager Welcome Message Background Color field. (By default, it is purple, #7F1C7D
 .)
.)To edit the welcome message text color, change it in the Manager Welcome Message Text Color field. (By default, it is white, #FFFFFF.)
To change the display value for a specific language, use the Select a Language drop-down. The text in the various label fields changes to reflect the selected language.
To export labels, change a default label, and select the Export Labels button. A zip file is created in the Downloads folder. The file name is based on the Client CName field. Once created, you can import this zip file.
To import labels, select the Browse button by File to Import, select the zip file (from the Downloads folder), and select the Import Labels button. The labels populate the fields on the page. (This zip file must first be created via the Export Labels button.)
If you select the Reset button, the default values are loaded.
If you do not want to save the entries you made, select the Cancel button. The Task List Labels page redisplays.
You need to select the Apply button or OK button to save the changes. If you:
Select the Apply button, a message informs you the settings were successfully saved, and you remain on the current page.
Select the OK button, the Task List Labels page redisplays.
To continue specifying/editing the settings, select a menu selection.
Specifying Maximum Number of Tasks to Display in a Task List Page
Abstract
On the Currently Onboarding and My Tasks pages, there is a list of tasks the onboarding manager must complete for each new hire. You can specify/edit the maximum results per page you want to display in the task list.
Onboard - Manager (showing the list of tasks that would be affected by the number you specify):
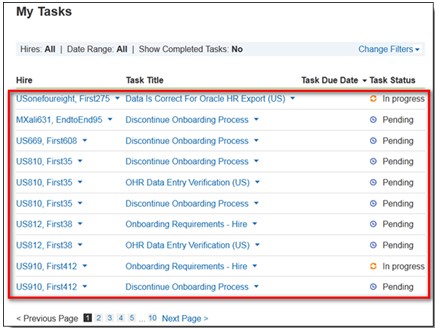
The Task List Settings menu item displays a page that allows you to specify the maximum results per page you want to display in the task list.
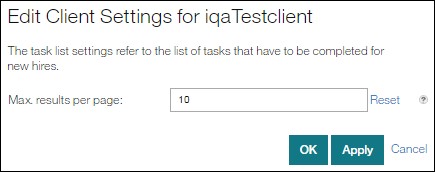
Select Task List Settings in the menu to display a page that allows you to specify/edit the maximum results per page you want to display in the task list.
Enter a positive integer in the Max Results Per Page field. The minimum value you can specify is 3, and the maximum is 1000. (The default is 10 tasks.)
If you select the Reset button, the default value (10 tasks maximum per page) is used.
If you do not want to save the entries you made, select the Cancel button. The Task List Labels page redisplays.
You need to select the Apply button or OK button to save the changes. If you:
Select the Apply button, a message informs you the settings were successfully saved, and you remain on the current page.
Select the OK button, the Task List Labels page redisplays.
To continue specifying/editing the settings, select a menu selection.
Specifying Labels for Task List Pages
Abstract
The Onboard - Manager application has various task list pages (Onboarding Tasks, My Tasks, and Currently Onboarding). Each page display a list of tasks the onboarding manager must complete for each new hire.
You can specify/edit the labels (names) for the following:
Onboarding Tasks
My Tasks
Currently Onboarding
You can also:
Change the label in context of a specific language.
Export the labels to a zip file, and import the labels from a zip file.
Onboard - Manager (showing a task list label that would be affected by the label you specify):

The Task List Labels menu item displays a page that allows you to specify labels (names).
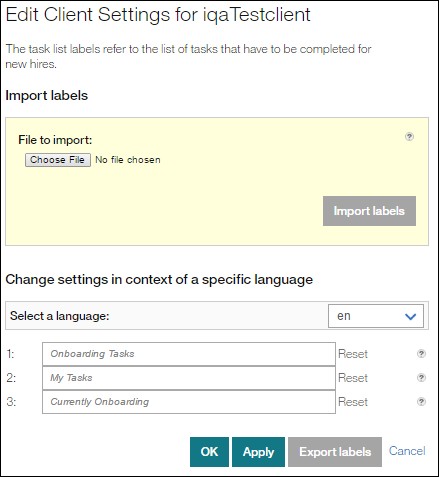
Select Task List Labels in the menu to display a page that allows you to specify/edit task list page labels, change them to other languages, and import/export the labels via a zip file.
To edit the labels that onboarding managers will see when they log on, change it in:
(1) Onboarding Tasks. Title of the task list as it is displayed on the Onboarding Tasks page when a manager views a new hire's list of tasks.
(2) My Tasks. Title of the task list as it is displayed on the My Tasks page.
(3) Currently Onboarding. Title of the task list as it is displayed on the Onboarding page.
To change the display value for a specific language, use the Select a Language drop-down. The text in the various label fields changes to reflect the selected language.
To export labels, change a default label, and select the Export Labels button. A zip (compressed) file is created in the Downloads folder. The file name is based on the Client CName field. Once created, you can import this zip file.
To import labels, select the Browse button by File to Import, select the zip file (from the Downloads folder), and select the Import Labels button. The labels populate the fields on the page. (This zip file must first be created via the Export Labels button.)
If you select the Reset button, the default values are loaded.
If you do not want to save the entries you made, select the Cancel button. The Task List Labels page redisplays.
You need to select the Apply button or OK button to save the changes. If you:
Select the Apply button, a message informs you the settings were successfully saved, and you remain on the current page.
Select the OK button, the Task List Labels page redisplays.
To continue specifying/editing the settings, select a menu selection.
Specifying Which User Types Can Access Standalone Onboard via Report Link
Abstract
You can specify which user types can view the Report link in the Onboard Manager navigation menu. The link lets users access the standalone (backend) Onboard application.
The Manager Settings menu item displays a page that allows you to specify which user types can view the Report link in the Onboard Manager navigation menu. The Report link lets users access the standalone Onboard application. Some users are limited to Onboard's reporting capabilities (via the Global Toolbar). Other users can do Onboard configuration (via the Settings menu). User-type permissions (as set in the standalone Onboard application) determine which screens users can access.
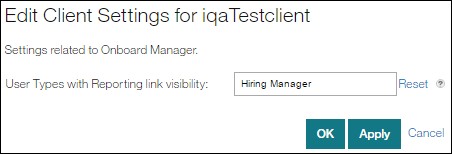
Select Manager Settings in the Branding menu to display a page that allows you to specify which user types will be able to see a Report link in the Onboard Manager navigation menu. This Report link allows the user to access standalone Onboard.
In the User Types with Reporting Link Visibility field, enter the user types. User types include: Admin, Hiring Manager, System Admin, Deity, Recruiter, I-9 Administrator, Recruiting Manager, Super User, Tim UT, TShm, Test HM. Note: These user types must exactly match those in the standalone Onboard application (Settings > Users > User Type). To add multiple user types, separate them with commas.
