- 20 Nov 2025
- 7 Minutes to read
- Print
- DarkLight
2. Configure Your Organization’s Identity Provider
- Updated on 20 Nov 2025
- 7 Minutes to read
- Print
- DarkLight
Abstract
The information provided on this page is intended to aid a user in setting up Single Sign-On for the Infinite BrassRing Platform by using a third-party Identity Provider (IdP).
Configure Your Organization’s Identity Provider
Identity configuration varies based on the specific Identity Provider (IdP) system your organization is using. The configuration steps are specified in the IdPs training and documentation. Infinite takes no responsibility for the content in third-party programs, and the process on this page might not accurately represent the IdP system.
If your organization's IdP system supports setting up a Service Provider (SP) setup by importing a SAML metadata file, then the Infinite BrassRing Platform SAML metadata file can be uploaded to the IdP system. If the IdP system does not support the import, this process configures the IdP system manually to communicate with Infinite BrassRing Platform as the SP.
SSO metadata files expire and need to be replaced before the date and time of expiration.
Note
Do not upload the certificates on this page for configuring BrassRing Single Sign-On.
Select the Infinite BrassRing Platform Service Provider links to download the Infinite BrassRing Platform SSO metadata files. These metadata files are uploaded to your organization's Identity Provider. Download and uncompress the .xml file for use in the Identity Provider. If your organization's Identity Provider requires ".cer" files, see Create Certificate Files from the metadata files. Ensure that the correct region and environment are downloaded. If your organization's Infinite BrassRing Platform URL starts with
https://stagingts.brassring.com, download the Talent Suite US Stage SSO metadata file.
https://ts.brassring.com, download the Talent Suite US Production SSO metadata file.
https://ets.brassring.com, download the Talent Suite EU Production SSO metadata file.
IdP configuration Tips
The following URL patterns show some of the values your organization's IdP system might require to be set during the manual configuration of that IdP. These values are based on the Infinite US-Prod environment as denoted by https://ts.brassring.com. Ensure that the URL is updated for the correct region and environment. If the import of metadata is used for IdP configuration, the IdP import parses these details from the Infinite BrassRing Platform metadata files.
Single Sign On URL = https://ts.brassring.com/sps/inboundSSOProd/saml20
Destination URL = https://ts.brassring.com/sps/inboundSSOProd/saml20/login
Recipient URL, also known as Assertion Consumer Service (ACS) = https://ts.brassring.com/sps/inboundSSOProd/saml20/login if the SAML Response has SubjectConfirmation and SubjectConfirmationData tags for the Subject.
Audience Restriction = https://ts.brassring.com/sps/inboundSSOProd/saml20
Configuring the Identity Provider
For more information on configuring an Azure AD, Okta, and ADFS IdP specific configuration, see Azure AD, Okta, and ADFS IdP Specific Configuration
All of the required Infinite BrassRing Platform SSO information is in the downloaded TS metadata files. If your organization's IdP system does not support the upload of an Infinite BrassRing Platform metadata file, manual configuration is required and the Infinite BrassRing Platform SSO information can be obtained from the metadata file content.
To obtain the Infinite BrassRing Platform SSO information from the metadata file content;
Define the entityID of Infinite BrassRing Platform. This can be found in the entityID tag in the Infinite BrassRing Platform metadata file, for example, entityID=https://[THE-ENV].brassring.com/sps/inboundSSO.../saml20
Define Infinite BrassRing Platform ACS address. This is where your organization's IdP sends the SAML Assertions and can be found in the AssertionConsumerService tag in the Infinite BrassRing Platform metadata file, for example, https://[THE-ENV].brassring.com/sps/inboundSSO.../saml20/login
Define NameID Format. The Infinite BrassRing Platform-supported formats are defined in the NameIDFormat tag in the metadata file. Infinite suggests that an email address is used, although some IdP system might call this email, as the starting point since some of the systems such as ADFS do not support unspecified.
Set SAML Signature Algorithm. SHA-256 must be used as Infinite BrassRing Platform only uses SHA-256 algorithm.
Set Relay State information. The IdP system determines the Relay State information. If no Relay State information is needed this field can be left blank.
Configure SAML {assertions) signing. If your organization's IdP requires SAML {assertions) to be signed, upload the Infinite BrassRing Platform signing certificate which can be found in the downloaded Infinite BrassRing Platform metadata file in the Configure Your Organization’s Identity Provider section.
Configure SAML response encryption. If your organization's IdP SAML response is required to be encrypted, upload the Infinite BrassRing Platform encryption certificate which can be found in the Infinite BrassRing Platform metadata file in the Configure Your Organization’s Identity Provider section.
Create Certificate Files from the metadata files
Your organization's IdP provider might require the signing and encryption certificate to be uploaded instead of the metadata file.
To create certificate files from the metadata files, download and extract the metadata file.
Open the .xml metadata file with an HTML editor or a Notepad application.
Open a new blank Notepad instance and enter the text
-----BEGIN CERTIFICATE-----For the signing certificate, locate the tag [<md:KeyDescriptor use="signing">], and copy the code inside the[ <X509Certificate>] tags. Do not include the [<X509Certificate>] or [</X509Certificate>] tags.

On a new line in the Notepad page, paste the code.
On a new line, enter the text
-----END CERTIFICATE-----Select File → Save as.
Select Save as type → All Files (*.*).
Enter the file name with the extension .cer, for example [TalentUSProdSigningCertificate.cer ].
Select Save.
For the encryption certificate, repeat this process for the <X509Certificate> code in the <md:KeyDescriptor use="encryption"> tags.
|
Azure AD, Okta, and ADFS IdP Specific Configuration
Abstract
This page describes the Azure AD, Okta, and ADFS IdP Specific Configuration processes for Talent Suite Single Sign-On
Infinite takes no responsibly for the content in third-party programs, and the process on this page might not accurately represent the ADFS system. Infinite is not responsible for the content on third-party websites.
Azure AD Specific Configuration
For more information on the Azure AD specific configuration, see the Azure AD documentation at https://docs.microsoft.com/en-us/azure/active-directory/manage-apps/configure-single-sign-on-non-gallery-applications. In the Azure AD configuration Talent Suite is the Service Provider (SP).
Okta Specific Configuration
For more information on the Okta specific configuration, see the Okta documentation at https://support.okta.com/help/s/article/Beginner-s-Guide-to-SAML. In the Okta specific Configuration Talent Suite is the Service Provider (SP).
ADFS Specific Configuration
Active Directory Federation Services (ADFS) is a Single Sign-On (SSO) solution created by Microsoft®. The steps that are provided on this page are designed to aid a user in setting up Single Sign-On for Talent Suite using ADFS as an IdP.
ADFS facilitates the communication between the system that needs to authenticate a user, and the system that can authenticate a user, this communication can be configured by using claims. Partner companies define and exchange these claims and then map them in the ADFS trust policy. When users access Talent Suite, ADFS checks the claims to determine whether the user is identified in the trust policy, and if so, directs the user onto the SSO authentication.
It is assumed that Infinite BrassRing Platform has been added and configured as a Relying Party Trust. In ADFS configuring a relying party trust tells ADFS where it can expect claims to come from. ADFS trusts the relying party so that when a user is authenticated they can be redirected back to that application, in this case Talent suite.
To support a Service Provider initiated SAML 2.0 communication, Administrators must add two custom claims to the ADFS configuration. These Claims can be configured after the Add relying Party Trust configuration has been completed.
In the instructions, the fields EmployeeID and NameID, are used as example LDAP Attributes, the ADFS administrator must select the correct Attributes that are actually being used in their ADFS system. The employeeID is a custom created claim type definition, and any text name can be used.
Configuring and Managing Active Directory Federation Service (ADFS)
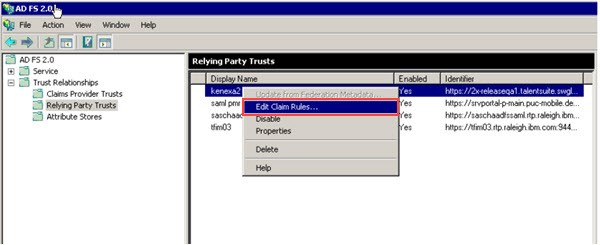
Open ADFS and add select Trust Relationships → Relying Party Trusts.
Right-click the Display name of the Infinite Relying Party Trust and select Edit Claim Rules.

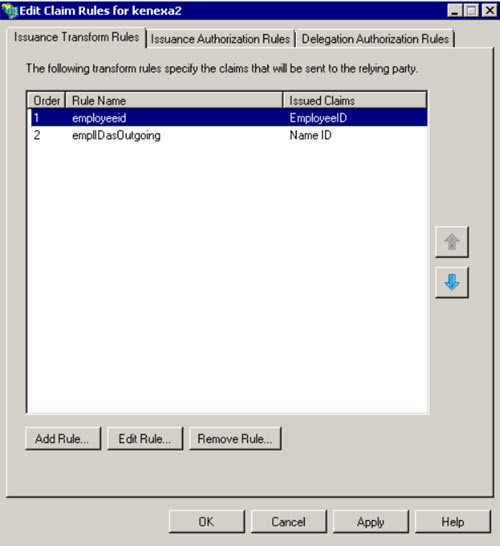
To add the first claim, select Add Rule.
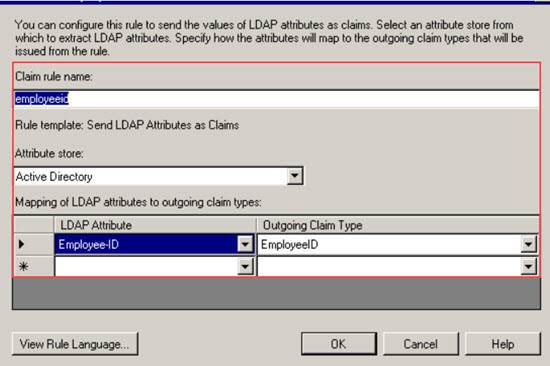
Select the Send LDAP Attribute as Claims template.

Insert a rule name, for example: employeeid.
Select Active Directory as the attribute store.
Select the correct LDAP attribute that uniquely identifies a person, for example Employee-ID. This field maps to the username value within Talent Suite User Management. This can be achieved by setting up a Transform Rule.
Select OK to save the first claim.
To add the second claim, right-click the Display name of the Infinite Relying Party Trust and select Edit Claim Rules.
Select Add Rule.
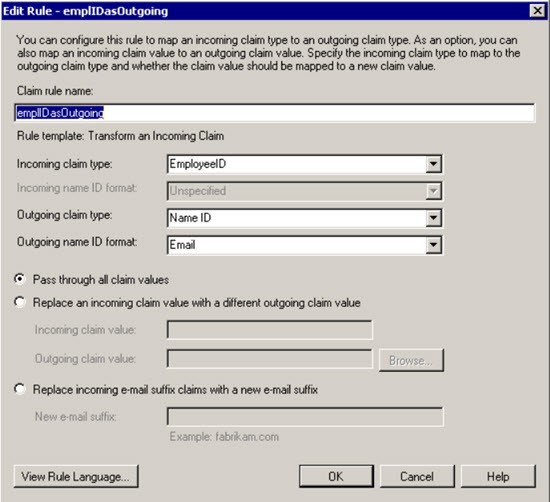
Select the Transform an incoming claim rule template.

Insert a rule name, for example: employeeIDasOutgoing.
Select the Outgoing Claim Type, for example EmployeeID from the first claim, as the Incoming Claim Type.
Select NameID for the Outgoing Claim Type.
Select Email as the Outgoing Name ID Format.
Select Pass through all claim values.
Select OK to save the second claim.
For more information on troubleshooting ADFS-specific issues, see ADFS troubleshooting and Active Directory Federation Services.
After this process is completed, when a user logs in using IdP or SP initiated log in, the login submits the Outgoing Claim Type from the first claim as the NameId field. <Subject> <NameID Format="urn:oasis:names:tc:SAML:1.1:nameid-format:emailAddress">007</NameID> <SubjectConfirmation Method="urn:oasis:names:tc:SAML:2.0:cm:bearer"> <SubjectConfirmationData NotOnOrAfter="2016-03-23T15:07:49.936Z" https://2x-releaseqa1.talentsuite.swglab.ibm.com/sps/inboundSSOiQA/saml20/login /> </SubjectConfirmation> </Subject>


