Process
Candidate form calculated fields can be used to create and store formulas by using CFAs that run when users enter values in predefined fields. For example, calculated fields are useful in deriving the components of a candidate’s salary, such as Base Salary, House Rental Allowance, Travel Allowance, etc. This eliminates the need to have users complete a manual calculation, thus reducing the possibility for error.
In this example, the candidate’s Annual Salary is entered by the user and the option to calculate is selected. This triggers the CFA to run and complete the calculated values, based on the formulas loaded into Workbench. Red check marks signify that the calculation ran properly:
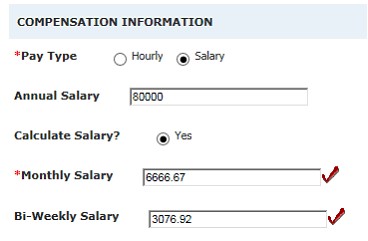
If the CFA runs and your calculated fields show a red x next to them, there is a potential issue that has stopped the calculation from running. Some reasons for the failure might be:
A value in the candidate form field that is used in the formula for the child fields is blank.
A candidate form field or a calculation field that is used in the formula for another calculation fields is selected to be hidden due to question branching/User type/language in Workbench.
A candidate form field that is used in the formula for the child fields is either inactivated or deleted.
A value of a candidate form field that is used in the formula for a child field has text string.
The system cannot render a value based on the formula that is imported for a child field.
A candidate form field or calculation field that is used in the formula for another calculation field is placed after this field on the candidate form.
If the value of a form field was not populated due to incorrect formula or a failed calculation, and if any other child field is calculated based on that value, then the other form field is also displayed as blank with a cross mark.
If a Calculation CFA is present on a candidate form, and that CFA is run, then the form automatically has a Recalculate button, allowing the user to “Recalculate” the values instead of having to reselect the parent option value.

Importing CFAs to create calculated fields is available for Workbench users with Power User access or for users that have Tier 5 access with the proper client setting enabled. The steps to successfully update CFAs by using a Workbench import are covered in this documentation.
As with all configuration and import tasks in Workbench, it is recommended that customers first complete the work in Staging before making any updates in Production. This helps identify and resolve any potential issues before completing the task in your Production environment.
Preparing the Spreadsheet
Export the CFA by selecting Tools → Forms → Candidate Forms. Select Administer Form Fields for the candidate form that houses the CFA to upload. Select Export Field Association.
Select Tools → Task Manager to retrieve your export and open the file. Save it to your computer as an Excel file type (.xls).
Your import spreadsheet can only have two tabs: Properties & Associations. Do NOT change the name of the tabs
You do not need to make any changes to the Properties tab unless you are creating a new association. If so, change the Parent Question cell to include the database Field Name of the parent question.
If you are creating a brand new CFA, you might create a new spreadsheet by following the sample Calculation CFA import spreadsheet format.
Properties Tab:

Associations Tab: (Do not include the first row in the final import):

CFA Calculation Rules
The Child fields can only be a type of numeric or text on the candidate form. The Child fields hold the end result/calculated value.
The Parent field must be a pull-down field (radio button or single-select). This Parent field initiates the calculation.
In the file, the formula must be entered in the “Child Text” column in the following format: # #.
Either numeric values or database field names can be used to construct the formula.
The database field name must match exactly to the database field name in Workbench. (Capitalization does matter.).
The database field name needs to be enclosed in @ symbols. For example: #[@DBFieldName@*10/100]#.
The following arithmetical operators are permitted in the formula: “+”, “-“, “*”, “/”, and “%”.
The following comparative operators are also permitted: Min, Max, and Between. These are used in a formula to validate the value entered in a child field.
The Min Operator checks if the child field value is greater than or equal to the value given in the formula. The syntax for a formula by using the “Min” operator needs to be as follows: #[Min(@DBFieldName1@)]# or #[Min(<value>)]#.
The Max Operator checks if the child field value is less than or equal to the value given in the formula. The syntax for a formula by using the “Max” operator needs to be as follows: #[Max(@DBFieldName1@)]# or #[Max(<value>)]#.
The Between Operator checks if the child field value falls within the range of values that are provided in the formula, inclusive of the lower, and upper limit values. The syntax for a formula by using the “Between” operator needs to be as follows: #[Between(@DBFieldName1@,@DBFieldName2@)]# or #[Between(<value1>, <value2>)]#.
These operators can also be used to calculate and restrict the output value in a child field at the same time. The syntax for such formulae needs to be as follows: #[Max(@DBFieldName@):1000+1400-1250]#.
Candidate form fields, against which the child field is validated, needs to be present on the candidate form in an active status otherwise the validation is unsuccessful.
Open parenthesis “(“ and closed parenthesis “)” are permitted to specify the order of operation.
Multiple candidate form fields can be used in a single formula. For example: #[@DBFieldName1@+@DBFieldName2*@DBFieldName3@]#
Candidate form fields that are used in the formula of a calculation field or calculation field that is used in the formula for another calculation field should be placed before this field to calculate and render the values successfully. For example, if the field name ‘Basic’ is used in the formula to calculate the value for the field ‘HRA’ on the ‘Offer Form’, then the field ‘Basic’ should be placed before the field ‘HRA’ on the Offer Form.
The values in the child fields of type numeric are rounded to the nearest integer and the values in the child fields of type text are rounded to two decimal points. Clients who require decimal values in the form fields need to configure text type fields for calculated fields.
Preparing the CFA Calculation spreadsheet for import
The export includes both active and inactive parent and child options. Delete the rows for associations you are not updating.
On the Associations tab, add a new column to the front of the spreadsheet (it is the new Column A). Name the new column Import Action. The only two acceptable values that are Update and Delete.
For CFAs: The Child Type column is always Candidate.
Import Calculated Candidate Field Associations (Power User)
Abstract
Product: Workbench
Relevant eLearning
Import Calculated Candidate Field Associations
Export the current Calculation Candidate Field Association by selecting Tools → Forms → Candidate Forms.
Select Administer Form Fields for the candidate form that houses the Calculation CFA to be uploaded.
Select Export Field Association.
Access the Task Manager by selecting Tools → Task Manager to access your spreadsheet.
If you are creating a new association, you can use the spreadsheet format from an existing CFA Calculation. Change the Form name (if necessary) and the Parent Question cell to include the database Field Name of the parent question. If you do not have an existing Calculation CFA, a sample can be found on the Table of Contents page.
Prepare your spreadsheet by adding or modifying the CFA Calculations that you would like to import.
Select Tools → Import → Profiles.
Create a New Import Profile or use an existing Import Profile to import your spreadsheet.
Creating a new Import Profile
It is not required that a new profile is created every time there is an import to run. It is recommended to create one profile per Import Type.
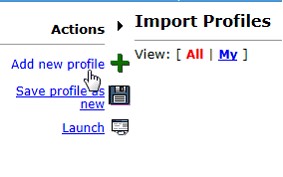
Select Add new profile.
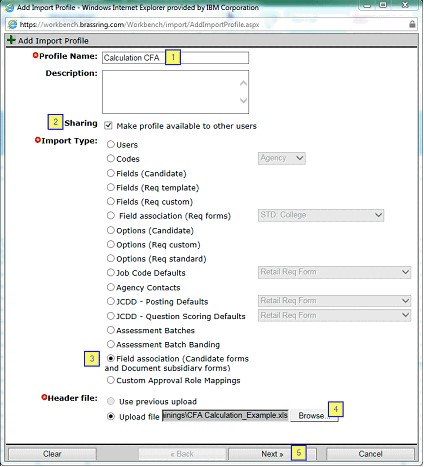
Complete the Import Profile page.
Name your Profile. It is recommended that you name the profile the type of import you are planning to run (1).
Select Sharing if you would like other Workbench users to see your Import Profile (2).
Select Field association (Candidate forms and Document subsidiary forms) (3).
Select your file (4).
Select Next (5).
Complete the Map Import Profile page.
The Column Name column shows the fields that are currently present on your req form (1).
The Map To column shows the column headers that are present in your excel sheet. It is recommended to review the Map To column to ensure that the columns are mapped correctly. It is also recommended that you do an initial export of the current CFA to get the layout needed to be imported. Having the proper column headers on your spreadsheet ensures that your Map To column aligns with the required columns.
The Overwrite column is used to select the fields you would like to overwrite the CFA data for. Selecting All checks each box automatically.
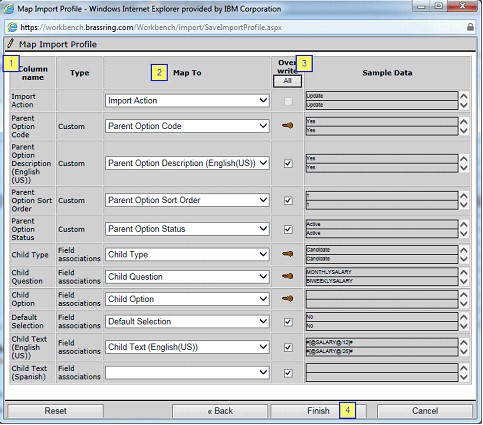
Select Finish.
If you would like to complete the Import process select Launch. If you would like to come back later to complete the steps, select Close.
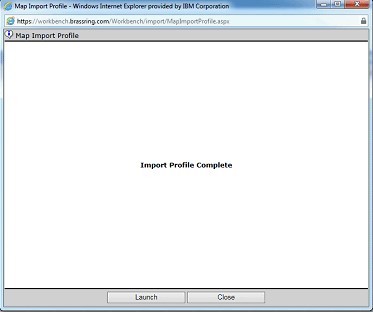
Selecting Launch opens the Launch Import Profile window.
Reselect your spreadsheet.
Select Launch.
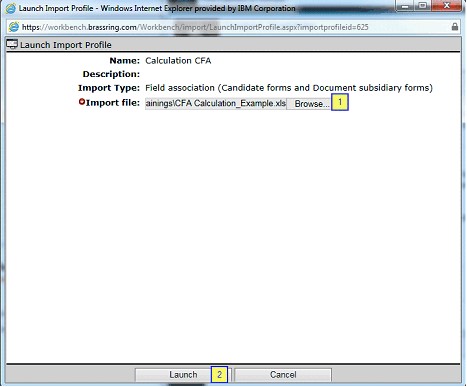
The system processes the spreadsheet and sends an email when the import is complete. See Completing the Process.
Launching an existing Import Profile
It is not necessary to create a new profile every time there is an import. It is recommended to create one profile per Parent field. Should you already have an import profile, double check the settings and the mapping of the profile and use that for your future imports.
Select the existing profile and select Launch.

Selecting Launch opens the Launch Import Profile window.
Reselect your spreadsheet (1).
Select Launch (2).
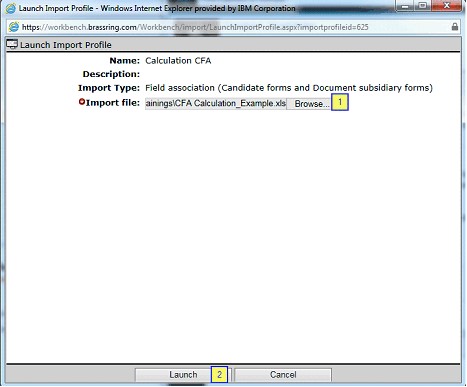
The system processes the spreadsheet and sends an email when the import is complete. See Completing the Process.
Completing the Process
The system processes the spreadsheet and sends an email when the import is complete.
Select Tools → Task Manager.
On the Task Manager page, there is a Status column that indicates the status of your import. There are five potential Statuses you can encounter:
Pending. The import is waiting in line to be processed.
Running. The import is being processed. Select Refresh display to watch the progress. The number of rows increases as the file is processed.
Completed. The import has completed without errors. However, it is important to open the file by using the binoculars icon to review the results.
Completed with Errors. The import has completed and has errors that need to be resolved. Open the results file by using the binoculars icon, review the errors, correct them in the original file and reload the file. You might reload the entire original file, with the corrections, or just the Calculation CFA that had to be corrected.
Failed. The import failed completely. This can be an issue with the extension of the excel file that you attempted to import, an overall system error or issue, or that the file was too large and timed out. See Read the Calculated CFA Results file and Common Errors for more information.
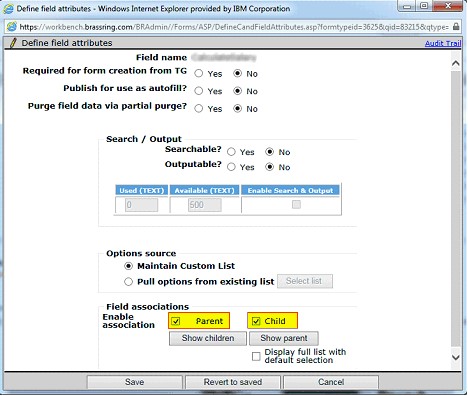
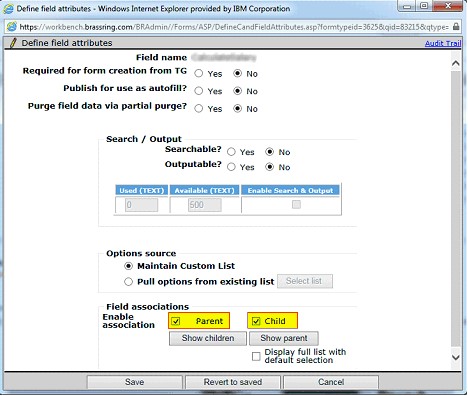
If this is a new field association, you need to update the parent and child fields settings to ‘turn on’ the association. This can be enabled by editing the field and navigating to the Field Associations section.
Import Calculated Candidate Field Associations (Tier 5)
Abstract
Product: Workbench
Import Calculated Candidate Field Associations in Workbench (Tier 5 User Access)
If you are a Workbench Tier 5 user and do not have access to import spreadsheets in Workbench, put a request into your Infinite representative to enable the setting for your account and add some public profiles to import successfully.

Export the current Calculation Candidate Field Association by selecting Tools → Forms → Candidate Forms.
Select Administer Form Fields for the candidate form that houses the Calculation CFA to be uploaded.
Select Export Field Association.
Access the Task Manager by selecting Tools → Task Manager to access your spreadsheet.
If you are creating a new association, you can use the spreadsheet format from an existing CFA Calculation. Simply change the Form name (if necessary) and the Parent Question cell to include the database Field Name of the parent question. If you do not have an existing Calculation CFA, a sample can be found on the Table of Contents page.
Prepare your spreadsheet by adding or modifying the CFA Calculations that you would like to import.
Select Tools → Import → Profiles.
With Tier 5 access, you do not have the ability to create Import Profiles, this must be completed by an Infinite representative. If you do not see a Calculation CFA profile for the Parent field, contact your Infinite representative to have one added. If you do have one available, follow the next steps.
Select the existing profile and select Launch.

Selecting Launch opens the Launch Import Profile window.
Reselect your spreadsheet.
Select Launch.
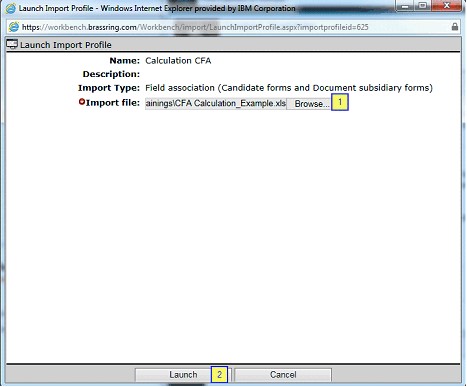
The system processes the spreadsheet and sends an email when the import is complete.
Select Tools → Task Manager.
On the Task Manager page, there is a Status column that indicates the status of your import. There are five potential Statuses you can encounter:
Pending. The import is waiting in line to be processed.
Running. The import is being processed. Select Refresh display to watch the progress. The number of rows increases as the file is processed.
Completed. The import has completed without errors. However, it is important to open the file by using the binoculars icon to review the results.
Completed with Errors. The import has completed and has errors that need to be resolved. Open the results file by using the binoculars icon, review the errors, correct them in the original file and reload the file. You might reload the entire original file, with the corrections, or just the Calculation CFA that had to be corrected.
Failed. The import failed completely. This can be an issue with the extension of the excel file that you attempted to import, an overall system error or issue, or that the file was too large and timed out. See Read the Calculated CFA Results file and Common Errors for more information.
If this is a new field association, you need to update the parent and child fields settings to ‘turn on’ the association. This can be enabled by editing the field and navigating to the Field Associations section.
Read the Calculated CFA Results File and Common Errors
Abstract
Product: Workbench
Reading the Results File
The results of your import can be viewed by selecting the binoculars icon. The spreadsheet is broken down into various tabs.
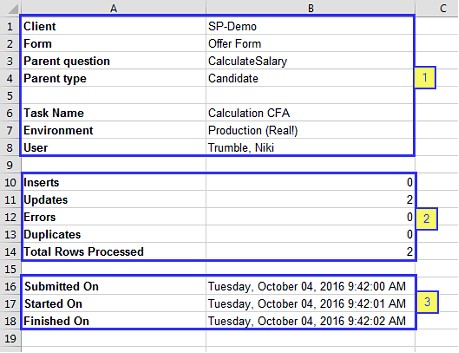
Properties Tab: This tab houses information about your import.
This section contains your “Client Name”, the database field name of the Parent field, the Parent field’s field type (always “Candidate”), the name of the import profile, the environment, and the user that imported the file (1).
This section houses the statistics of your import. How many new options (Inserts), how many updates to the existing CFA Calculations, how many CFA Calculation rows errored out, how many duplicate rows were found, and total rows processed. Each of these statuses are broken down further in the additional tabs (2).
This section shows when the import was submitted to the Task Manager, when it was started, and when it was finished (3).
Inserted Tab: This tab shows the Calculation CFA options/associations that were added and therefore ‘inserted’ into the BrassRing system.

Updated Tab: This tab shows the Calculation CFA associations that were ‘updated’ in the BrassRing system.

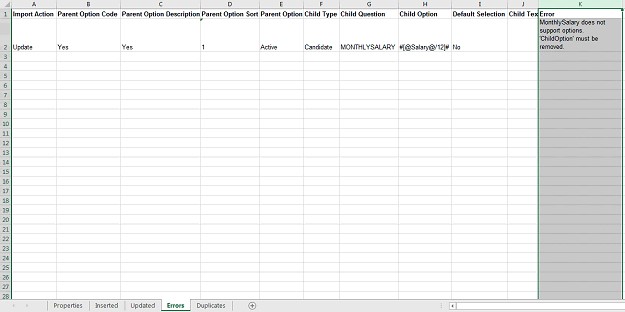
Errors Tab: This tab is critical to review as it houses any Calculation CFA rows that did NOT process due to an error. There is an extra column added to the end of this page that displays the detailed reason.
Duplicates Tab: This tab shows any duplicate Calculation CFA rows that might have been in your import spreadsheet. It is important to review the content of this tab as any Calculation CFAs that are shown have NOT been processed.

COMMON ERRORS AND RESOLUTION
'Properties$' is not a valid name. Make sure that it does not include invalid characters or punctuation and that it is not too long.
CAUSE: The file that is imported does not have a Properties tab or the Properties tab is incorrectly labeled/spelled.
RESOLUTION: Add a Properties tab with the proper information included (Client, Form, Parent Question, Parent Type).
'Associations$' is not a valid name. Make sure that it does not include invalid characters or punctuation and that it is not too long.
CAUSE: The file that is imported does not have an Associations tab or the Associations tab is incorrectly labeled/spelled.
RESOLUTION: Add an Associations tab with the proper information included. Columns (Import Action, Parent Option Code, Parent Option Description, Parent Option Sort Order, Parent Option Status, Child Type, Child Question, Child Option, Default Selection, Child Text) and data for your associations.
‘Child Field’ does not support options. 'ChildOption' must be removed.
CAUSE: The Child field is a text/numeric field and does not support options.
RESOLUTION: The Child Option column is filled out instead of the Child Text column. Move your calculation to the Child Text column and reimport your spreadsheet.
'Child Type' is invalid.
CAUSE: The Child Type is not valid.
RESOLUTION: Update the Child Type. The Child Type column should always be “Candidate”. Update the spreadsheet to read “Candidate”.
Child question can be empty only for Delete or Remove Association action.
CAUSE: There is no Child Question defined.
RESOLUTION: Add the Child Question to the spreadsheet (if your import is an Update for this association). If you would like to delete the association between this Parent Option and ALL of its Child Options, then update the “Import Action” column to Delete and leave the Child Question blank.
Primary key has not been mapped to an import column.
CAUSE: The file that is imported does not have an “Import Action” column.
RESOLUTION: Make sure that your file has a column that is called Import Action. The only valid actions are Update and Delete. If your file has the Import Action column, go back to your mapping page and check that this column is mapped to the corresponding Import Action column on the screen.
Invalid value for Parent Option Code (; “ * ! ` ~ @ # = + ? \ , > < ‘’ % \ [ { } ] are not allowed).
CAUSE: The parent option code has an invalid character (; “ * ! ` ~ @ # = + ? \ , > < ‘’ % \ [ { } ])
RESOLUTION: Remove the invalid character from the Parent option code.
‘Default Selection’ is invalid.
CAUSE: The value that is entered in the Default Selection column is not “Yes” or “No”. The Default Selection can not be blank and must be one of these values.
RESOLUTION: Update the Default Selection column to either be “Yes” or “No”.
'Import Action' is invalid.
CAUSE: The value that is entered in the Import Action column is not “Update” or “Delete”. The Import Action column cannot be blank and must be one of these values.
RESOLUTION: Update the Import Action column to either be “Update” or “Delete”.
Property 'parent type' does not match the import profile.
CAUSE: The “Parent Type” on the Properties tab is incorrect.
RESOLUTION: Update the “Parent Type” on the Properties tab. The Parent Type must be “Candidate”. Update the Parent Type on the Properties tab of the spreadsheet.
Value for property 'parent type' must be provided on 'Properties' tab.
CAUSE: The “Parent Type” on the Properties tab is blank.
RESOLUTION: Enter the “Parent Type” on the Properties tab. The Parent Type must be “Candidate”. Update the Parent Type on the Properties tab of the spreadsheet.
'Parent Option' value must be provided.
CAUSE: The Parent Option cell is blank.
RESOLUTION: Update the Parent Option cell to include the code for the Parent Option.
Parent Option Code cannot be more than 50 characters long.
CAUSE: The value that is entered in the Parent Option Code column is greater than 50 characters.
RESOLUTION: Reduce the size of the Parent Option Code value (fewer than 50 characters long).
[Field name] is a multi-select field. Multi-select field types might not be parents to fields which do not contain option list.
CAUSE: The parent field cannot be a multi-select or check box type with a child that is numeric, text box, text area, or email type field.
RESOLUTION: These field types are not valid in the association function. Reconsider the association, and the fields included in that association, that you are attempting to build.
[Field name] might not be used as a child field.
CAUSE: A Child field cannot be a Date, Label, Grid, SSN, or Autofill field type, nor can it be Job code, Approval Routing or Add type.
RESOLUTION: These field types are not valid in the association functions. Please reconsider the association, and the fields included in that association, that you are attempting to build.
Child field is already associated to another Req field [field name]. A child field cannot have more than one (1) parent.
CAUSE: A child cannot have more than one parent.
RESOLUTION: The Child Field that is selected is already associated to a Parent Field. Child fields can only have one Parent field, while Parent fields can have many Child fields. Please reconsider the association, and the fields included in that association, that you are attempting to build.
Object reference not set to an instance of an object.
CAUSE: A child cannot have more than one parent.
RESOLUTION: The Child Field that is selected is already associated to a Parent Field. Child fields can only have one Parent field, while Parent fields can have many Child fields. Please reconsider the association, and the fields included in that association, that you are attempting to build.