Abstract
Product: Workbench
Preparing the Spreadsheet for Import
It is recommend that you always obtain the properly formatted spreadsheet before completing your Req Field Association (RFA) or Candidate Field Association (CFA) import in Workbench. Req Field Association Export:
Export the RFA by selecting Tools → Reqs → Req Forms → Define Custom Req Fields → Export Field Association.
Open the Task Manager by selecting Tools → Task Manager to retrieve your export and open the file.
Save it to your computer as an Excel file type (.xls)
Your import spreadsheet can only have two tabs: Properties & Associations. Do NOT change the name of the tabs
You do not need to change the Properties tab unless you are creating a new association. If so, change the Parent Question cell to include the database Field Name of the parent question.
If you are creating a brand new RFA, you might create a new spreadsheet by following the sample RFA import spreadsheet format.
Properties Tab:

Associations Tab:

RFA Rules
Field types that cannot be a ‘parent’: Date, Text area, Text box, Label, Grid, SSN, Email, Autofill, and Numeric. These field types do not have options.
The following field types cannot be a child field: Date, Label, Grid, SSN, Autofill.
Text-based child fields must be loaded in each applicable language.
A Parent field can have multiple children fields.
A Child field can have only one parent field.
Circular field associations are not supported. Example: If Department is parent to Location and Location is parent to Business Group, Business Group cannot be parent to Department.
Field associations are applied across req templates and languages. In order for association to work consistently, all options should be translated.
If you have an RFA/CFA where the child field is a single select and the default value is Yes and you want to default a new value to yes then you must first DELETE the existing association before you can create a new one. Example: Parent field is “State” and child field is “City.” My existing association is whenever Massachusetts is selected for the State, Boston is automatically selected in the City field. Now I want to have Waltham default in the City field instead of Boston. I must first delete the association between Massachusetts and Boston before I can create an association between Massachusetts & Waltham. This is done through two different imports, a delete action on the first one and an update action on the second one.
Preparing the RFA spreadsheet for import:
The export includes both active and inactive parent and child options. Delete the rows for associations you are not updating.
On the Associations tab, add a new column to the front of the spreadsheet (A new Column A). Name the new column Import Action. The only two acceptable values are Update and Delete.
The Child Option column can include the option’s code or description.
Import Req Field Association (Power User)
Abstract
Product: Workbench
Relevant eLearning
Import Req Field Association in Workbench (Power User Access)
Export the current Req Field Association by selecting Tools → Forms → Reqs → Req Forms → Define Custom Req Fields and selecting Export field association.
Access the Task Manager by selecting Tools → Task manager to access your spreadsheet.
If you are creating a new association, you can use the spreadsheet format from an existing RFA. Change the Parent Question cell to include the database Field Name of the parent question.
Prepare your spreadsheet by adding or modifying the RFA for the import.
Select Tools → Import → Profiles.
Create a New Import Profile or use an existing Import Profile to import your spreadsheet.
Creating a new Import Profile
It is not required that a new profile is created every time there is an import to run. It is recommended to create one profile per Import Type.
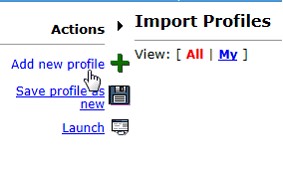
Select Add new profile.
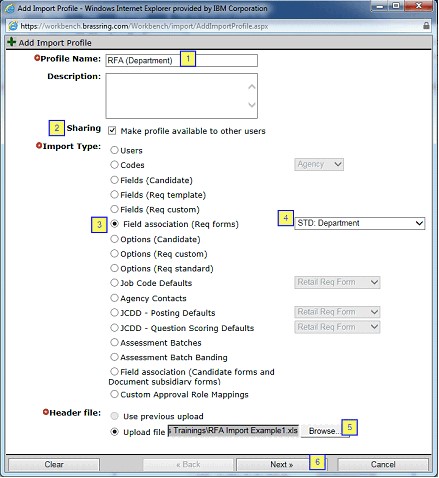
Complete the Import Profile page.
Name your Profile. It is recommended that you name the profile the type of import you are planning to run (1).
Select Sharing if you would like other Workbench users to see your Import Profile (2).
Select Field association (Req Forms) (3).
Select the PARENT field from the pull-down menu (4).
Select your file (5).
Select Next (6).
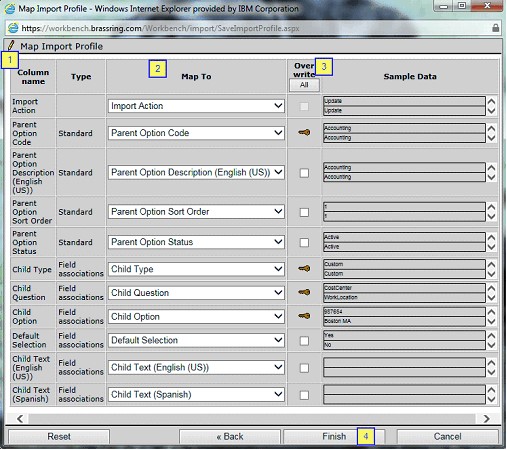
Complete the Map Import Profile page.
The Column Name column shows the fields that are currently present on your req form (1).
The Map To column shows the column headers that are present in your excel sheet. It is recommended to review the Map To column to ensure that the columns are mapped correctly. It is recommended that you do an initial export of the current RFA to get the layout needed to be imported. Having the proper column headers on your spreadsheet ensures that the Map To column aligns with the required columns (2).
The Overwrite column is used to select the fields you would like to overwrite the RFA data for. Selecting All checks each box automatically (3).
Select Finish.
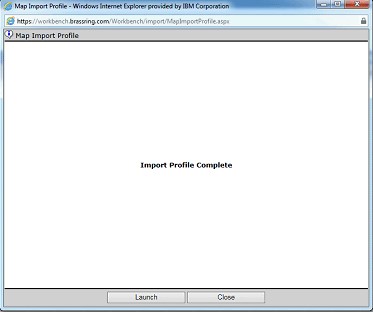
If you want to complete the Import process select Launch. If you would like to come back later to complete the steps, select Close.
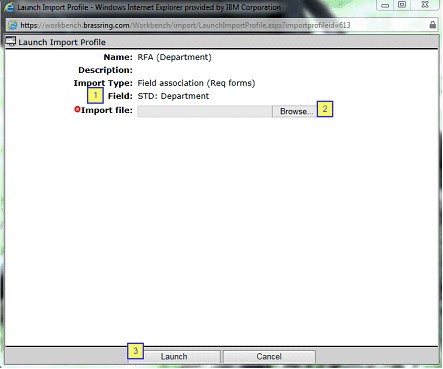
Selecting Launch opens the Launch Import Profile window.
The PARENT field should be auto-selected; based on the field that is selected on the Profile creation page (1).
Reselect your spreadsheet (2).
Select Launch (3).
The system processes the spreadsheet and sends you an email when the import is complete. See Completing the Process to continue.
Launching an existing Import Profile
It is not necessary to create a new profile every time there is an import. It is recommended to create one profile per Parent field. Should you already have an import profile, double check the settings and the mapping of the profile and use that for your future imports.
Select the existing profile and select Launch.

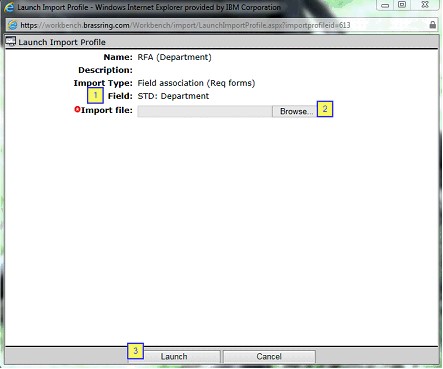
Selecting Launch opens the Launch Import Profile window.
The PARENT field should be auto-selected; based on the field selected on the Profile creation page.
Reselect your spreadsheet.
Select Launch.
The system processes the spreadsheet and sends you an email when the import is complete.
Completing the process
Select Tools → Task Manager.
On the Task Manager page, there is a Status column that indicates the status of your import. There are five potential Statuses you can encounter:
Pending. The import is waiting in line to be processed.
Running. The import is being processed. You can select Refresh display link to watch the progress. The number of rows increases as the file is processed.
Completed. The import has completed without errors. However, it is important to open the file by using the binoculars icon to review the results.
Completed with Errors. The import has completed and has errors that need to be resolved. Open the results file by using the binoculars icon, review the errors, correct them in the original file and reload the file. You can reload the entire original file, with the corrections, or just the CFA that had to be corrected.
Failed. The import failed completely. This can be an issue with the extension of the excel file that you attempted to import, an overall system error or issue, or that the file was too large and timed out. See Reading the RFA Import Results file and Common Errors for more information.
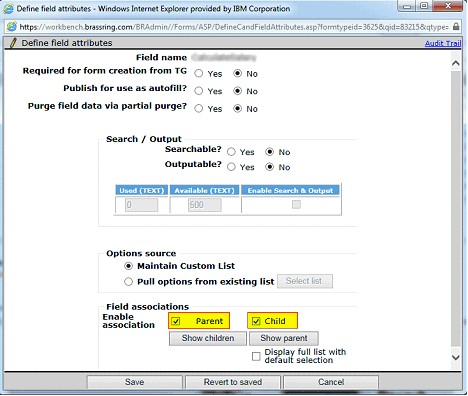
If this is a new field association, you need to update the parent and child fields settings to ‘turn on’ the association. This can be enabled by editing the field and navigating to the Field Associations section. You then select Parent or Child depending on your configuration.
Import Req Field Association (Tier 5)
Abstract
Product: Workbench
Import Req Field Association in Workbench (Tier 5 User Access)
If you are a Workbench Tier 5 user and do not have access to import spreadsheets in Workbench, put a request into your Infinite representative to enable the setting for your account and add some public profiles to import successfully.

Export the current Req Field Association by selecting Tools → Forms → Reqs → Req Forms → Define Custom Req Fields. Select Export field association.
Access the Task Manager by selecting Tools → Task Manager to access your spreadsheet.
If you are creating a new association, you can use the spreadsheet format from an existing RFA. Change the Parent Question cell to include the database Field Name of the parent question.
Prepare your spreadsheet by adding or modifying the RFA for the import.
Select Tools → Import → Profiles.
With Tier 5 access, you cannot create Import Profiles, this must be completed by an Infinite representative. If you do not see an RFA profile for the Parent field, contact your Infinite representative to have one added. If you do have one available, continue the process.
Select the existing profile and select Launch.

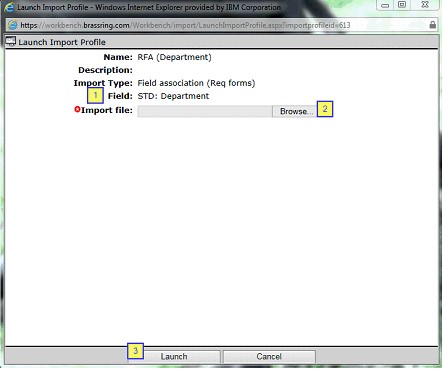
Selecting Launch opens the Launch Import Profile window.
The PARENT field should be auto-selected; based on the field that is selected on the Profile creation page (1).
Reselect your spreadsheet (2).
Select Launch (3).
The system processes the spreadsheet and sends you an email when the import is complete.
Select Tools → Task Manager.
On the Task Manager page, there is a Status column that indicates the status of your import. There are five potential Statuses you can encounter:
Pending. The import is waiting in line to be processed.
Running. The import is being processed. Select Refresh display to watch the progress. The number of rows increases as the file is processed.
Completed. The import has completed without errors. However, it is important to open the file by using the binoculars icon to review the results.
Completed with Errors. The import has completed and has errors that need to be resolved. Open the results file by using the binoculars icon, review the errors, correct them in the original file and reload the file. You can reload the entire original file, with the corrections, or just the RFA that had to be corrected.
Failed. The import failed completely. This can be an issue with the extension of the excel file that you attempted to import, an overall system error or issue, or that the file was too large and timed out. See Reading the RFA Import Results file and Common Errors in this page for more information.
If this is a new field association, you need to update the parent and child fields settings to ‘turn on’ the association. This can be enabled by editing the field and navigating to the Field Associations section. You then select Parent or Child depending on your setup.

Read the RFA Import Results file and Common Errors
Abstract
Product: Workbench
Req Field Association (RFA): Reading The Results File
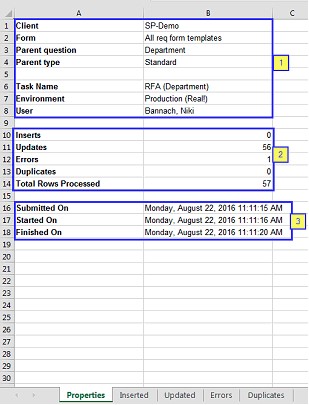
The results of your import can be viewed by selecting the binoculars icon. The spreadsheet is broken down into various tabs.
Properties Tab: This tab houses information about your import.
This section contains your “Client Name”, the database field name of the Parent field, the Parent field’s field type (Standard or Custom), the name of the import profile, the environment, and the user that imported the file (1).
This section houses the statistics of your import. How many new options (Inserts), how many updates to the existing RFA, how many RFA rows errored out, how many duplicates rows were found, and total rows processed. Each of these statuses are broken down further in the additional tabs (2).
This section shows when the import was submitted to the Task Manager, when it was started, and when it was finished (3).
Inserted Tab: This tab shows the RFA options/associations that were added and therefore ‘inserted’ into the BrassRing system.

Updated Tab: This tab shows the RFA associations that were ‘updated’ in the BrassRing system.

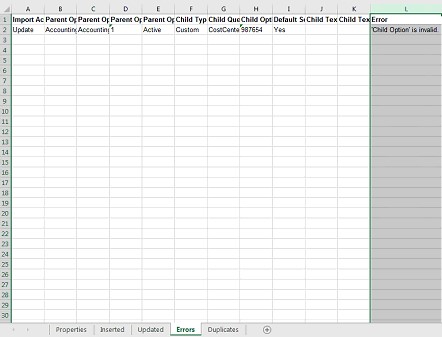
Errors Tab: This tab is critical to review as it houses any RFA rows that did NOT process due to an error. There is an extra column added to the end of this page that displays the detailed reason.
Duplicates Tab: This tab shows any duplicate RFA rows that might have been in your import spreadsheet. It is important to review the content of this tab as any RFAs that are shown have NOT been processed.

Req Field Association (RFA): Common Errors and Resolutions
'Properties$' is not a valid name. Make sure that it does not include invalid characters or punctuation and that it is not too long.
CAUSE: The file that is imported does not have a Properties tab or the Properties tab is incorrectly labeled/spelled.
RESOLUTION: Add a Properties tab with the proper information included (Client, Form, Parent Question, Parent Type).
'Associations$' is not a valid name. Make sure that it does not include invalid characters or punctuation and that it is not too long.
CAUSE: The file that is imported does not have an Associations tab or the Associations tab is incorrectly labeled/spelled.
RESOLUTION: Add an Associations tab with the proper information included. Columns (Import Action, Parent Option Code, Parent Option Description, Parent Option Sort Order, Parent Option Status, Child Type, Child Question, Child Option, Default Selection, Child Text) and data for your associations.
'Child Option' is invalid.
CAUSE: The child option that is entered in your spreadsheet does not exist in the option list for the child field.
RESOLUTION: Review the current option in Workbench for the child field. If the option is not found, add the option to the list. RFAs: Select Tools → Forms → Reqs → Req Forms. Select either Define Custom Req Fields or Define Standard Fields depending on if the child field is a Custom or Standard Field → Administer form field options.
‘Child Option’ not allowed.
CAUSE: The Child Option does not support text.
Child Question is not a valid value.
CAUSE: The Child Question is not valid/not found on the req/candidate form.
RESOLUTION: Update the Child Question cell to include the proper database field name.
'Child Type' is invalid.
CAUSE: The Child Type is not valid.
RESOLUTION: Update the Child Type. RFAs: The Parent Type must be Standard or Custom. Review the child field to confirm if it is a custom or a standard req field.
Child option can be empty only for Delete or Remove Association actions.
CAUSE: There is no Child Option defined.
RESOLUTION: Add the Child Option to the spreadsheet (if your import is an Update for this association). If you would like to delete the association between this Parent Option and all of its previously selected Child options, then update the “Import Action” column to Delete and leave the Child Option blank.
Child question can be empty only for Delete or Remove Association action.
CAUSE: There is no Child Question defined.
RESOLUTION: Add the Child Question to the spreadsheet (if your import is an Update for this association). If you would like to delete the association between this Parent Option and ALL of its Child Options, then update the “Import Action” column to Delete and leave the Child Question blank.
Label is not of a field type which may be used as a child field.
CAUSE: Label fields cannot be child fields.
RESOLUTION: The Child Question in the spreadsheet has a field type of ‘label’. This field type cannot be a child, nor a parent field.
Multiple default selections are not allowed for single-select question.
CAUSE: Only one default value is allowed on single-select and radio button field types. If the child field is a single-select or radio button field type, and more than one (1) default selection is specified for a specific parent.
RESOLUTION: Your child field is a single-select and unfortunately the child field can only have one child option that is defaulted at a time. You might have 1 option defaulted (set to “Yes”) and all others set to “No”, or you might set all to “No”. Setting all to “No” shows the user a limited list of options in the child field.
Primary key has not been mapped to an import column.
CAUSE: The file that is imported does not have an “Import Action” column.
RESOLUTION: Make sure that your file has a column that is called “Import Action”. The only valid actions are “Update” and “Delete”. If your file has the Import Action column, go back to your mapping page and check that this column is mapped to the corresponding Import Action column on the screen.
Invalid value for Parent Option Code (; “ * ! ` ~ @ # = + ? \ , > < ‘’ % \ [ { } ] are not allowed).
CAUSE: The parent option code has an invalid character (; “ * ! ` ~ @ # = + ? \ , > < ‘’ % \ [ { } ])
RESOLUTION: Remove the invalid character from the Parent option code.
‘Default Selection’ is invalid.
CAUSE: The value that is entered in the Default Selection column is not “Yes” or “No”. The Default Selection can not be blank and must be one of these values.
RESOLUTION: Update the Default Selection column to either be “Yes” or “No”.
'Import Action' is invalid.
CAUSE: The value that is entered in the Import Action column is not “Update” or “Delete”. The Import Action column cannot be blank and must be one of these values.
RESOLUTION: Update the Import Action column to either be “Update” or “Delete”.
Property 'parent type' does not match the import profile.
CAUSE: The “Parent Type” on the Properties tab is incorrect.
RESOLUTION: Update the “Parent Type” on the Properties tab. RFAs: The Parent Type must be Standard or Custom. Review the type of field you are using for the Parent and enter that field’s parent type on the Properties tab of the spreadsheet.
Property 'parent question' does not match the import profile.
CAUSE: The Parent Question on the Properties tab does not match the parent question that is selected when creating the Import Profile.
RESOLUTION: Update the Parent Question on the Properties tab to match the parent question that was selected when you created the import profile OR create a new import profile and select the proper parent question (matching what your Parent Question is on the spreadsheet).
Value for property 'parent type' must be provided on 'Properties' tab.
CAUSE: The “Parent Type” on the Properties tab is blank.
RESOLUTION: Enter the “Parent Type” on the Properties tab. RFAs: The Parent Type must be Standard or Custom. Review the type of field you are using for the Parent and enter that field’s parent type on the Properties tab of the spreadsheet.
'Parent Option' value must be provided.
CAUSE: The Parent Option cell is blank.
RESOLUTION: Update the Parent Option cell to include the code for the Parent Option.
Parent Option Code cannot be more than 50 characters long.
CAUSE: The value that is entered in the Parent Option Code column is greater than 50 characters.
RESOLUTION: Reduce the size of the Parent Option Code value (fewer than 50 characters long).
Form that is specified does not match the import profile.
CAUSE: There are HTML tags present in the Child Text that are invalid and cannot be imported.
RESOLUTION: Remove any unsupported HTML tags in the Child Text column.
[Field name] is a multi-select field. Multi-select field types may not be parents to fields which do not contain option list.
CAUSE: The parent field cannot be a multi-select or check box type with a child that is numeric, text box, text area, or email type field.
RESOLUTION: These field types are not valid in the association functions. Please reconsider the association, and the fields included in that association, that you are attempting to build.
[Field name] may not be used as a child field.
CAUSE: A Child field cannot be a Date, Label, Grid, SSN, or Autofill field type, nor can it be Job code, Approval Routing or Add type.
RESOLUTION: These field types are not valid in the association functions. Please reconsider the association, and the fields included in that association, that you are attempting to build.
Insert not allowed.
CAUSE: The parent field option is not present in the query-select list, and therefore the system does not allow you to add the option to the field.
RESOLUTION: A query-select field pulls its option list from another field/location within BrassRing. For example, the field pulls from the active users list, a code list, etc. The resolution to receiving this error is to have the code and description in the spreadsheet match exactly to what the description is for the option from which the query-select field pulls from.
Child field is already associated to another Req field [field name]. A child field cannot have more than one (1) parent.
CAUSE: A child cannot have more than one parent.
RESOLUTION: The Child Field that is selected is already associated to a Parent Field. Child fields can only have one Parent field, while Parent fields can have many Child fields. Reconsider the association, and the fields included in that association, that you are attempting to build.
Circular field relationships cannot be supported. Parent field is related to child field through an existing field association: ([PATH: Field A; Field B])
CAUSE: Field A is a parent to Field B, Field B is a parent to Field C, a field association cannot be imported where Field C is a parent to Field A.
RESOLUTION: Reconsider the association, and the fields included in that association, that you are attempting to build.
Only default selection data (Default Selection = Yes) may be imported for this child field
CAUSE: The child field has the check box “Display full list with default selection” checked, and the association you’re trying to build has the value of “No” in the Default Selection column.
RESOLUTION: This error occurs because the field setting (Display full list with default selection) and the Default Selection of “No” contradicts one another. The field can not default a child option AND show the full list of options in that child field. The resolution is to either mark the Default Selection to “Yes” on the spreadsheet, OR uncheck the “Display full list with default select” box. (This checkbox is on the page that houses the ‘parent’ and ‘child’ checkboxes for the individual fields.)
Object reference not set to an instance of an object.
CAUSE: Typically, this error results from system issues, not related to your import/export.
RESOLUTION: It is recommended to wait 5-15 minutes and trying the import/export again.
Job Code cannot be selected as a parent value.
CAUSE: Typically, this error results from system issues, not related to your import/export.
RESOLUTION: It is recommended to wait 5-15 minutes and trying the import/export again.