Abstract
Product: Data Insight Tool
Scheduling Reports
It is common for users that experience a delay in receiving a scheduled report, to access Data Insight Tool, and run the same report as an adhoc report. This should be avoided as it adds to the load on the server and causes further delays.
Unused report templates that are already scheduled should be either ‘Paused’ or ‘Canceled’. Example: A user is moved to another role within the company but no longer needs to receive scheduled DIT reports (the user does not get inactivated in BrassRing). These scheduled reports should be paused or canceled.
The data presented in a report depends on the user type privileges and permissions of the user that schedules or runs the report and not on the user that creates the report. Updated Build 20.01.13.
Relevant eLearning
Process
Schedule a Report to Run
To schedule a report, in Data Insight Tool, select the report and select Schedule.
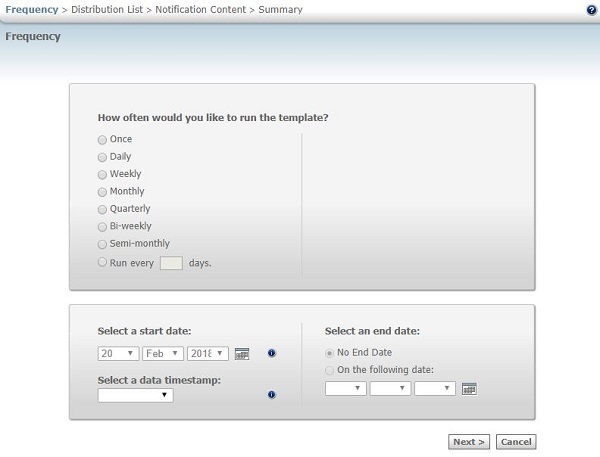
The Frequency Window opens. Select how often the report is to run.

Take note of the frequency you set to receive reports and how the report filters are configured. A user should not have a report run daily if the filter is looking to pull information for last year to date. In this example, it is recommended to have the date filter pull information from the previous day.
Select a Start date, and a data time stamp.
Most users choose to schedule a report to run at 5 GMT which can cause the reports queue to grow. If possible, select a separate refresh/transform time for your scheduled report. This results in slower report generation times. It is recommended to spread your reports out across all three data time stamps.
If needed, select an end date.
It is recommended to select an ‘End Date’ rather than ‘No End Date’ for a frequency in scheduled jobs. This stops the sending of the report when no longer required.
Select Next.
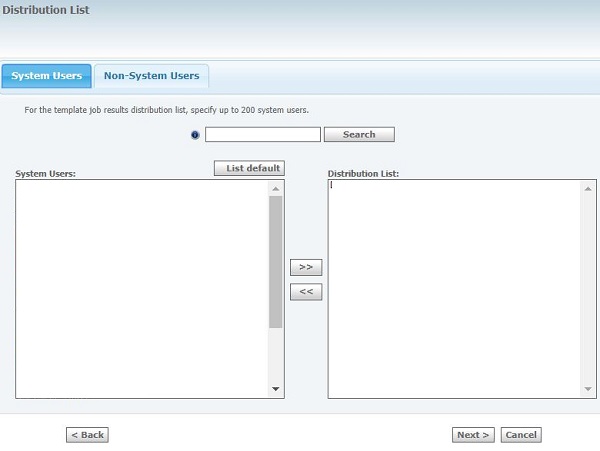
The Distribution List opens.
Select System Users, and select the arrows to add them to the list of recipients of the notification.
To add non BrassRing users, select Non-System Users, enter the users email list, and select Add.

Select Next.
The Notification Content window opens. Update the Notification Subject and Message as needed.
Select Next.
The Schedule Summary opens.
To save the schedule select Save, or to make further changes, select Back.
If a scheduled report runs for more than the threshold limit, then the report is stopped and user receives an automated email. Users should verify the filter criteria, and the output fields, selected for that template. If a report is stopped by the system, it is highly suggested that the user adds filters to get the most relevant data from the report, avoiding future failures or delays for the report.
The threshold limits are:
Adhoc Schedule: 10 hours.
Custom Schedule: 10 Hours.
Daily Schedule: 4 Hours.
Bi-weekly Schedule: 8 Hours.
Weekly Schedule: 8 Hours.
Semi-monthly Schedule: 10 Hours.
Monthly Schedule: 18 Hours.
Quarterly Schedule: 18 Hours.
Editing Schedules.
To View, Edit, Cancel, Pause, or Resume schedules, select the My Scheduled Jobs tab.
The Status column describes whether the report schedule is running or paused.

View Schedule Details
To View the schedule details, select the schedule and select View Job Details.
Edit Schedule Frequency or Notification.
To edit the frequency or notification of a report schedule, select the schedule to be updated, and select Edit Schedule.
Update the frequency or notification as required, and select Save.
Cancel A Schedule.
To Cancel a schedule, select the schedule to be canceled, and select Cancel Schedule.
A notification appears questioning whether you are sure that you want to cancel the templates schedule, select Yes.
Pause A Schedule.
To Pause a schedule, select the schedule to be paused, and select Pause.
The schedule status updates to Paused, and the schedule no longer runs.
Resume A Paused Schedule.
To Resume paused schedules, select the schedule, and select Resume.
The schedule status updates to Scheduled.