- 05 Mar 2024
- 10 Minutes to read
- Print
- DarkLight
Viewing and Approving Workflows
- Updated on 05 Mar 2024
- 10 Minutes to read
- Print
- DarkLight
You can view and approve requisitions from the Approvals tab. You can see requisitions by workflow and status. You can view requisitions for yourself or for anyone who has specified you as their alternate approver.
This topic describes how to :
View active requisitions
View completed requisitions
Approve requisitions
View requisition details
Viewing active requisitions
To view active requisitions:
Select the Approvals tab.
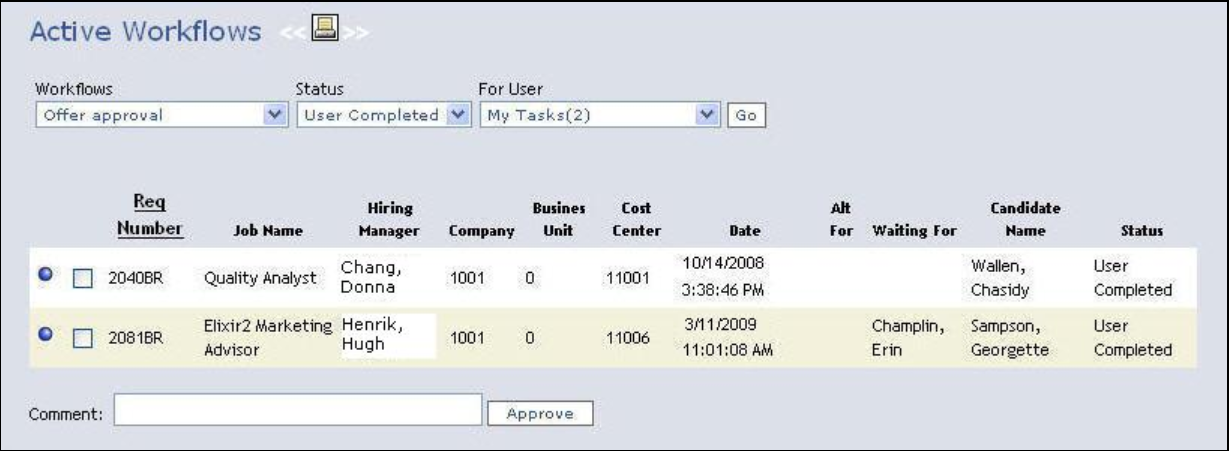
Select Active Workflows to work with requisitions that are still making their way through the approval chain. Active Workflows is the default setting for the Approvals tab.
Select a workflow.
Select a status:
All Active lists all active requisitions for which the person specified in the For User list is part of the approval chain. This includes requisitions that the user has already approved.
Waiting on User lists active requisitions for which the person specified in the For User list is the next approver on the list.
In Progress lists all requisitions for which the person specified in the For User list is an upcoming approver, but not necessarily the next approver on the list.
User Completed lists all active requisitions that have already been approved by the person specified in the For User list.
To see requisitions for one of your alternates, select its name from the For User drop-down list. To see your requisitions, select My Tasks from the list.
Select Go.
Viewing Completed Requisitions
Select the Approvals tab.
Select Final Status to work with requisitions that have completed the approval process. These requisitions include both approved and declined requisitions, as well as requisitions that have been canceled or put on hold.
Select a workflow.
To see requisitions for one of your alternates, select its name from the For User drop-down list. To see your requisitions, select My Tasks from the list.
Select Go.
Approving Requisitions
Follow the instructions in Viewing Requisitions to display a list of requisitions.
Select the check box for one or more requisitions to approve.
(Optional) Type a comment. If you are approving more than one requisition, this comment is added to each of them.
Select Approve.
Viewing Requisition Details
Follow the instructions in Viewing active requisitions or Viewing completed requisitions to display a list of requisitions.
Select the icon for the requisition you want to open. For active requisitions, the icon is a blue circle. For completed requisitions, the icon is a green checkmark. For requisitions that have been canceled or put on hold, the icon is a red circle with an exclamation point.
BrassRing Custom Approval Workflow displays the following requisition information in a new browser window.
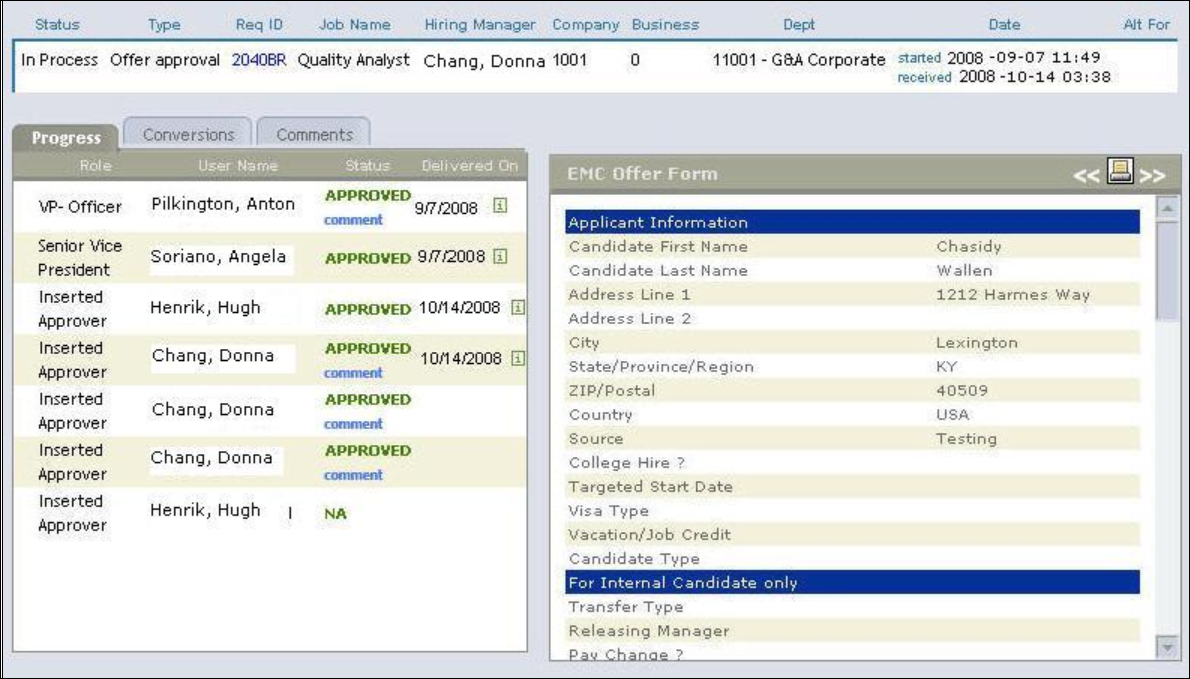
Select one of the following tabs to see more information about the requisition:
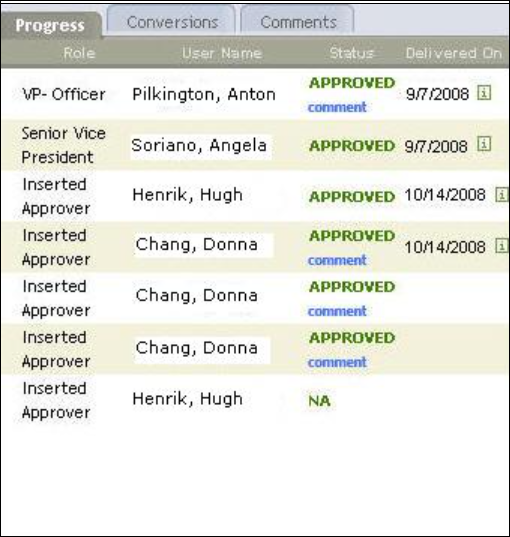
Progress displays the names, roles, and approval status of the requisition's approvers.
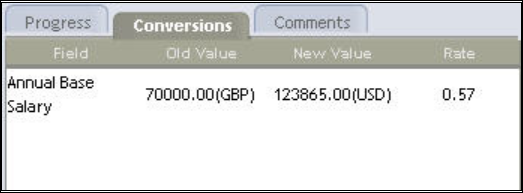
Conversions display information for all currency conversion fields in the requisition.
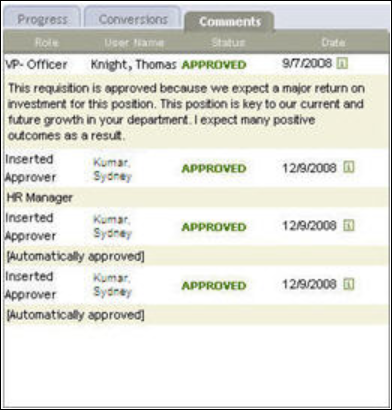
Comments display the comments added by each person who has approved the requisition so far, as well as the BrassRing user name of the last user who updated the status of a canceled, declined, or on hold requisition (if BrassRing "User Name Differentiator" client setting is enabled).
To print the requisition or form, Select
 .
.BrassRing Custom Approval Workflow displays a printer-friendly copy of the requisition in a new browser window. You can then use the browser's Print menu item to print the requisition.
Performing an Express Approval
You can use Express approval to:
Restart a stalled approval process.
Manually approve a requisition.
Notify the next approver in the workflow that a requisition is awaiting his or her approval.
Mark a workflow as approved by the next approver or all approvers.
Note
To use this feature, you must belong to a privilege group that has permission to perform express approvals.
To perform an express approval:
On the Admin tab, select Workflow > Express approve.
Select a workflow type from the Workflow Types list.
Select a workflow instance from the Running workflows list. A running workflow specifies an open requisition that is currently being routed through the approval chain.
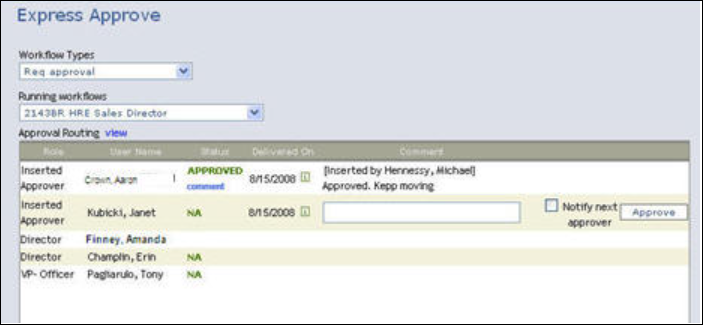
(Optional) Select View to display the requisition in a new browser window.
(Optional) Type a comment. If you are approving the requisition for more than one person, this comment is added for each remaining approver.
In the Approval Routing section, perform one of the following actions:
To remind the next approver in the sequence that a requisition is waiting without approving the workflow, Select the Notify next approver button at the bottom of the page
To approve the workflow for the next approver in the sequence, find his or her name in the list and Select the Approve button on the same line as the name. To notify the approver that you approved the requisition, Select the Notify next approver checkbox on the same line as the name before you Select the Approve button.
To approve the workflow for all remaining approvers, Select Express Approve.
Configure Business Rules
BrassRing Custom Approval Workflow includes fully configurable business rules that govern workflows. You can base criteria for the approval path on any number of fields in a requisition or form.
You build business rules using expressions that examine data from a requisition or a form field and evaluate whether a condition you specify is true. If the condition is true, the rule takes a specific action. The condition can consist of a single expression or multiple expressions logically using "or" or "and" to connect them.
For example, you can create the following rule: If a requisition is created for a job where travel costs are greater than $10,000 and the referral bonus is greater than $5,000, then the requisition must be approved by all roles up to Senior Vice President.
BrassRing Custom Approval Workflow lets you create, edit, or delete business rules.
Adding Business Rules to a Workflow
Adding a business rule to a workflow includes three steps:
Creating an expression
Adding an expression group
Specifying possible actions the workflow can take
Creating an Expression
To create an expression:
On the Admin tab, select Workflow > Add/Edit/Delete business rules.
Select a Workflow type from the drop-down list.
Select the Add Business rule icon.
Select whether the business rule is for a requisition or Form approval. If you are adding a rule for a form, select the Form type from the drop-down.
Select the Next button.
Enter a descriptive name for the business rule.
Select a Form field or a requisition field for the rule to process.
The field you select acts as the criteria for the rule. If you selected a form in step 4, you can pick a field from either the form you selected or the requisition. This allows you to compare fields across forms. For example, you can determine if the Base Salary on the Offer form is greater than the Base Salary on the requisition.
Select an Operator. The available operators depend on the field you selected in the previous step. For example, if you selected a text field, such as Work Location, the only choice in the Operator list is Equals. If you selected a numeric field, such as the No. of Positions, the choices in the Operator list include Equals, Less than, Greater than, and so on.
Depending on the field you selected in Step 7, either specify a value for the expression to evaluate or select another field to compare.
If BrassRing Custom Approval Workflow displays a Select an option drop-down list, pick an option from the list, and select Add Expression. For example, if you selected the field Work Location in step 7, the Select an option list contains all your organization's geographic locations. If you picked Houston, this expression evaluates to Work Location = Houston.
If BrassRing Custom Approval Workflow displays an empty Value box, you can either enter a value or select another field to compare with the field you selected in Step 7. You can then select a mathematical function to apply to the value to reach a specified value (the To field), or select an Option. (Options are answers to From field questions). For example, if you want to specify that Advertising Costs equal no more than $500 more than Relocation Costs, you have already selected the field Advertising Costs in Step 7 and the operator Equals in Step 8, select Relocation Costs from the Value drop-down list, select Add from the Function to Apply list, and type 500 in the To box. Because this is a currency field, select Is this a currency field? and select United States of America, Dollar from the currency types drop-down list.
Select the Add expression button.
Adding an Expression Group
To add an Expression group:
Select the Add expression group icon in the right-hand column.
Drag the expression you created in the previous procedure from the middle column to the right column to place it in an expression group.
Create as many additional expressions as the rule requires.
Arrange the expressions by groups and select the appropriate logical operator ( And or Or) to link them together.
Tip
When viewing expression group hierarchy trees, you can select the plus sign to expand or the minus sign to collapse an expression group.
To delete an expression group, drag it to the Delete expression group icon.
Select the Next button.
Specifying Workflow Actions Resulting from a Rule
To specify workflow actions resulting from a rule:
In the Possible Actions drop-down list, select the action that occurs if the rule evaluates to TRUE.
If the action you selected in the previous step requires additional details, BrassRing Custom Approval Workflow displays an Action Details drop-down list. Select an action detail from the list. For example, if you selected the action Add all roles up to..., you would select the appropriate role from a hierarchical list of approvers. However, if you selected the action Insert next role in the chain, no Action Details list appears because no further clarification is required.
The following table describes all possible actions of a business rule.
Action
Description
Add all roles up to…
Adds to the approval list all roles up to the role you select. BrassRing Custom Approval Workflow moves up the organizational tree by comparing the current approver’s functional title against the Role Ranking.
For example, suppose you pick the role of Manager. If there are several levels of Manager roles, the system moves through the organization until it reaches the next level of functional role (Director), then inserts approvers with the highest-ranking Manager being the highest-ranking approver in the list.
Insert next role in chain
Automatically chooses the role that is the next level up from the Hiring Manager.
Insert second next role in chain
Automatically chooses the role that is two levels up from the Hiring Manager.
Insert a user
Inserts the BrassRing user you select.
Insert the manager
Inserts the manager from the requisition's STANDARD Manager field
Insert the recruiter
Inserts the recruiter from the requisition's STANDARD Recruiter field
Disable mapped roles
You might want to disable mapped roles and use only hierarchical roles if, for example, approval for offers with salaries of less than $50,000 do not require the approval of any financial functional roles. A Role Mapping identifies several financial functional roles for the organizational unit combination Company = Acme, Business Units = ALL, and Departments = ALL. If an offer has a salary of $45,000, these functional roles are not required; approval by the organizational hierarchy is sufficient.
Disable hierarchical roles
You might want to disable hierarchical roles and use only mapped roles if, for example, the custom requisition field requisition Type = Executive
Send an email
Not functional in this release.
Insert first match of a role
Inserts the first match of the role you specify, searching up your organizational tree, when routing approvals. This action excludes the req creator (prevents users from being asked to approve their own requisitions). In the case of candidate forms, it also skips the creator of the req (to which the form is attached) if the creator is the first match found.
Select Next.
Editing Business Rules
Log in to BrassRing Custom Approval Workflow.
On the Admin tab, select Workflow > Add/Edit/Delete business rules.
Select a Workflow type that contains the business rule you want to edit.
Select the Edit button for the business rule you want to edit.
Make changes to expressions, expression groups, and possible actions. See Adding Business Rules for more information.
Deleting Business Rules
Deleting a business rule does not affect running workflows.
Important
Deleting a business rule permanently removes it from the system. You cannot undo this action.
Log in to BrassRing Custom Approval Workflow.
On the Admin tab, select Workflow > Add/Edit/Delete business rules.
Select a Workflow type from which to delete business rules.
In the Business Rules list, find the rule you want to delete and select the associated Delete button.
BrassRing Custom Approval Workflow asks you to confirm that you want to delete the rule. Select OK to delete the rule from the workflow or select Cancel to leave the rule unchanged.
Work with Mobile Form Fields
BrassRing Custom Approval Workflow uses BrassRing's eLink technology to route requisitions and forms using Web browsers or handheld wireless devices, such as a Blackberry. For each type of requisition or form, you can specify which fields are displayed when approvers view the form on a handheld wireless device. Displaying a limited number of fields on handheld devices can reduce page loading time.
To display fields on a mobile device:
On the Admin tab, select Workflow > Mobile form fields.
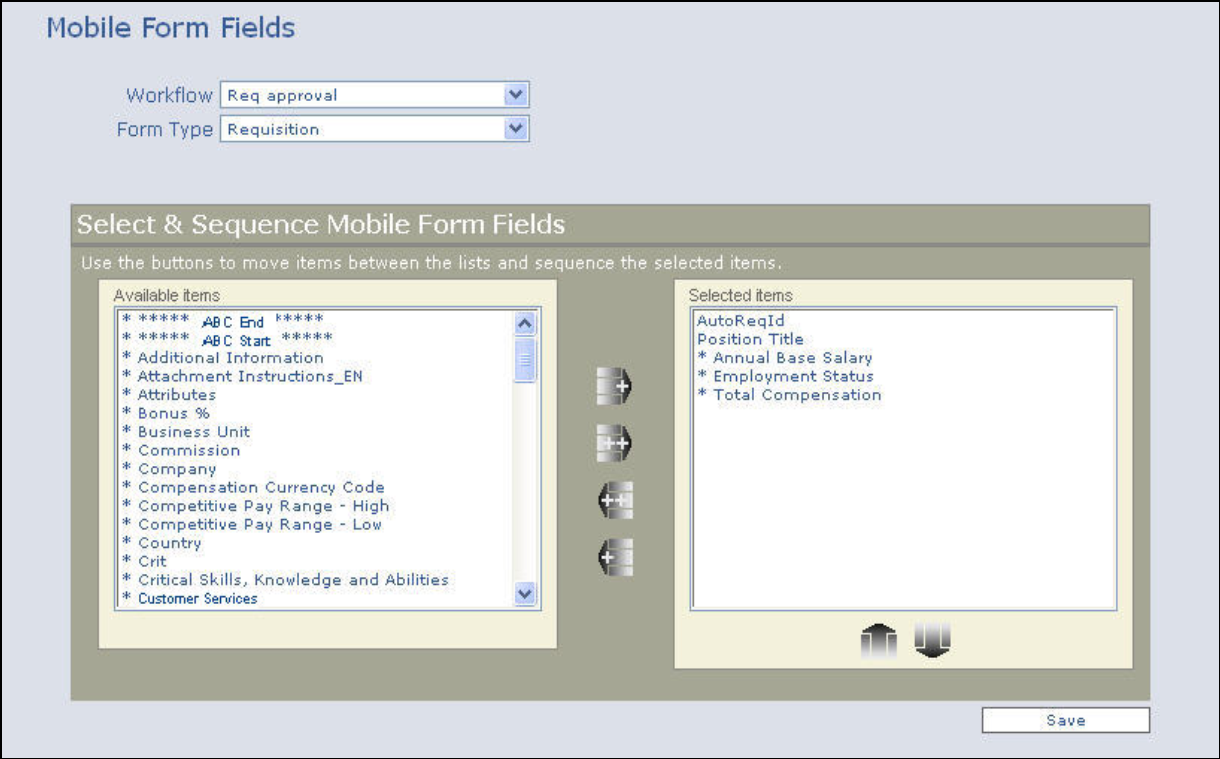
Select a workflow to edit from the drop-down list.
Select Requisition or Client Form from the Form Type drop-down list. If you selected Client Form, select the form from the Form drop-down list.
Select fields to appear on mobile devices:
To add fields: Select fields in the Available Items list and click
To move all available fields, click
To remove fields: Select fields in the Selected Items list and click
To remove all fields from a sequence, click
Tip
Select items by clicking them. To select adjacent items, select the first one then hold down the SHIFT key and select the last one. To select nonadjacent items, select the first one, and then hold down the CTRL key and select additional items.
To change the display order of fields, select the field you want to move then select
 or
or  .
.Select the Save button.
