Abstract
Product: Workbench
Candidate Form Field Option Lists Import
You can create single-select, multi-select, radio button, and check box fields within BrassRing for your candidate forms, req forms, doc subsidiary forms, and so on. These fields require options to be added so the users and candidates are able to select from a list.
There are three ways you can update/maintain field option lists in BrassRing.
Manual updates through BrassRing by selecting Admin → Admin+ → Lists and administer the List for any field you want to edit the option list for.
Foundation Data Import Integration. Options can be kept up-to-date through an integration with your HRIS or system of record. These option list integrations are called Foundation Data Imports.
Option List excel import by using Workbench. This option is available for Workbench users with Power User access or for users that have Tier 5 access with the proper client setting enabled.
Preparing the Spreadsheet for Import
It is recommended to obtain the properly formatted spreadsheet before completing your Option List import in Workbench. To do this:
Export the Option List by selecting Tools → Forms → Candidate Forms.
Select the Administer Form Fields icon for the form to administer the options for.
Select the Administer Field Options icon for the field to administer the options for.
Select Export to Excel, name your export, and select Launch.
Select Tools → Task Manager to retrieve your export and open the file. Save it to your computer as an Excel file type (.xls).
Your import spreadsheet can only have two tabs: Properties & Options. Do NOT change the name of the tabs.
You do not need to change the Properties tab.
As with all configuration and import tasks in Workbench, it is recommended that customers first complete the work in Staging before making any updates in Production. This helps you identify and resolve any potential issues before completing the task in your Production environment.
Preparing the Candidate Form Field Options spreadsheet for import
The export includes both active and inactive options. Delete the rows for options you are not updating.
For Candidate Form Fields, the Properties tab should include a “Client”, “Form”, and “Field” cell.
The Options tab contains the standard columns of Code, Sort Order, Status, and Description.
Sample Candidate Form Field Option Import Spreadsheet Format.
Properties Tab:

Options Tab:

Import Candidate Form Field Options (Power User)
Abstract
Product: Workbench
Relevant eLearning
Steps to Perform the Workbench Import (Power User Access)
Export the current Option List by selecting Tools → Forms → Candidate Forms.
Select the Administer Form Fields icon for the form to administer.
Select the Administer Field Options icon for the field to administer.
Select Export to Excel, name the export, and select Launch.
Access the Task Manager by selecting Tools → Task Manager to access your spreadsheet.
Prepare your spreadsheet by adding or modifying the options for the import.
Select Tools → Import → Profiles.
Create a New Import Profile or use an existing Import Profile to import your spreadsheet:
Creating a new Import Profile
It is not required that a new profile is created every time there is an import to run. It is recommended to creating one profile per Import Type.
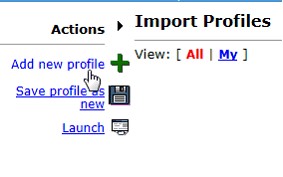
Select Add new profile.
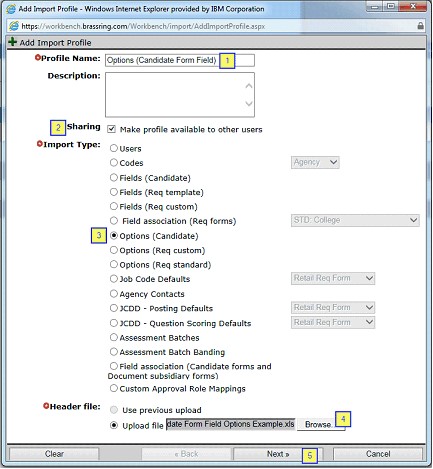
Complete the Import Profile page.
Name your Profile. It is recommended that you name the profile the type of import you are planning to run (1).
Select Sharing if you would like other Workbench users to see your Import Profile (2).
Select Options (Candidate) if you are importing options for a candidate form field (3).
Select your file (4).
Select Next (5).
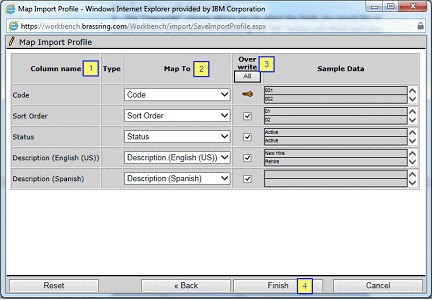
Complete the Map Import Profile page.
The Column Name shows standard option import columns necessary for the import (1).
The Map To column shows the column headers that are present in your excel sheet. It is recommended to review the Map To column to ensure that there is a column header for each of the standard option import columns. It is recommended that you do an initial export of the current Option List to get the layout needed to be imported. Having the proper column headers on your spreadsheet ensures that your Map To column aligns correctly (2).
The Overwrite column is used to select the fields you would like to overwrite the option data for. Selecting All checks each box automatically (3).
Select Finish (4).
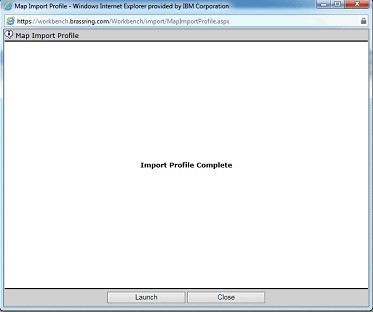
If you would like to complete the Import process select Launch. If you would like to come back later to complete the steps, select Close.
Selecting Launch opens the Launch Import Profile window.
Select the form to upload the options list for (1).
Select the field on the form to upload the options for (2).
Reselect your spreadsheet (3).
Select Launch (4).
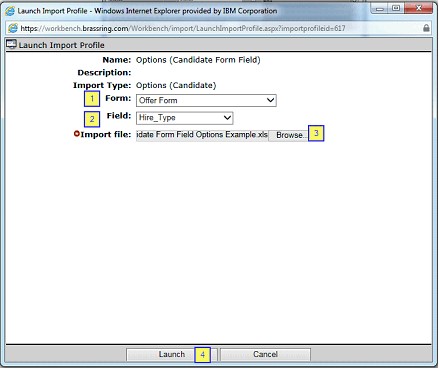
The system processes the spreadsheet and sends an email when the import is complete. See Completing the Process.
Launching an existing Import Profile
It is not necessary to create a new profile every time there is an import. It is recommended to create one profile per Import Type. Should you already have an import profile, double check the settings and the mapping of the profile and use that for your future imports.
Select the existing profile and select Launch.
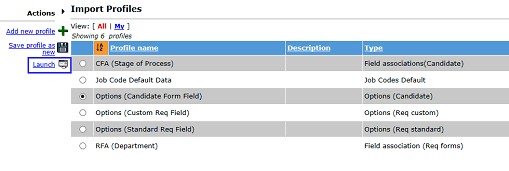
Selecting Launch opens the Launch Import Profile window.
Select the form to upload the options list for (1).
Select the field on the form to upload the options for (2).
Reselect your spreadsheet (3).
Select Launch (4).
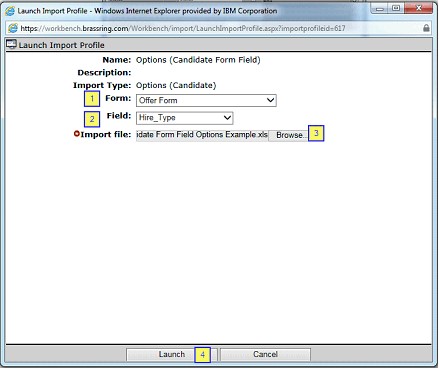
The system processes the spreadsheet and sends an email when the import is complete.
Completing the process
Select Tools → Task Manager.
On the Task Manager page, there is a Status column that indicates the status of your import. There are five potential Statuses you can encounter:
Pending. The import is waiting in line to be processed.
Running. The import is being processed. Select Refresh display to watch the progress. The number of rows increases as the file is processed.
Completed. The import has completed without errors. However, it is important to open the file by using the binoculars icon to review the results.
Completed with Errors. The import has completed and has errors that need to be resolved. Open the results file by using the binoculars icon, review the errors, correct them in the original file and reload the file. You can reload the entire original file, with the corrections, or just the Calculation CFA that had to be corrected.
Failed. The import failed completely. This might be an issue with the extension of the excel file that you attempted to import, an overall system error or issue, or that the file was too large and timed out. See Read Candidate Form Field Options Results file and Common Errors for more information.
Import Candidate Form Field Options (Tier 5)
Abstract
Product: Workbench
Steps to Perform the Workbench Import (Tier 5 User Access)
If you are a Workbench Tier 5 user and do not have access to import spreadsheets in Workbench, put a request into your Infinite representative to enable the setting for your account and add some public profiles to import successfully.

Export the current Option List by selecting Tools → Forms → Candidate Forms.
Select the Administer Form Fields icon for the form to administer.
Select the Administer Field Options icon for the field to administer.
Select Export to Excel, name the export, and select Launch.
Access the Task Manager by selecting Tools → Task Manager to access your spreadsheet.
Prepare your spreadsheet by adding or modifying the options for the import.
Select Tools → Import → Profiles.
With Tier 5 access, you cannot create Import Profiles, this must be completed by an Infinite representative. If you do not see a candidate form field options Import Profile, contact your Infinite representative to have one added. If you do have one available, follow the next steps.
Select the existing profile and select Launch.
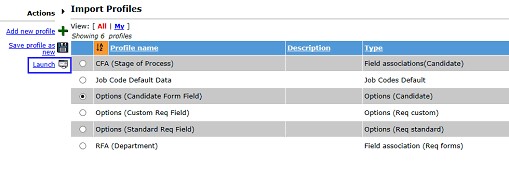
Selecting Launch opens the Launch Import Profile window.
Select the form to upload the options list for (1).
Select the field on the form to upload the options for (2).
Reselect your spreadsheet (3).
Select Launch (4).

The system processes the spreadsheet and sends an email when the import is complete. See Completing the Process.
Select Tools → Task Manager.
On the Task Manager page, there is a Status column that indicates the status of your import. There are five potential Statuses you can encounter:
Pending. The import is waiting in line to be processed.
Running. The import is being processed. Select Refresh display to watch the progress. The number of rows increases as the file is processed.
Completed. The import has completed without errors. However, it is important to open the file by using the binoculars icon to review the results.
Completed with Errors. The import has completed and has errors that need to be resolved. Open the results file by using the binoculars icon, review the errors, correct them in the original file and reload the file. You can reload the entire original file, with the corrections, or just the Calculation CFA that had to be corrected.
Failed. The import failed completely. This might be an issue with the extension of the excel file that you attempted to import, an overall system error or issue, or that the file was too large and timed out. See Read Candidate Form Field Options Results file and Common Errors for more information.
Read Candidate Form Field Options Results File and Common Errors
Abstract
Product: Workbench
Reading The Results File
The results of your import can be viewed by selecting the binoculars icon. The spreadsheet is broken down into various tabs.
Properties Tab: This tab houses information about your import.
This section contains your “Client” name, the “Form”, the “Field” you loaded this option list for, the name of the import profile, the environment, and the user that imported the file (1).
This section houses the statistics of your import. How many new option list values (Inserts), how many updates to existing option list values, how many option list rows errored out, how many duplicate rows were found, and total rows processed. Each of these statuses are broken down further in the additional tabs (2).
This section shows when the import was submitted to the Task Manager, when it was started, and when it was finished (3).
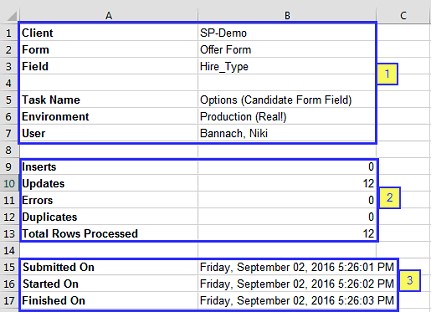
Inserted Tab: This tab shows the options that were processed as ‘new’ and therefore inserted into the BrassRing system.

Updated Tab: This tab shows the options that were found to exist in BrassRing and therefore might have just been ‘updated’.

Errors Tab: This tab is critical to review as it houses any options that did NOT process due to an error. There is an extra column added to the end of this page that displays the detailed reason.
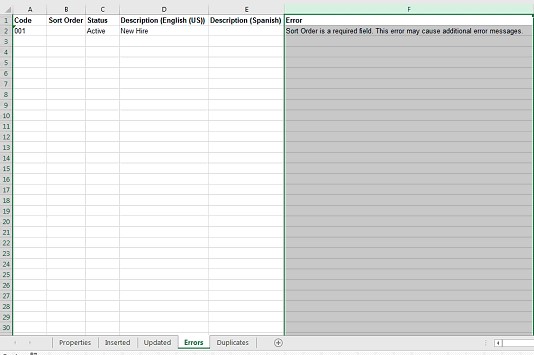
Duplicates Tab: This tab shows any duplicate option rows that might have been in your import spreadsheet. It is important to review the content of this tab as any options that are shown have NOT been processed.

Common Errors and Resolutions
'Properties$' is not a valid name. Make sure that it does not include invalid characters or punctuation and that it is not too long.
CAUSE: The Properties tab is missing.
RESOLUTION: Add the Properties tab to the spreadsheet. Properties tab formatting can be viewed in the Preparing the Spreadsheet section.
'Options$' is not a valid name. Make sure that it does not include invalid characters or punctuation and that it is not too long.
CAUSE: The Options tab is missing.
RESOLUTION: Add the Options tab to the spreadsheet. Options tab formatting can be viewed in the Preparing the Spreadsheet section.
Value for property 'client' must be provided on 'Properties' tab.
CAUSE: The spreadsheet does not have a “Client” name that is defined on the Properties tab.
RESOLUTION: Add your Client name to the Properties tab.
Value for property 'form' must be provided on 'Properties' tab.
CAUSE : The spreadsheet does not have a “Form” name that is defined on the Properties tab.
RESOLUTION: Add the name of the Form that you would like to import the option list for to the Properties tab.
Value for property 'field' must be provided on the 'Properties' tab.
CAUSE: The spreadsheet does not have a “Field” name that is defined on the Properties tab.
RESOLUTION: Add the database name of the Field that you would like to import the option list for to the Properties tab.
Sort Order is a required field. This error might cause additional error messages.
CAUSE: The option’s row is missing a ‘Sort Order’.
RESOLUTION: Ensure that the spreadsheet has a Sort Order column along with the numeric value. If the field option list is marked as “Designated Order” the sort order entered DOES matter and options show that in the order entered. If the field option list is marked as “Alphabetical” the sort order entered DOES NOT matter and options show in an alphabetical order.
Sort Order cannot be more than 5 characters long. Sort Order must be a positive whole number.
CAUSE: The Sort Order row does not have a valid Sort Order.
RESOLUTION: Update the Sort Order row to include positive whole numbers.
Invalid value for Code ( ; " * ! ` ~ @ # = + ? \ , > < ' ' % | [ { } ] are not allowed).
CAUSE: The option’s code has an invalid character.
RESOLUTION: Update the option’s code by removing the invalid special character ( ; " * ! ` ~ @ # = + ? \ , > < ' ' % | [ { } ]
Status is a required field. This error might cause additional error messages.
CAUSE: The option’s row is missing a ‘Status’
RESOLUTION: Ensure that the spreadsheet has a Status column along with the value of ‘Active’ or ‘Inactive’ depending on if you want the option to be selectable (active) or not selectable (inactive) to the user.
Description (English (US)) cannot be more than 255 characters long.
CAUSE: The option’s Description is greater than 255 characters.
RESOLUTION: Update the option’s Description so it is fewer than 255 characters.
Valid values for Status are 'Active' or 'Inactive'.
CAUSE: The option’s Status is something other than Active or Inactive.
RESOLUTION: Update the Status to be Active (selectable to the user) or Inactive (not selectable to the user).
Code cannot be more than 255 characters long.
CAUSE: The option’s Code is greater than 255 characters.
RESOLUTION: Update the option’s Code so it is fewer than 255 characters.
Object reference not set to an instance of an object.
CAUSE: The option’s Code is greater than 255 characters.
RESOLUTION: Update the option’s Code so it is fewer than 255 characters.